Is your OBD2 port not working on your 2002 Honda Civic DX? This can be a frustrating issue, especially when you need to diagnose a check engine light or perform emissions testing. A non-functional OBD2 port means you can’t connect a scanner to retrieve diagnostic trouble codes (DTCs) and understand what’s going on with your vehicle. Let’s troubleshoot this problem step-by-step.
First, it’s important to understand why a working OBD2 port is crucial. The OBD2 (On-Board Diagnostics II) port is your car’s communication gateway. It allows diagnostic tools to interface with the vehicle’s computer system (ECM/PCM) to read sensor data, fault codes, and other vital information. If it’s not working, you’re essentially blind to your car’s internal health.
Let’s start with the simplest and most common causes before moving to more complex issues.
Checking the Basics: Fuses and the OBD2 Port Itself
Often, a non-working OBD2 port is due to a blown fuse. The OBD2 port and the systems it communicates with are protected by fuses. For your 2002 Civic DX, you should check two main fuses as a starting point, as indicated by 2carpros.com:
- Fuse No. 9 (10A) in the under-hood fuse/relay box: This fuse is often related to the engine control system and can affect OBD2 port function.
- Fuse No. 10 (7.5A) in the under-dash fuse/relay box: This fuse is also crucial for the instrument panel and related systems, potentially impacting the OBD2 communication.
Refer to your Civic’s owner’s manual for the exact location of these fuse boxes and fuses. Visually inspect these fuses for a broken filament. Even better, use a fuse tester to confirm if they are blown. Replace any blown fuses with the correct amperage rating.
If the fuses are intact, or replacing them doesn’t solve the problem, let’s physically inspect the OBD2 port itself.
- Visual Inspection: Look for any physical damage to the OBD2 port located under your dashboard, usually near the steering column. Check for bent or broken pins inside the port. Also, look for signs of corrosion or debris that might be preventing a good connection with your scanner.
 2002 Civic Under-Dash Fuse Box Diagram
Alt text: Diagram showing the location of the under-dash fuse box in a 2002 Honda Civic, relevant for checking fuse #10 related to OBD2 port issues.
Power and Ground: Essential for OBD2 Operation
The OBD2 port needs power and ground to function. Pin 16 of the OBD2 port should provide battery voltage (12V+), and pins 4 and 5 are grounds. You’ll need a multimeter to check these.
Steps to check power and ground:
- Turn your ignition to the “ON” position (you don’t need to start the engine).
- Set your multimeter to DC voltage mode.
- Connect the black lead of your multimeter to a known good ground on the vehicle chassis (a clean, unpainted metal surface).
- Probe pin 16 of the OBD2 port with the red lead of your multimeter. You should read approximately 12 volts.
- Next, switch your multimeter to continuity test or resistance (Ohms) mode.
- Probe pin 4 and then pin 5 of the OBD2 port with the red lead, and connect the black lead to a known good ground. You should have continuity (near zero resistance) for both pins, indicating a good ground connection.
If you are missing power at pin 16, re-check fuse No. 9 and No. 10. Also, inspect the wiring harness leading to the OBD2 port for any breaks or damage. If you’re missing ground, ensure pins 4 and 5 are properly grounded to the vehicle chassis.
Communication Line Check: Utilizing the Self-Diagnosis Function
While the original article from 2carpros.com focuses on the gauge assembly self-diagnosis, the “communication line check” within this procedure might indirectly help identify broader communication issues that could affect the OBD2 port.
Here’s how to perform the self-diagnosis function as described:
- Prepare: Check fuse No. 9 (10A) in the under-hood fuse/relay box and No. 10 (7.5A) fuse in the under-dash fuse/relay box again to be certain they are good.
- Initiate Self-Diagnosis:
- Push and hold the trip/reset button on your instrument cluster.
- Turn the headlight switch ON.
- Turn the ignition switch to the ON (II) position.
- Within 5 seconds, turn the headlight switch OFF, then ON, and OFF again.
- Within 5 seconds, release the trip/reset button, then push and release it four times repeatedly.
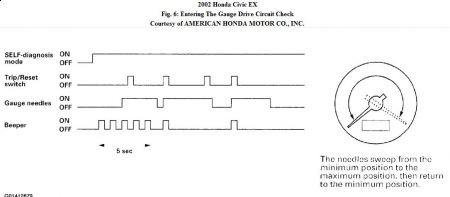 2002 Civic Gauge Assembly Self-Diagnosis Buttons
Alt text: Close-up view of the instrument cluster buttons on a 2002 Honda Civic, highlighting the trip/reset button used to initiate the self-diagnosis mode for troubleshooting potential OBD2 communication issues.
Interpreting the Communication Line Check:
After the initial checks (beeper, indicators, LCD segments, gauge sweep), the system performs a communication line check.
-
“All segments come on”: According to the original article, if all segments of the odometer/trip display light up, the communication line is considered OK for the instrument cluster. This doesn’t directly guarantee the OBD2 port is working, but it suggests the car’s computer system is generally communicating with the instrument cluster.
-
“Error” is indicated: If the word “Error” appears on the display, this indicates a malfunction in the communication line between the gauge assembly, the multiplex control unit, and the ECM/PCM. This “Error” message is a significant clue. It strongly suggests a broader communication problem within the vehicle’s network, which could very well be the reason your OBD2 port isn’t working.
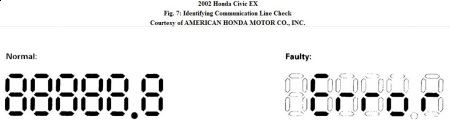 2002 Civic Gauge Assembly Communication Error Display
Alt text: Image showing the instrument cluster display of a 2002 Honda Civic indicating an “Error” message during the self-diagnosis communication line check, suggesting potential network communication problems that might affect OBD2 port functionality.
If you get the “Error” message, it reinforces the possibility of a wiring or ECM/PCM issue affecting communication, and thus the OBD2 port.
Wiring and ECM/PCM Issues: More Advanced Troubleshooting
If fuses, physical port inspection, power/ground checks, and the self-diagnosis communication check haven’t resolved the issue, the problem might lie in the wiring between the OBD2 port and the ECM/PCM, or, less likely, a faulty ECM/PCM itself.
-
Wiring Issues: Trace the wires from the OBD2 port back towards the ECM/PCM, checking for any damage, breaks, or corrosion along the way. Wiring diagrams for a 2002 Civic DX can be helpful in this step, but this type of troubleshooting can become complex and might require professional expertise.
-
ECM/PCM Issues: A faulty ECM/PCM is less common but can cause OBD2 port failure. Diagnosing a faulty ECM/PCM usually requires specialized tools and knowledge. This is generally considered a last resort after ruling out all other possibilities.
Conclusion: Step-by-Step to OBD2 Port Repair
Troubleshooting a non-working OBD2 port on your 2002 Civic DX involves a logical step-by-step approach:
- Check Fuses: Start with fuses No. 9 and No. 10.
- Inspect OBD2 Port: Look for physical damage or corrosion.
- Verify Power and Ground: Use a multimeter to confirm power and ground at the OBD2 port.
- Perform Self-Diagnosis Communication Check: Look for the “Error” message.
- Investigate Wiring: Check for wiring issues between the OBD2 port and ECM/PCM (more advanced).
- Consider ECM/PCM (Last Resort): Suspect ECM/PCM issues only after ruling out other causes.
If you’ve gone through these steps and are still facing issues, it’s recommended to seek professional help from a qualified mechanic. They have advanced diagnostic tools and expertise to pinpoint the problem and get your 2002 Civic DX’s OBD2 port working again.