If you’re having trouble connecting your scan tool to your 2005 Chevy 1500, the first step is to locate the OBD2 port. This port, also known as the Diagnostic Link Connector (DLC), is essential for accessing your vehicle’s computer system for diagnostics and repairs. Once you’ve located it, if you’re still facing issues, it’s crucial to ensure it’s receiving power and ground correctly. This guide will walk you through finding the OBD2 port location on your 2005 Chevy 1500 and troubleshooting common power problems to get your scan tool working.
Locating the OBD2 Port on Your 2005 Chevy 1500
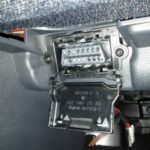
The OBD2 port is typically located inside the cabin of your 2005 Chevy 1500. You can usually find it under the dashboard on the driver’s side. It’s often near the steering column or slightly to the left, in the vicinity of the pedals. You might need to look under the dash and possibly feel around for it, as it can sometimes be tucked away but is generally easily accessible once you know where to look.
Alt text: The typical OBD2 port location under the dashboard of a vehicle, similar to a 2005 Chevy 1500, showing its trapezoidal shape.
Troubleshooting Power Issues with Your 2005 Chevy 1500 OBD2 Port
If your scan tool isn’t powering up when connected to the OBD2 port, it’s likely a power or ground issue. The OBD2 port requires a few key connections to function correctly. Here’s how to check these connections on your 2005 Chevy 1500:
Essential Preliminary Checks
Before diving into detailed checks, there are a couple of easy things to verify first:
-
Check the Cigar Fuse: The OBD2 port often shares a fuse with the cigarette lighter or auxiliary power outlets. For a 2005 Chevy 1500, this is commonly a 15 Amp fuse. Consult your owner’s manual to identify the exact fuse location in your fuse box and check if it’s blown. A blown fuse is a common culprit for a dead OBD2 port.
-
Gather Your Tools: You’ll need a voltmeter to perform these tests. Ensure you have one ready before proceeding.
Step-by-Step Voltage Testing Guide
With your voltmeter, you can quickly check the essential power and ground connections at the OBD2 port. Here’s how:
-
Pin 16 – +12V Power Check:
- Set your voltmeter to measure DC Voltage.
- Locate Pin 16 on the OBD2 port. It’s usually the top right pin.
- Place the red lead of your voltmeter on Pin 16.
- Find a good ground point on the vehicle’s frame – an unpainted bolt on the door hinge works well. Place the black lead on this ground point.
- You should read approximately +12V DC on your voltmeter.
- If you get +12V: This indicates that Pin 16 and its power supply are good. The power for Pin 16 on your 2005 Chevy 1500 is supplied by Circuit 640. If power is present, the 15A Cigar fuse is also likely good.
- If you don’t get +12V: There is a power supply issue. The orange wire supplying power might be the problem. According to wiring diagrams for similar Chevy models, this power wire may be connected at Connector C1, Pin D5. You may need to investigate this connector and wiring for breaks or issues if no voltage is present at Pin 16.
-
Pin 4 – Ground Connection Check (G200):
- Keep the red lead of your voltmeter on Pin 16 (still checking for power).
- Move the black lead of your voltmeter to Pin 4 on the OBD2 port. Pin 4 is one of the ground pins.
- You should read +12V DC again on your voltmeter.
- If you get +12V: This is correct and indicates that Pin 4 is properly grounded at ground location G200.
- If you don’t get +12V (or get 0V): This suggests a ground issue with Pin 4’s circuit (Circuit 1050). You’ll need to troubleshoot the ground circuit for Pin 4. Refer to wiring diagrams for your 2005 Chevy 1500, potentially page 8-74 in service manuals for similar years, to trace this circuit and connector pin numbers to find breaks or loose connections in the ground path to G200.
-
Pin 5 – Ground Connection Check (G203):
- Keep the red lead on Pin 16.
- Move the black lead to Pin 5 on the OBD2 port. Pin 5 is the second ground pin.
- Again, you should read +12V DC on your voltmeter.
- If you get +12V: Pin 5 is properly grounded at location G203 via Circuit 1851.
- If you don’t get +12V (or get 0V): There’s a ground problem with Pin 5’s circuit (Circuit 1851). Troubleshoot the Pin 5 ground circuit, referencing wiring diagrams, possibly page 8-82 for similar models, to find circuit and connector pin details to identify issues in the ground path to G203.
Interpreting Your Results and Next Steps
By performing these voltage checks, you can quickly isolate whether the issue with your OBD2 port is power, ground, or something else. If all voltage readings are as expected, the power and ground connections to your OBD2 port are likely good. The problem might then lie with the scan tool itself or the Class 2 Serial Data circuit (Pin 2 – Circuit 1132), which is used for communication.
If you find issues with the power or ground circuits, tracing the circuits using wiring diagrams specific to your 2005 Chevy 1500 is the next step. Look for corroded connectors, broken wires, or loose ground connections at locations G200 and G203.
Note: While this information is based on general OBD2 system knowledge and references manuals for Chevy trucks around the 2003 year, always consult the specific wiring diagrams and service manual for your 2005 Chevy 1500 for the most accurate connector and pin information. Wiring and connector details can sometimes vary between model years.
By systematically checking these power and ground connections, you should be able to pinpoint why your scan tool isn’t working with your 2005 Chevy 1500’s OBD2 port and get your diagnostic process back on track.