The fourth-generation Chevrolet Camaro, particularly the 1995 model, often brings up questions regarding its onboard diagnostic system. Specifically, owners and enthusiasts frequently ask: Is a 1995 Camaro Obd1 Or Obd2? Understanding this, along with related systems like the Vehicle Anti-Theft System (VATS), is crucial for diagnostics and repairs. This article will clarify the OBD system in a 1995 Camaro and delve into how to address VATS issues, offering a practical guide for enthusiasts and DIY mechanics.
While the 1996 model year is widely recognized as the shift to OBD2 for most vehicles, the 1995 Camaro remains firmly in the OBD1 camp. This distinction is important because OBD1 and OBD2 systems utilize different diagnostic connectors, communication protocols, and scanning tools. For a 1995 Camaro, you’ll need OBD1-compatible scanners to pull diagnostic trouble codes and assess engine performance.
Decoding the VATS Challenge in a ’95 Camaro
The Vehicle Anti-Theft System (VATS) in a 1995 Camaro is designed to prevent theft by disabling the fuel and starter systems if an improper key is used. This system relies on a resistor embedded in the ignition key. The Body Control Module (BCM) reads this resistance value. If it doesn’t match the expected value, the BCM prevents the engine from starting.
Over time, VATS can become problematic. Issues can range from a failing key resistor or wiring problems to a malfunctioning BCM. Symptoms of VATS issues include a no-start condition, even with a good battery and starter, and the security light illuminating on the dashboard.
Bypassing VATS on a 1995 Camaro: A Practical Guide
For those experiencing VATS problems in their 1995 Camaro, a bypass might be a viable solution, especially when troubleshooting or modifying the vehicle. It’s important to note that bypassing VATS should be approached responsibly and is intended for off-road or diagnostic purposes.
The most common method to bypass VATS involves simulating the correct key resistance using resistors. Here’s a step-by-step guide based on proven techniques:
Step 1: Determine the Correct Resistance Value
The first step is to determine the resistance value of your original Camaro key. If you have a working key, use a multimeter to measure the resistance across the pellet on the key. Set your multimeter to the ohms setting and place the probes on either side of the key pellet. The reading you get is the resistance value you need to replicate.
Step 2: Obtain the Matching Resistors
Once you know the resistance value, you’ll need to acquire resistors that match. The original forum post provided a helpful table outlining the 15 possible VATS resistance values and combinations of standard resistors to achieve them. You can use this table to select the appropriate resistor or combination. Resistors can be connected in series (+) to add their values or in parallel (||) to achieve intermediate values.
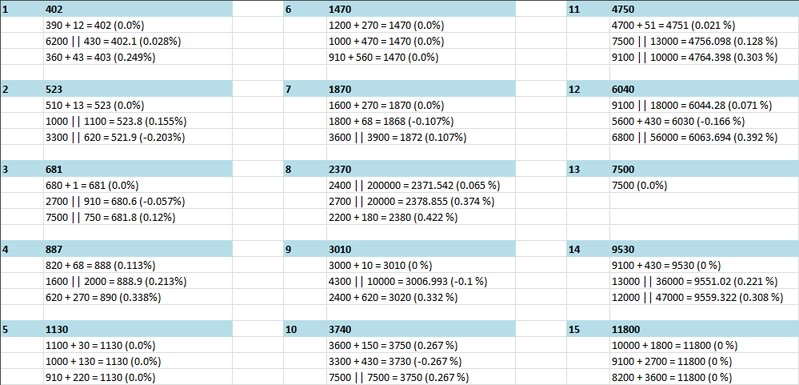
VATS resistance values and the resistor combinations to match them.
Step 3: Locate the VATS Wiring Connector
The VATS wiring connector is typically located at the base of the steering column, under the dashboard. You’ll need to access this area, which might be a bit cramped. Identify the connector with the VATS wires. Refer to the original forum post’s image for visual guidance.
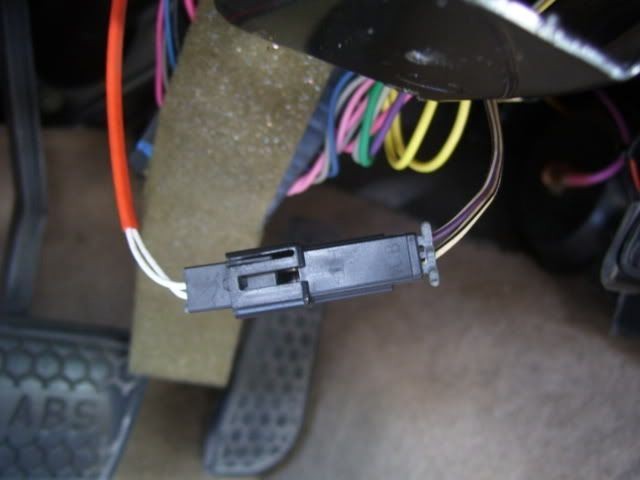
Unplug this connector and install resistors across the white/black and purple/white wires.
Step 4: Connect the Resistors
Unplug the VATS connector. You will be working with the wires leading to the Body Control Module (BCM) side of the connector, not the ignition switch side. Insert the leads of your chosen resistor (or resistor combination) across the purple/white and white/black wires. For testing, you can simply insert the resistor leads into the connector terminals. For a permanent solution, soldering the resistors or using crimp connectors is recommended for a reliable connection.
Step 5: Secure and Insulate Connections
Ensure all connections are solid and well-insulated to prevent shorts. Proper insulation is crucial for the longevity and safety of the bypass.
Step 6: Tidy Up and Test
Carefully tuck the wiring and resistors neatly under the dash, ensuring they are out of the way and protected. Reconnect the battery and attempt to start your 1995 Camaro. If the bypass is successful, the engine should start, and the security light should no longer be an issue related to VATS.
Conclusion
Understanding whether your 95 Camaro is OBD1 or OBD2 is the first step in effective diagnostics. For 1995 Camaro owners facing VATS issues, this guide provides a pathway to bypass the system using resistors, drawing upon established methods within the car enthusiast community. Remember to always prioritize safety and responsible vehicle modification practices. This information is intended for educational and troubleshooting purposes and should be implemented with caution and awareness of potential implications.