Understanding your 2005 Ford F-250’s fuse box is crucial for diagnosing and resolving electrical issues. Like many modern vehicles, the F-250 utilizes multiple fuse boxes to protect its various electrical circuits. This guide will help you locate the OBD2 fuse within the 2005 F-250 fuse panel, ensuring you can maintain your truck’s diagnostic capabilities.
Your 2005 Ford F-250 is equipped with two primary fuse box locations. Knowing where these are and how they are laid out is the first step in addressing any electrical problem, including issues related to your OBD2 port. These locations are:
- Passenger Compartment Fuse Panel: Located inside the vehicle, this panel is usually more accessible and houses fuses for many interior and convenience features.
- Power Distribution Box: Found in the engine compartment, this box typically contains fuses and relays for higher-current systems and engine management components.
Let’s delve into the specifics of each location to pinpoint the 2005 F250 Obd2 Fuse.
Passenger Compartment Fuse Panel Diagram
The passenger compartment fuse panel in your 2005 Ford F-250 is situated to provide easy access for interior electrical components. This is where you’ll find the fuse related to your OBD2 port.
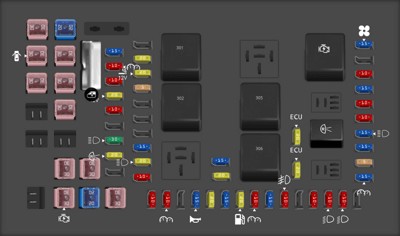 2005 Ford F-250 Passenger Compartment Fuse Panel Diagram
Within this fuse panel, locate Fuse #12. According to the diagram, this 20A Mini fuse is designated for the Cigar lighter and OBD II port. This is the fuse that protects the power supply to your OBD2 diagnostic port. If you are experiencing issues with your OBD2 scanner not powering up or connecting to your truck’s computer, this fuse should be your first point of inspection.
Here’s a detailed table outlining the fuses within the Passenger Compartment Fuse Panel for your 2005 Ford F-250:
| Type | No. | Description |
|---|---|---|
| Fuse MINI 15A | 1 | Adjustable pedals |
| Fuse MINI 10A | 2 | Cluster |
| Fuse MINI 10A | 3 | Upfitter #3 |
| Fuse MINI 20A | 4 | Power point (Instrument panel) |
| Fuse MINI 10A | 5 | Upfitter #4 |
| Fuse MINI 30A | 7 | High beam headlamps, Flash-to-pass |
| Fuse MINI 20A | 8 | Back-up lamps |
| Fuse MINI 20A | 11 | Radio (Main) |
| Fuse MINI 20A | 12 | Cigar lighter, OBD II |
| Fuse MINI 5A | 13 | Power mirrors |
| Fuse MINI 15A | 17 | Exterior lamps |
| Fuse MINI 20A | 18 | Flasher, Brake On-Off (BOO) lamps |
| Fuse MINI 10A | 19 | Body Security Module (BSM) (Security) |
| Fuse MINI 15A | 20 | Trailer tow Electric Brake Controller (EBC) |
| Fuse MINI 20A | 21 | Heated seats |
| Fuse MINI 20A | 22 | Engine control |
| Fuse MINI 20A | 23 | Engine control [gasoline engine only] /Climate control [Diesel engine only] |
| Fuse MINI 15A | 24 | Tow haul, Blower relay, Electronic Automatic Temperature Control (EATC) |
| Fuse MINI 10A | 26 | Air bags |
| Fuse MINI 15A | 27 | Ignition switch RUN feed |
| Fuse MINI 10A | 28 | Trailer tow EBC logic |
| Fuse MINI 10A | 29 | Customer access |
| Fuse MINI 15A | 30 | High beam headlamps |
| Fuse MINI 15A | 31 | 4×4 |
| Fuse MINI 5A | 32 | Radio (start) |
| Fuse MINI 15A | 33 | Cluster, 4×4, Wipers |
| Fuse MINI 10A | 34 | BOO switch (Low current) |
| Fuse MINI 10A | 35 | Instrument cluster |
| Fuse MINI 15A | 37 | Horn |
| Fuse MINI 20A | 38 | Trailer tow park lamps |
| Fuse MINI 15A | 39 | Heated mirrors |
| Fuse MINI 20A | 40 | Fuel pump |
| Fuse MINI 10A | 41 | Instrument cluster |
| Fuse MINI 15A | 42 | Delayed accessory |
| Fuse MINI 10A | 43 | Fog lamps |
| Fuse MINI 10A | 45 | Ignition switch RUN/START feed |
| Fuse MINI 10A | 46 | Left-hand low beam headlamp |
| Fuse MINI 10A | 47 | Right-hand low beam headlamp |
| Fuse FMX/JCase 30A | 101 | Trailer tow EBC |
| Fuse FMX/JCase 30A | 102 | BSM (Door locks) |
| Fuse FMX/JCase 30A | 103 | Ignition switch |
| Fuse FMX/JCase 20A | 107 | Trailer tow battery charge |
| Fuse FMX/JCase 30A | 108 | Upfitter #1 |
| Fuse FMX/JCase 30A | 109 | Upfitter #2 |
| Fuse FMX/JCase 30A | 110 | Ignition switch |
| Fuse FMX/JCase 30A | 112 | Power seat (Driver) |
| Fuse FMX/JCase 30A | 113 | Starter |
| Fuse FMX/JCase 30A | 114 | Power seat (Passenger) |
| Fuse FMX/JCase 20A | 115 | Upfitter control |
| Fuse FMX/JCase 30A | 116 | Ignition switch |
| Circuit breaker MAXI 601 | 601 | Delayed accessory, Power windows, Moonroof |
| Relay | 211 | Back-up lamps |
| Relay | 301 | Trailer tow battery charge |
| Relay | 302 | Powertrain Control Module (PCM) |
| Relay | 305 | Upfitter control |
| Relay | 306 | Delayed accessory |
| Relay | 307 | Starter |
Power Distribution Box Diagram
The power distribution box, located under the hood, manages fuses and relays for more critical vehicle systems. While the OBD2 port fuse is in the passenger compartment, understanding this box is helpful for overall electrical system knowledge.
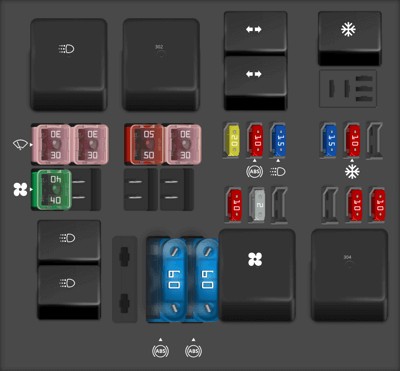 2005 Ford F-250 Power Distribution Box Diagram
For completeness, here is the fuse and relay layout for the Power Distribution Box of your 2005 Ford F-250:
| Type | No. | Description |
|---|---|---|
| Fuse FMX/JCase 30A | 1 | Wipers |
| Fuse FMX/JCase 40A | 2 | Blower |
| Fuse FMX/JCase 30A | 3 | Electronic Shift on the Fly (ESOF) |
| Fuse FMX/JCase 50A | 5 | Injector Driver Module (IDM) [Diesel engine only] |
| Fuse FMX/JCase 30A | 7 | Horizontal Fuel Conditioner Module (HFCM) [Diesel engine only] |
| Fuse MINI 20A | 9 | Trailer tow turn signals |
| Fuse MINI 10A | 10 | Powertrain Control Module (PCM) keep alive power, Canister vent solenoid [gasoline engine only] |
| Fuse MINI 10A | 11 | Anti-lock Brake System (ABS) |
| Fuse MINI 2A | 12 | Brake pressure switch |
| Fuse MINI 15A | 13 | Daytime Running Lamps (DRL) |
| Fuse MINI 15A | 15 | IDM logic [Diesel engine only] |
| Fuse MINI 10A | 17 | A/C clutch |
| Fuse MINI 10A | 18 | IDM relay [Diesel engine only] |
| Fuse MINI 10A | 20 | Trailer tow back-up lamps |
| Fuse MAXI 60A | 22 | ABS (Coils) |
| Fuse MAXI 60A | 23 | ABS (Pump) |
| Relay | 201 | Trailer tow right turn signal/stop lamp |
| Relay | 202 | Trailer tow left turn signal/stop lamp |
| Relay | 203 | A/C clutch |
| Relay | 205 | DRL #1 |
| Relay | 206 | DRL #2 |
| Relay | 301 | DRL #3 |
| Relay | 302 | HFCM |
| Relay | 303 | Blower |
| Relay | 304 | IDM [Diesel engine only] |
Checking and Replacing the OBD2 Fuse
If your OBD2 port isn’t working, follow these steps to check and replace the fuse:
- Locate the Passenger Compartment Fuse Box: Refer to your 2005 Ford F-250 owner’s manual for the exact location if you are unsure, but it is generally under the dashboard on the driver’s side.
- Identify Fuse #12: Use the diagram provided above or the diagram printed on the fuse box cover to locate Fuse #12, the 20A fuse for the cigar lighter and OBD II port.
- Inspect the Fuse: Carefully pull out the fuse. You can use a fuse puller tool or needle-nose pliers. Hold the fuse up to the light and check if the internal wire is broken or melted. A blown fuse will have a visible break.
- Replace if Necessary: If the fuse is blown, replace it with a new 20A Mini fuse. Important: Always replace a fuse with one of the same amperage rating. Using a higher amperage fuse can damage your vehicle’s electrical system.
- Test Your OBD2 Port: After replacing the fuse, try using your OBD2 scanner again to see if it now powers up and connects.
By understanding the fuse box locations and specifically identifying the 2005 F250 OBD2 fuse, you can effectively troubleshoot and resolve common electrical issues related to your diagnostic port. Remember to always consult your vehicle’s owner’s manual for the most accurate and model-specific information.