The On-Board Diagnostics II (OBD2) port in your 2006 Ram 2500 is a crucial component for vehicle maintenance and diagnostics. It’s the gateway for mechanics and DIY enthusiasts to communicate with your truck’s computer, read trouble codes, and ensure everything is running smoothly. However, like any part of your vehicle, the OBD2 port can sometimes malfunction or become damaged. This article will guide you through troubleshooting common issues with your 2006 Ram 2500’s OBD2 port and provide a step-by-step guide on how to replace it if necessary.
Understanding the Importance of Your OBD2 Port
Before diving into troubleshooting and replacement, it’s important to understand why the OBD2 port is so vital. Since the mid-1990s, OBD2 has been a standardized system in vehicles, mandated to monitor emissions-related components and systems. This system helps:
- Diagnose Issues: When your “Check Engine Light” comes on, it signifies that the OBD2 system has detected a problem. Scanning the OBD2 port with a diagnostic tool provides Diagnostic Trouble Codes (DTCs) that pinpoint the source of the issue.
- Emissions Testing (Smog Check): In many regions, vehicles must pass emissions tests. The OBD2 system is a key part of these inspections, ensuring your 2006 Ram 2500 meets environmental standards.
- Performance Monitoring: Beyond emissions, OBD2 data can be used to monitor various engine and vehicle parameters, aiding in performance tuning and preventative maintenance.
A malfunctioning OBD2 port can prevent you from accessing this valuable information, making it harder to diagnose problems, pass inspections, and maintain your vehicle effectively.
Common OBD2 Port Problems in a 2006 Ram 2500
Several issues can affect the OBD2 port in your 2006 Ram 2500. Recognizing these common problems is the first step in troubleshooting:
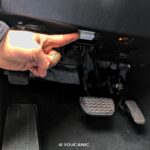
- Physical Damage: The port is located under the dashboard, often in the driver’s side footwell. It can be bumped, kicked, or have objects fall on it, leading to bent pins, cracks in the housing, or even detachment from its mounting.
- Bent or Broken Pins: The pins inside the OBD2 port are delicate. Inserting a diagnostic tool incorrectly or forcing a tool into a damaged port can bend or break these pins.
- Corrosion: Exposure to moisture or spills can cause corrosion on the pins, leading to poor or no communication.
- Wiring Issues: The OBD2 port is wired to your Ram 2500’s computer system. Damaged, loose, or corroded wiring can disrupt the connection.
- Blown Fuse: The OBD2 port is often powered by a fuse. A blown fuse can cut off power to the port, preventing any communication.
Understanding the typical location of an OBD2 port can help in initial inspection for physical damage.
Diagnosing OBD2 Port Issues on Your 2006 Ram 2500
Before assuming you need to replace the entire OBD2 port, follow these diagnostic steps:
-
Visual Inspection:
- Location: Locate the OBD2 port on your 2006 Ram 2500. It’s typically under the dashboard on the driver’s side. Consult your owner’s manual if you’re unsure.
- Physical Damage: Carefully inspect the port for any visible damage. Look for cracks, breaks, or if the port is loose.
- Pin Condition: Use a flashlight to examine the pins inside the port. Check for bent or broken pins. Compare them to images of a standard OBD2 port pinout online if needed.
- Corrosion: Look for any signs of corrosion on the pins or inside the port.
-
Check the Fuse:
- Locate Fuse Box: Find the fuse box in your 2006 Ram 2500. Its location will be in your owner’s manual (often under the hood or dashboard).
- Identify OBD2 Fuse: Refer to the fuse box diagram (usually on the fuse box cover) to identify the fuse that powers the OBD2 port or the cigarette lighter/accessory power, as they are often on the same circuit.
- Inspect Fuse: Remove the fuse and inspect it. A blown fuse will have a broken wire inside.
- Replace Fuse: If the fuse is blown, replace it with a fuse of the same amperage rating. Caution: Repeatedly blowing fuses indicates a more serious electrical problem that needs further diagnosis.
- Test Again: After replacing the fuse, try connecting your OBD2 scanner again.
-
Test with a Known Good Scanner:
- Try a Different Scanner: If you have access to another OBD2 scanner, try using it to connect to your Ram 2500’s port. This will help rule out a problem with your original scanner.
- Professional Scan: If possible, take your vehicle to a trusted mechanic or auto parts store and ask them to try scanning your OBD2 port with their professional-grade scanner.
-
Wiring Inspection (Advanced):
- Locate Wiring: If visual inspection and fuse checks don’t reveal the issue, the problem might be with the wiring. You’ll need to access the wiring harness connected to the OBD2 port. This may require removing some trim panels under the dashboard.
- Check for Continuity: Using a multimeter, check for continuity in the wires leading to the OBD2 port. Refer to a 2006 Ram 2500 wiring diagram (available online or in repair manuals) to identify the correct wires.
- Look for Damage: Visually inspect the wires for any cuts, breaks, or corrosion.
If, after these diagnostic steps, your OBD2 port still isn’t working, replacement is likely necessary.
Step-by-Step Guide to Replacing the OBD2 Port on a 2006 Ram 2500
Replacing the OBD2 port is a straightforward task that most DIYers with basic automotive knowledge can accomplish. Here’s a step-by-step guide:
Tools and Materials You’ll Need:
- New OBD2 Port: Purchase a replacement OBD2 port compatible with your 2006 Ram 2500. You can find these at auto parts stores or online. Ensure it has the correct pin configuration.
- Basic Hand Tools:
- Screwdrivers (Phillips and flathead)
- Socket set with extensions
- Wire stripper/crimper
- Multimeter (optional, but recommended for testing)
- Wiring Supplies:
- Electrical tape or heat shrink tubing
- Wire connectors (butt connectors or solder and soldering iron – soldering is more reliable)
- Wiring diagram for 2006 Ram 2500 OBD2 port (obtain online or from a repair manual)
- Flashlight or work light
- Safety Glasses and Gloves
Procedure:
-
Disconnect the Battery: Safety First! Disconnect the negative terminal of your 2006 Ram 2500’s battery. This prevents electrical shorts and potential damage to the vehicle’s electrical system.
-
Access the OBD2 Port:
- Locate Mounting: Determine how the OBD2 port is mounted. It’s usually held in place by screws or clips to a bracket under the dashboard.
- Remove Trim: You may need to remove some plastic trim panels under the dashboard to gain clear access to the OBD2 port and its wiring. Use a flathead screwdriver or trim removal tool to carefully pry off any panels.
-
Disconnect the Old OBD2 Port:
- Unplug Connector: Locate the wiring connector plugged into the back of the OBD2 port. Gently depress the locking tab on the connector and pull it straight out to disconnect it. Do not pull on the wires themselves.
-
Remove the Old OBD2 Port:
- Unscrew/Unclip: If the port is screwed in, use the appropriate screwdriver to remove the screws. If it’s clipped in, carefully use a flathead screwdriver to release the clips while gently pushing the port out from the front.
-
Prepare the Wiring on the New OBD2 Port (If Necessary):
- Compare Ports: Compare the new OBD2 port to the old one. Ensure they have the same pin configuration and connector type.
- Wiring Check: Some aftermarket OBD2 ports may come with bare wires instead of a direct connector. In this case, you’ll need to wire it to the existing vehicle harness using the wiring diagram. If your replacement port has a direct connector matching the original, you can skip to step 7.
- Identify Wires: Using your 2006 Ram 2500 wiring diagram, identify the function of each wire on the vehicle’s OBD2 port connector (e.g., power, ground, CAN bus, etc.). Note down the wire colors and their corresponding pin numbers.
- Prepare Wires: If needed, strip the ends of the wires on both the new OBD2 port and the vehicle’s wiring harness to prepare them for connection.
-
Connect the New OBD2 Port Wiring (If Wiring Required):
- Match Wires: Carefully connect the wires from the new OBD2 port to the corresponding wires on the vehicle’s harness, matching them based on your wiring diagram and notes from step 5.
- Secure Connections: Use butt connectors, solder, or your preferred method to create secure and reliable electrical connections. If soldering, insulate each connection with heat shrink tubing. If using butt connectors, ensure they are properly crimped.
- Double Check: Double-check all wiring connections against your wiring diagram to ensure accuracy. Incorrect wiring can damage your vehicle’s computer system.
-
Install the New OBD2 Port:
- Mount Port: Position the new OBD2 port in its mounting location and secure it with screws or clips, just like the original port. Ensure it’s firmly in place.
-
Reconnect the Wiring Connector:
- Plug-In: Plug the vehicle’s wiring connector into the back of the new OBD2 port until you hear a click, indicating it’s securely connected.
-
Test the Connection Before Reassembly:
- Reconnect Battery: Reconnect the negative battery terminal.
- Test Scanner: Plug your OBD2 scanner into the new port and turn the ignition to the “ON” position (engine off).
- Verify Communication: See if your scanner powers up and establishes communication with the vehicle’s computer. Check if you can read basic data like VIN or current trouble codes.
-
Reassemble Trim Panels:
- Reinstall Trim: If you removed any trim panels to access the OBD2 port, carefully reinstall them in their original positions.
-
Final Test:
- Full Scan: Perform a full scan of your 2006 Ram 2500’s systems using your OBD2 scanner to ensure everything is working correctly and there are no new error codes.
Visual representation of an OBD2 port being replaced, highlighting the connection and mounting.
Tips for a Successful OBD2 Port Replacement
- Take Pictures: Before disconnecting anything, take pictures of the OBD2 port, wiring, and mounting. This can be helpful for reassembly and wiring reference.
- Wiring Diagram is Key: Always use a wiring diagram specific to your 2006 Ram 2500. Wire colors can sometimes vary, and the diagram is your definitive guide.
- Secure Connections: Ensure all wiring connections are solid and well-insulated to prevent future problems caused by loose connections or corrosion.
- Test Before Final Assembly: Always test the OBD2 port’s functionality before fully reassembling everything. This saves time and effort if you need to troubleshoot any wiring issues.
- Professional Help: If you are uncomfortable with electrical work or wiring, it’s always best to seek assistance from a qualified mechanic.
Maintaining Your OBD2 Port
To prevent future OBD2 port problems, consider these maintenance tips:
- Gentle Use: Be gentle when plugging and unplugging diagnostic tools. Avoid forcing the connector.
- Keep it Clean and Dry: Protect the port from moisture and debris. Use a port plug or cover if your vehicle is exposed to harsh conditions.
- Regular Checks: Periodically inspect the OBD2 port for any signs of damage or corrosion.
- Address Issues Promptly: If you notice any communication problems with your OBD2 port, address them quickly to prevent further complications.
Conclusion
A functioning OBD2 port is essential for diagnosing and maintaining your 2006 Ram 2500. By following these troubleshooting and replacement steps, you can address common OBD2 port issues and ensure you can effectively communicate with your vehicle’s computer system. If you encounter difficulties or are unsure about any step, don’t hesitate to consult a professional mechanic at cardiagnosticnearme.com to ensure your Ram 2500 stays in top running condition. Regular maintenance and prompt attention to issues like a faulty OBD2 port will contribute to the longevity and reliability of your truck.