Ensuring the electrical integrity of your 2001 Ford Ranger is crucial for its overall performance and safety. Fuses play a vital role in protecting your vehicle’s electrical system from overloads, preventing potential damage to sensitive components. If you’re experiencing electrical issues in your Ford Ranger, checking the fuses should be one of your first troubleshooting steps. This guide will help you locate the fuse boxes in your 2001 Ford Ranger, understand the fuse diagrams, and identify the correct fuses, particularly those related to the OBD2 system, which is essential for diagnostics and emission testing.
Understanding Fuses in Your 2001 Ford Ranger
Fuses are designed as sacrificial safety devices in your vehicle’s electrical circuits. They contain a thin wire that melts and breaks the circuit when excessive current flows through it, preventing damage to more expensive components. When electrical parts in your 2001 Ford Ranger stop working, a blown fuse is a likely culprit. Before assuming a major electrical component failure, inspecting and replacing the appropriate fuse can often resolve the issue quickly and inexpensively.
Your 2001 Ford Ranger has two main fuse locations:
- The Passenger Compartment Fuse Panel: Located inside the vehicle.
- The Power Distribution Box: Situated in the engine compartment.
Understanding the location and function of fuses in both these boxes is key to effectively diagnosing and resolving electrical problems in your Ford Ranger.
Passenger Compartment Fuse Panel
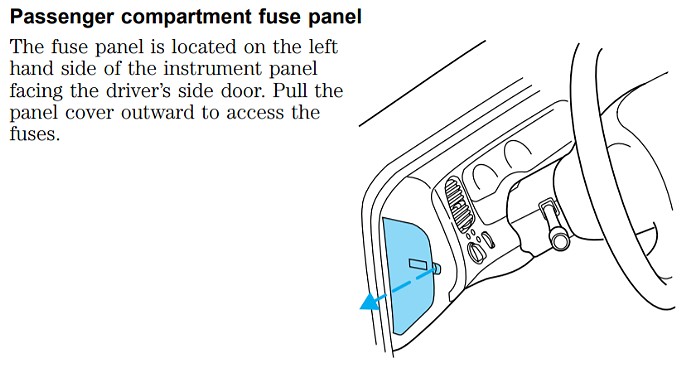
The passenger compartment fuse panel in your 2001 Ford Ranger is conveniently located inside the vehicle, making it easily accessible.
Location: Typically found on the left end of the instrument panel, often near the driver’s side door.
To access the fuses, you will need to remove the fuse panel cover. You can usually do this by inserting your finger into the provided divot and gently pulling the cover off. The inside of the cover often contains a diagram of the fuse layout and sometimes spare fuses, which can be very helpful.
 Passenger Compartment Fuse Panel Location in a Ford Ranger
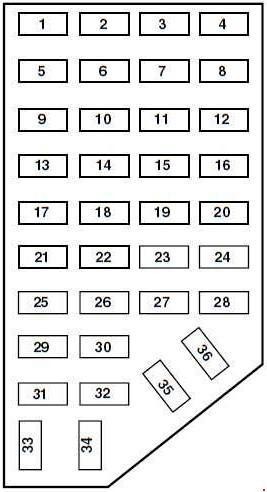
Once you have located and accessed the fuse panel, you can use the diagram (usually on the fuse box cover) to identify the fuse related to the circuit you are investigating. Below is a fuse diagram and chart detailing the fuses in the passenger compartment fuse panel for a 2001 Ford Ranger.
 1998-2000 Ford Ranger Passenger Compartment Fuse Box Diagram
| No. | AMPS | Protected circuits |
|---|---|---|
| 1 | 5 | Power Mirror Switch |
| 2 | 10 | Daytime Running Lights (DRL), Back-up Lamps, Transmission, Passenger Air Bag Deactivation Switch, Blower Motor Relay |
| 3 | 7.5 | 2001-2002: Right Stop/Turn Trailer Tow Connector 2003: Left Stop/Turn Trailer Tow Connector |
| 4 | — | Not Used |
| 5 | 15 | 4×4 Control Module |
| 6 | 2 | 2002-2003: Brake Pressure Switch |
| 7 | 7.5 | 2001-2002: Left Stop/Turn Trailer Tow Connector 2003: Right Stop/Turn Trailer Tow Connector |
| 8 | — | Not Used |
| 9 | 7.5 | Brake Pedal Position Switch |
| 10 | 7.5 | Speed Control Servo/Amplifier Assembly, Generic Electronic Module (GEM), Shift Lock Actuator, Turn Signals, 4×4 |
| 11 | 7.5 | Instrument Cluster, 4×4, Main Light Switch, Truck Central Security Module (TCSM), GEM |
| 12 | — | Not Used |
| 13 | 20 | Brake Pedal Position Switch |
| 14 | 10 | ABS Control Module |
| 15 | — | Not Used |
| 16 | 30 | Windshield Wiper Motor, Wiper Hi-Lo Relay, Wiper Run/Park Relay |
| 17 | 20 | Cigar Lighter, Data Link Connector (DLC) |
| 18 | — | Not Used |
| 19 | 25 | Powertrain Control Module (PCM) Power Diode, Ignition, PATS |
| 20 | 7.5 | Generic Electronic Module (GEM), Radio |
| 21 | 15 | Flasher (Hazard) |
| 22 | 20 | Auxiliary Power Socket |
| 23 | — | Not Used |
| 24 | 7.5 | Clutch Pedal Position (CPP) switch, Starter Interrupt Relay |
| 25 | — | Not Used |
| 26 | 10 | Battery Saver Relay, Auxiliary Relay Box, Restraint Central Module (RCM), Generic Electroic Module (GEM), Instrument Cluster |
| 27 | — | Not Used |
| 28 | 7.5 | Generic Electronic Module (GEM), Radio |
| 29 | 20 | Radio |
| 30 | — | Not Used |
| 31 | — | Not Used |
| 32 | — | Not Used |
| 33 | 15 | Headlamps, Daytime Running Lamps (DRL) Module, Instrument Cluster |
| 34 | — | Not Used |
| 35 | 15 | Horn Relay if Not Equipped with Truck Central Security Module |
| 36 | — | Not Used |
Fuse 17 (20 Amp) is particularly important as it protects the Data Link Connector (DLC), which is also known as the OBD2 port. If you are having trouble connecting your OBD2 scanner to your 2001 Ford Ranger, or if the scanner is not powering up, this fuse should be one of the first you check. A blown fuse 17 can prevent communication with your vehicle’s computer system, hindering diagnostic efforts and emission testing.
Power Distribution Box (Engine Compartment Fuse Box)
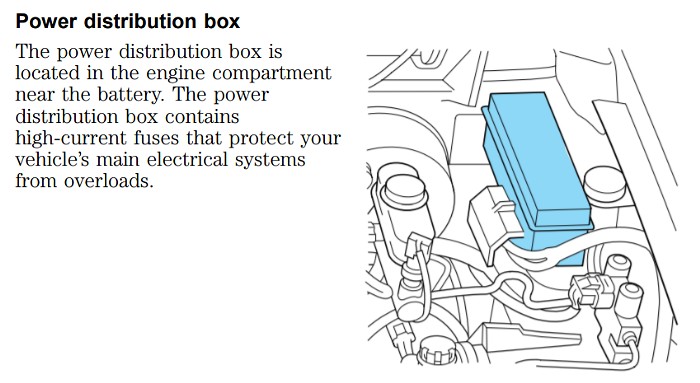
The power distribution box, sometimes referred to as the engine compartment fuse box, houses fuses and relays that protect high-current circuits.
Location: Located in the engine compartment, typically on the driver’s side near the fender.
This box is usually black and clearly labeled. Open the box by releasing the clips or latches that secure the cover.
 Power Distribution Box Location in a Ford Ranger Engine Compartment
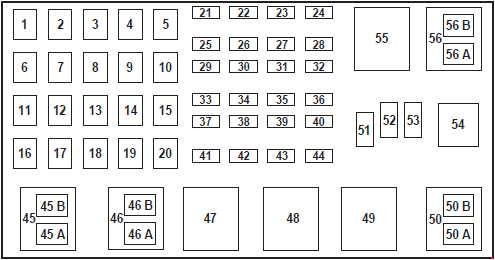
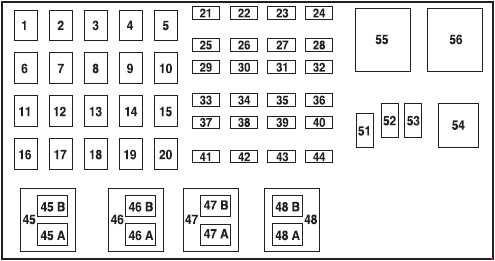
The power distribution box contains fuses for critical vehicle systems. Below are diagrams showing the layout for different 2001 Ford Ranger engine configurations and model years.
 2001 Ford Ranger Power Distribution Box Diagram – 2.3L Engine
2.3L Engine (above)
 2001 Ford Ranger Power Distribution Box Diagram – 3.0L & 4.0L Engines
3.0L & 4.0L Engines (2001)(above)
 2003 Ford Ranger Power Distribution Box Diagram – 3.0L & 4.0L Engines
3.0L & 4.0L Engines (2002-2003)(above)
| No. | AMP | Protected circuits |
|---|---|---|
| 1 | 50 | I/P Fuse Panel |
| 2 | 50 | Amplifier (Tremor audio system only) |
| 3 | — | Not Used |
| 4 | — | Not Used |
| 5 | — | Not Used |
| 6 | 50 | ABS Pump Motor |
| 7 | 30 | Powertrain Control Module (PCM) |
| 8 | 20 | Power Door Locks and Remote Entry |
| 9 | — | Not Used |
| 10 | — | Not Used |
| 11 | 50 | Starter Relay, Ignition Switch |
| 12 | 20 | Power Windows |
| 13 | 20 | 3.0L and 4.0L engines: 4×4 Motor |
| 14 | — | Not Used |
| 15 | — | Not Used |
| 16 | 40 | Blower Motor |
| 17 | 20 | 2.3L engine: Auxiliary Cooling Fan |
| 18 | — | Not Used |
| 19 | — | Not Used |
| 20 | — | Not Used |
| 21 | 10 | PCM Memory |
| 22 | — | Not Used |
| 23 | 20 | Fuel Pump Motor |
| 24 | 30 | Headlamps |
| 25 | 10 | A/C Clutch Solenoid |
| 26 | — | Not Used |
| 27 | — | Not Used |
| 28 | 30 | 4WABS Module |
| 29 | — | Not Used |
| 30 | 15 | Trailer Tow |
| 31 | 20 | Foglamps, Daytime Running Lamps (DRL) |
| 32 | — | Not Used |
| 33 | 15 | Park Lamp |
| 34 | — | Not Used |
| 35 | — | Not Used |
| 36 | — | Not Used |
| 37 | — | Not Used |
| 38 | 10 | Left Headlamp Low Beam |
| 39 | — | Not Used |
| 40 | — | Not Used |
| 41 | 20 | Heated Oxygen Sensors |
| 42 | 10 | Right Headlamp Low Beam |
| 43 | — | 2.3L engine: (Resistor) |
| 44 | — | Not Used |
| 51 | — | Not Used |
| 52 | — | Not Used |
| 53 | — | Diode: Powertrain Control Module (PCM) |
| Relay | ||
| 45A | Wiper HI/LO | |
| 45B | Wiper Park/Rim | |
| 46A | 2.3L engine: Fuel Pump 3.0L and 4.0L engines (2002-2003): Fuel Pump | |
| 46B | 2.3L engine: Trailer Tow 3.0L and 4.0L engines (2001): Front Washer Pump 3.0L and 4.0L engines (2002-2003): Trailer tow | |
| 47 | 2.3L engine: Starter 3.0L and 4.0L engines (2001): A/B – Not Used | |
| 47A | 3.0L and 4.0L engines (2002-2003): A/C clutch solenoid | |
| 47B | 3.0L and 4.0L engines (2002-2003): Front washer pump | |
| 48 | 2.3L engine: Auxiliary Cooling Fan | |
| 48A | 3.0L and 4.0L engines: Fog Lamps | |
| 48B | 3.0L and 4.0L engines: Fog Lamp Relay | |
| 49 | 3.0L and 4.0L engines (2001): Starter | |
| 50 | Not Used | |
| 50A | 3.0L and 4.0L engines (2001): Not Used | |
| 50B | 3.0L and 4.0L engines (2001): Fuel Pump | |
| 54 | Powertrain Control Module (PCM) | |
| 55 | Blower | |
| 56 | 3.0L and 4.0L engines (2002-2003): Starter | |
| 56A | A/C Clutch Solenoid | |
| 56B | 2.3L engine: Front Washer Pump 3.0L and 4.0L engines (2001): Trailer Tow |
While there isn’t a fuse labeled explicitly as “OBD2 fuse” in the power distribution box, it’s important to note that this box powers many critical systems, including the Powertrain Control Module (PCM). Fuses like Fuse 7 (30 Amp – PCM Power) and Fuse 21 (10 Amp – PCM Memory) are crucial for the overall operation of the engine management system, which directly relates to the OBD2 functionality. Issues with these fuses could indirectly affect your OBD2 port’s ability to communicate if the PCM is not powered correctly.
Checking and Replacing Fuses: A Step-by-Step Guide
Once you’ve identified the fuse you suspect is blown, follow these steps to check and replace it:
-
Locate the Fuse Panel: Refer to the diagrams above to find the passenger compartment fuse panel and/or the power distribution box in your 2001 Ford Ranger.
-
Identify the Fuse to Check: Use the fuse panel diagram (usually on the cover) to locate the specific fuse number you need to inspect. For OBD2 port issues, check Fuse 17 (20 Amp) in the passenger compartment fuse panel.
-
Inspect the Fuse: Visually check the fuse. Look for a broken or melted wire inside the clear plastic casing. If the wire is separated, the fuse is blown and needs replacement.
You can also use a fuse tester for a more definitive check without removing the fuse. A fuse tester, like a Bussmann fuse tester, allows you to test the fuse while it’s still in the panel. Simply align the tester prongs with the metal contacts on top of the fuse and observe the indicator light. If the light illuminates, the fuse is good; if not, it’s blown.
-
Remove the Fuse (If Necessary): If you need to remove the fuse, use the fuse pulling tool often found in the passenger compartment fuse panel (or needle-nose pliers if the tool is missing). Gently grip the fuse and pull it straight out.
-
Replace the Fuse: Important: Always replace a blown fuse with a fuse of the exact same amperage rating. Using a fuse with a higher amperage can overload the circuit and cause significant damage or even a fire. Refer to the fuse diagram to ensure you are using the correct amperage. Spare fuses are often located on the underside of the passenger compartment fuse panel cover.
-
Re-install the Fuse Panel Cover: Once the new fuse is in place, securely re-attach the fuse panel cover.
-
Test the Circuit: After replacing the fuse, test the affected electrical component to see if it is now working correctly. For OBD2 issues, try connecting your OBD2 scanner again.
-
If the Fuse Blows Again: If the new fuse blows immediately or shortly after replacement, it indicates an underlying problem in the electrical circuit. This could be a short circuit or an overloaded circuit. In such cases, it is recommended to have your 2001 Ford Ranger’s electrical system professionally diagnosed by a qualified mechanic.
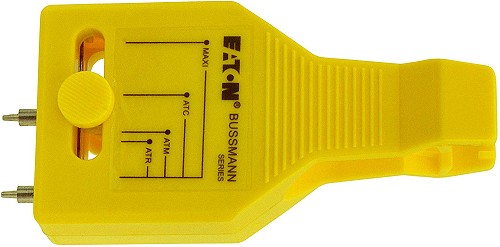 Bussmann Fuse Tester
Understanding Fuse Color Codes and Amperage Ratings
Fuses are color-coded to indicate their amperage rating, making it easy to select the correct replacement. Here are common fuse colors and their corresponding amperage ratings:
- Red: 10 Amp
- Light Blue: 15 Amp
- Natural (Clear/White): 20 Amp
- Light Green: 30 Amp
Other amperage ratings and colors exist, so always double-check the fuse diagram for your specific 2001 Ford Ranger.
 Fuse Color and Amperage Ratings Chart
By understanding the fuse locations, diagrams, and troubleshooting steps for your 2001 Ford Ranger, you can effectively diagnose and resolve many common electrical issues. Remember to always use the correct fuse amperage and seek professional help if you encounter persistent problems. Maintaining your vehicle’s fuses is a simple yet crucial part of vehicle care, ensuring the longevity and reliability of its electrical systems, including the vital OBD2 diagnostic port.