The On-Board Diagnostics II (OBD2) port in your 2013 Acura MDX is a crucial interface for accessing your vehicle’s computer system. Whether you’re a seasoned DIYer or a car owner looking to understand your vehicle better, knowing how to locate and test your OBD2 port is essential. This guide will walk you through finding the OBD2 port in your 2013 Acura MDX and performing basic diagnostic checks.
Locating the OBD2 Port in Your 2013 Acura MDX
The OBD2 port is standardized across most modern vehicles, and the 2013 Acura MDX is no exception. You can typically find the OBD2 port located inside the cabin of your MDX, beneath the dashboard on the driver’s side.
It’s often positioned near the steering column or in the vicinity of the pedals. You might need to crouch down and look under the dash to spot it. The port is usually black or grey and has a trapezoidal shape with 16 pins.
Once you’ve located it, it should resemble the diagram below:
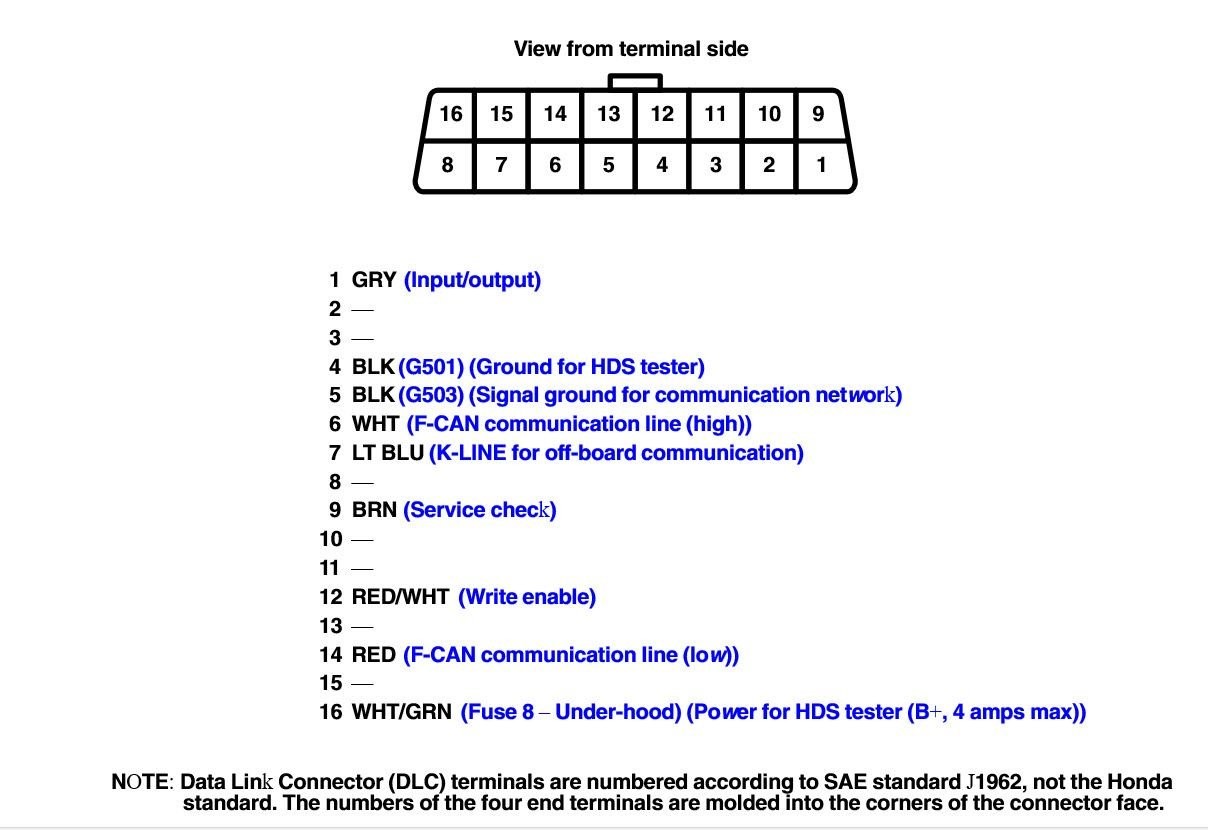 2013 Acura MDX OBD2 Port Pin Layout Diagram
Understanding the OBD2 Port Pin Layout for your 2013 Acura MDX.
Testing Your 2013 Acura MDX OBD2 Port
If you’re experiencing issues connecting your OBD2 scanner or suspect a problem with the port itself, you can perform a few basic tests using a multimeter to ensure it’s functioning correctly. These tests check for ground continuity and power supply to the port.
Safety First: Before starting any electrical testing, ensure your vehicle is turned off and the keys are removed from the ignition.
Checking for Ground Continuity
-
Pin 4 (Chassis Ground): Use your multimeter to check for continuity between Pin 4 of the OBD2 port and a known vehicle ground. A good vehicle ground can often be found on a metal part of the chassis, such as behind the driver’s side kick panel. You should get a solid continuity reading, indicating a good ground connection.
-
Pin 5 (Signal Ground): Similarly, check for continuity between Pin 5 and the same vehicle ground location. Again, you should expect a solid continuity reading.
-
Voltage Between Pins 4 & 5: Set your multimeter to measure DC voltage. Place the probes on Pin 4 and Pin 5. The voltage reading should be very low, ideally less than 2V, and in many cases, close to 0mV. This confirms the ground integrity.
Checking for Power Supply
-
Pin 16 (Battery Power): Pin 16 should provide battery voltage to the OBD2 port. Check the voltage between Pin 16 and the vehicle ground. In a 2013 Acura MDX with a healthy electrical system, you should expect a reading close to 12.2V – 12.6V (or the battery voltage of your vehicle).
-
Voltage Between Pins 4 & 16: Measure the voltage between Pin 4 (ground) and Pin 16 (power). You should again see a reading consistent with battery voltage, around 12.2V – 12.6V.
-
Voltage Between Pins 5 & 16: Finally, check the voltage between Pin 5 (ground) and Pin 16 (power). This reading should also be approximately 12.2V – 12.6V.
If your voltage readings are significantly different from these expected values, or if you have no continuity where expected, it may indicate an issue with your 2013 Acura Mdx Obd2 Port wiring, or the vehicle’s electrical system.
Troubleshooting OBD2 Port Connection Issues
If your OBD2 port tests positive for power and ground but you are still having trouble connecting your diagnostic device, consider the following:
- Device Compatibility: Ensure your OBD2 scanner or device is compatible with the 2013 Acura MDX and supports the necessary protocols.
- Port Condition: Visually inspect the OBD2 port for any bent pins, damage, or debris that might be obstructing a good connection.
- Secure Connection: Sometimes, a loose connection can be the culprit. Make sure your OBD2 device is firmly and securely plugged into the port.
If you’ve checked these points and are still facing issues, it might be beneficial to consult a professional mechanic to further diagnose the OBD2 port or related vehicle systems. Understanding your 2013 Acura MDX OBD2 port is the first step towards effective vehicle diagnostics and maintenance.