Embarking on an engine swap can dramatically transform your Pontiac Fiero, injecting new life and significantly enhanced performance. For Fiero enthusiasts seeking a potent upgrade, the 3800 Supercharged (3800 SC) engine swap stands out as a popular and effective choice. This guide provides a comprehensive parts list and installation overview, specifically tailored for those considering this powerful modification. While this guide focuses on the robust 3800 SC engine, it’s important to understand the diagnostic systems of your Fiero, especially if you own a classic model like the 1986 Pontiac Fiero 2.5L. These older models utilize OBD1 diagnostic systems, which are different from the OBD2 systems found in newer vehicles and the donor cars for 3800 SC engines. Understanding this difference is crucial for both pre- and post-swap diagnostics.
This guide is primarily based on “Build 1,” a budget-conscious approach to the 3800 Fiero swap, and is independent of “Build 2” (which represents a more advanced setup), although “Build 2” inherently includes the elements of “Build 1” unless explicitly stated otherwise.
Note: For an optimal donor engine and vehicle, aim for a 1998-2002 Pontiac Grand Prix GTP or Buick Regal. Utilizing an engine from these models streamlines the swap process, minimizing the need for additional components listed below.
Performance Expectations and Preface
With this engine swap, anticipate approximately 280 horsepower at the crankshaft. This figure can be further enhanced with straightforward, minor modifications, including:
- 3.4″ Supercharger Pulley: Increases air intake for enhanced performance.
- 180-Degree Thermostat: Promotes slightly cooler combustion temperatures.
- ECU/PCM Tuning: Essential for optimizing performance and addressing factors like VATS security deletion, shift speed adjustments, torque limiter increase, ABS removal (if applicable), radiator fan setpoints, fuel and MAF calibration, and timing adjustments. Always verify local regulations before disabling EGR/Rear O2 sensors.
- Autolite 104 Spark Plugs: These spark plugs, two heat ranges colder than stock, offer improved knock resistance.
This guide assumes optional deletions or modifications to further simplify and optimize the swap:
- Valve Cover Swap: Position the oil fill cap for easier access within the Fiero engine bay.
- Vacuum Canister Deletion: The “coffee can” vacuum accumulator for stock cruise control can be removed. The 3800 engine’s superior vacuum allows the stock Fiero cruise control to function effectively by connecting the vacuum line directly to the supercharger port.
- Vacuum Line Simplification: Retain only the brake booster and cruise control vacuum lines from the Fiero (unless cruise control is also being deleted or upgraded to the 3800 module).
- Alternator and Power Steering Adjustments: Alternator bracket and coolant circuit relocation with cooling circuit bypass; power steering pump deletion.
- Optional Emissions System Deletions (Check Local Laws): EGR system, catalytic converter and rear O2 sensor, and EVAP system/vacuum lines can be optionally removed, requiring computer reprogramming to eliminate associated codes and functionalities.
Completing this swap is achievable in under a month, potentially resulting in quarter-mile times of 13-13.5 seconds and 1.9-second 60-foot times without initial tune modifications.
Parts List for the 3800 Supercharged Fiero Swap
The quantities needed for each part are indicated in parentheses (x).
—–PARTS SOURCED FROM THE DONOR CAR—–
- Engine Assembly
- MAP Sensor Vacuum Lines
- Transmission (automatic transmission is common for donor cars, but manual transmissions can be used; transmission choice will affect other parts needed)
- Wiring Harness (engine harness up to the firewall) + OBD II Connector (cut from inside the donor car) + Fiero Wiring Harness (for integration)
- Engine Computer (PCM/ECU)
- A/C Hose (up to the firewall)
- 3″ Exhaust Flange (cut from the donor car’s exhaust system)
- Extra Fuses and Relays (from the donor car’s fuse box)
- Power Washer Fluid Pump, Tank, and Hoses (for optional methanol injection – not detailed in this guide)
- Electronic Cruise Control Module and Cruise Cable (if upgrading Fiero cruise control)
- CV Front Axles (from a GTP donor car; compatibility of others may vary)
Finding a Donor Car: Junkyard Search
—–AIR Intake and Supercharger Components—–
Note: For throttle cable mounting on a 3800 Series II engine, refer to the Assembly Diagrams section of the original build thread.
- Supercharger 3.7″ Pulley Belt – 66.3″, 6 Ribs (1x): Roadmax 6k663AP – Amazon Link
- Note: Belt size may require slight adjustment (±0.5″) for optimal fitment. Use RockAuto to search for alternatives using wildcards (e.g., K0606 or 6k6 for 60″-69″ lengths): RockAuto Search
- Optional: Supercharger 3.4″ Pulley Belt – 66″, 6 Ribs (1x): Gates K060660 – Amazon Link
- Note: Similar fitment considerations as the 3.7″ belt.
- Optional: 3.4″ Supercharger Modular Pulley System (1x): ZZPerformance 3.4 MPS – eBay Link or Smoothflow 3.4 Polished Finish Pulley System MPS – Smoothflow Pulleys Link
- Note: Ensure the pulley system includes the hub for supercharger shaft installation. Avoid going smaller than 3.4″ on a stock engine setup without further modifications (see “Build 2”).
- Optional: Supercharger Pulley Puller (1x): eBay Link
- Note: Pulley re-installation can be challenging; consider cooling the shaft and heating the pulley hub for easier mounting. Rental pullers may not be ideal.
- Optional: Flexible Air Duct Flex 4″ Diameter, 41″ Long (1x): Spectre SPE-9751 – Amazon Link
- Note: Universal fit, easy to install. Alternatives below offer different lengths and diameters.
- Alternative: Walker 42423 4″ Diameter INSIDE, 18″ Long (1x): Amazon Link
- Alternative: Walker 43381 4″ Diameter INSIDE, 36″ Long (1x): Amazon Link
- Note: Couplings larger than 4″ inner diameter may be needed for Walker alternatives.
- Alternative: UCREATIVE U-SH-45-102-T (1x): Amazon Link
- Alternative: GM GENUINE 25173861 / Dorman 696-426 (2x): Amazon Link
- Optional: Air Filter (1x): K&N RE-1040 – Amazon Link
- Note: Replaces stock intake and water separator. Fits behind the driver’s side intake scoop, largest filter size that fits in this location.
- Optional: Air Filter Wrap (1x): FILTERWEARS K298K – Amazon Link
- Note: Protects filter from water and debris, especially important in wet conditions. Refer to K&N Filter Wrap Size Chart.
- Optional: 1.9 Ratio Rocker Arms (1x): eBay Link
- Note: Enhances performance by 5-7% with a direct bolt-on installation. Incompatible with aftermarket camshafts. Consider valve spring replacement if engine mileage exceeds 100,000 miles (refer to “Build 2”).
- Valve Cover Seals (1x): Ultra-Power VS50465R – Amazon Link
- Note: Replace worn seals to prevent oil leaks.
—–FUEL System Components—–
Note: For advanced fuel system solutions, especially for “Build 2,” Larry Curchoe offers custom fuel system builds: Larry Curchoe Facebook. The setup below is designed for direct connection to stock 3800 fuel rails and Fiero lines. For complete E-85/Ethanol conversion and custom fuel rail setups, see “Build 2.”
- Fuel Pump (1x): Walbro 255 LPH F20000169 – Amazon Link
- Alternative (quieter): Quantum 255 LPH HFP-343 – Amazon Link
- Note: Exercise caution with Quantum pumps; inlet proximity to tank bottom may restrict fuel flow under high demand. Trimming the bottom lip can improve clearance. The 3800 SC requires slightly more fuel than the stock Fiero pump. Upgrading can be deferred and done later as the fuel tank is independently accessible. For E85 conversions in “Build 2,” a 340+ LPH pump is necessary. Beware of counterfeit fuel pumps; purchase from reputable sources.
- Fuel Tank Lock Ring and Seal (1x): Dorman 579-001 – Amazon Link
- Stock Fuel Rail Hose Release Tools (1x): Performance Tool W83148 – Amazon Link
- Note: These tools can be challenging to use; refer to this YouTube Video for guidance.
Fuel Hose and Fittings (Refer to diagram below)
- 0 – Optional (Check local laws): EVAP Circuit Block-off: 1/4″ bolt and hose clamps to seal the EVAP fuel sender hose.
- 1 – Push-Lok Ethanol Fuel Hose 3/8″ (1x): Fragola 871006 (10ft) – Amazon Link
- 2 – Fuel Filter (1x): Wix 33481 – Amazon Link
- Note: Welded 16mm x 1.5 (M16-1.5) female inlet/outlet.
- 3 – M16 x 1.5 Adapter to -6 AN (1x): Edelbrock Russell 648060 – Amazon Link
- 4 – 90° -6 AN Female Swivel Push-Lok Barb Male (1x): EVIL ENERGY CS00465D90 – Amazon Link
- 5 – Stock 3800sc Fuel Rail 3/8″ Supply Line Adapter (1x): Vibrant 16886 – Amazon Link
- 6 – Stock 3800sc Fuel Rail 5/16″ Return Line Adapter (1x): Vibrant 16885 – Amazon Link
- Note: Only required for Series II return-style fuel rails, not Series III.
- 7 – 1/4″ Barb to 3/8″ Barb (1x): Beduan 1yf-02920-srb – Amazon Link
- 8 – 1/4″ Fiero Ethanol Fuel Tank Return Hose (1x 5′): UCREATIVE U-FH-30R7-5-14 – Amazon Link
- Note: For ethanol compatibility.
- 9 – 5/8″ ID Molded Ethanol Hose with Right Angle (1x): Gates 28467 – Amazon Link
- Note: For ethanol compatibility.
- 10 – 1.5″ Fiero Ethanol Fuel Tank Filler Neck Hose (1x): Gates 21660 – Amazon Link
- Note: For ethanol compatibility.
- 11 – 180° Bend -6AN to Push Lock 3/8″ Barb (2x): Dexepe OCH-AN6-180#1-BK-LC – Amazon Link
- Note: Only one needed for Series III returnless systems.
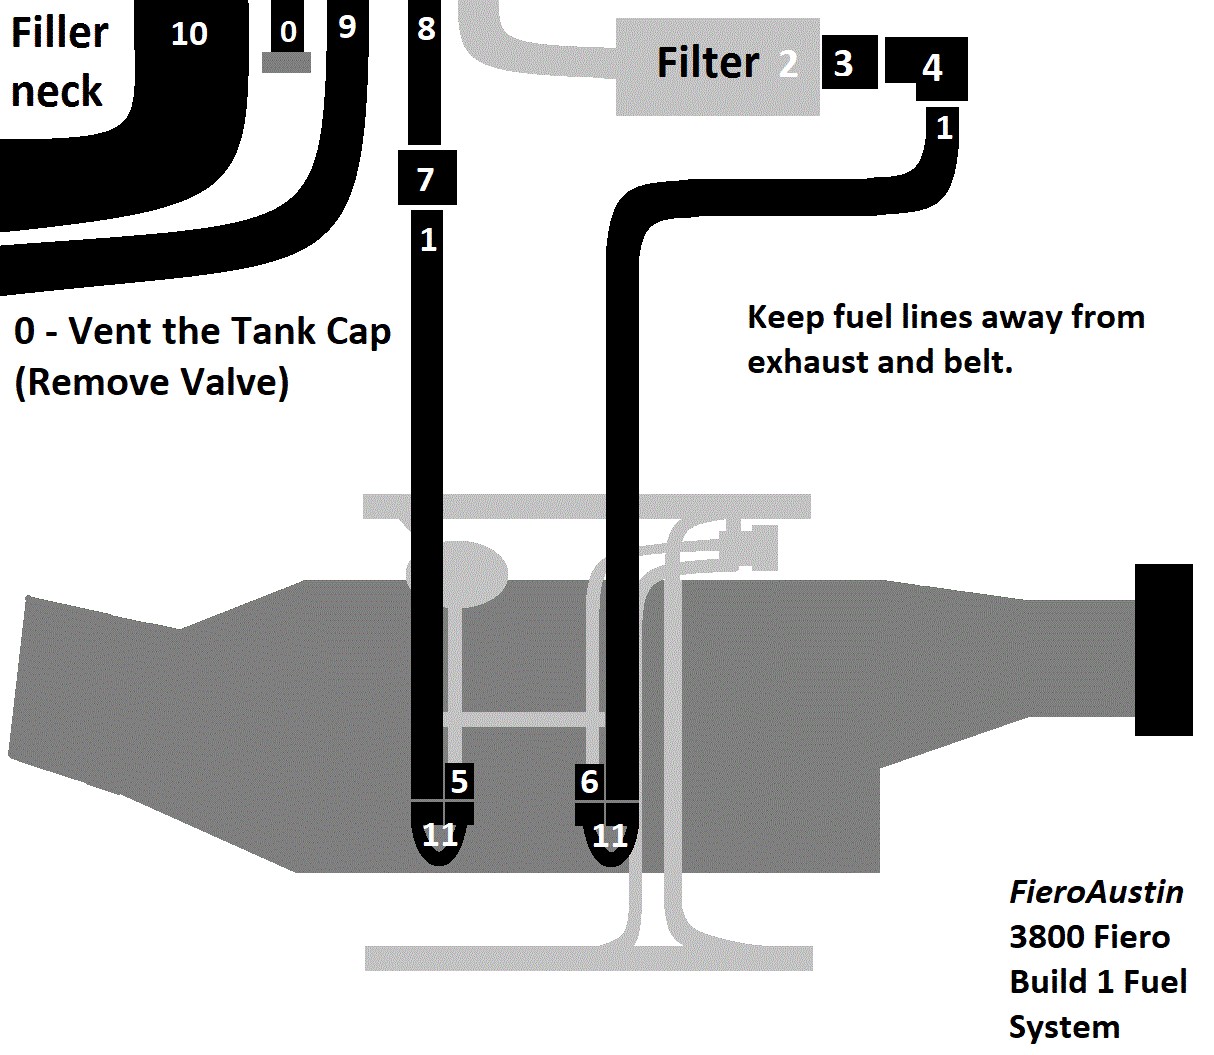 Fuel System Diagram
—–SPARK Ignition Components—–
- Spark Plug Wire Kit for Custom Lengths (1x): Taylor Cable 83253 (45-degree boots) – Amazon Link
- Note: Requires a vise and spark plug wire crimper.
- Spark Plug Wire Crimper (1x): MSD 3503 – Amazon Link
- Optional: Colder Spark Plugs (6x): Autolite 104 – Amazon Link
- Note: Two heat ranges colder than stock Autolite 606, gap to 0.035″-0.040″. Reduces hot spots and knock, improving timing and power.
- Optional: Spark Plug Gap Tool (1x): Performance Tool W80540 – Amazon Link
—–EXHAUST System Components—–
Note: This exhaust setup is designed to mate with stock 3800 exhaust headers (supporting up to 300hp). Custom welding is required. Bolt-on exhaust systems for engine swaps are not readily available. Mandrel-bent stainless steel is recommended for optimal exhaust flow and durability.
- Muffler (1x): 3″ Inlet, Dual 2.5″ Outlet, 13″ Body Length
- Spintec 343SC – eBay Link
- OR Flowtech 50363FLT (potentially discontinued) – eBay Link
- OR Magnaflow 12158 (2.5″ inlet, stainless) – Amazon Link
- Note: Longer mufflers (especially with OE Fiero routing; max dimensions 15×9.5×5″) may require more complex setups. Examples of longer mufflers:
- MagnaFlow 12265/12266/12267 (Stainless) – Amazon Link
- BORLA 40474 (Stainless) – Amazon Link
- BORLA 400499 (Stainless) – Amazon Link
- Walker 18375 (QUIET, 2.5″ INLET, 2.25″ OUTLET) – Amazon Link
- Cherry Bomb SA2265-CE (2.5″ INLET, 2.5″ OUTLET) – eBay Link
- Note: Welding a bend in the exhaust system will be necessary.
- Donor Car Exhaust Flange (1x): Crucial – Cut from the donor vehicle to integrate with the custom exhaust.
- 90° Bend 3″ Diameter (1x): X AUTOHAUX a22111700ux0403 – Amazon Link
- Note: Tight bend radius essential, likely requiring cutting and re-welding for a sharper angle.
- 180° Bend 3″ Diameter (1x): X AUTOHAUX a22111700ux0413 – Amazon Link
- Note: Tight bend radius essential, likely requiring cutting and re-welding for a sharper angle.
- 90° Bend 2.5″ Diameter (1x 2-PACK): X AUTOHAUX a22111700ux0402 – Amazon Link
- Straight 2.5″ Diameter, 1 ft (1x): X AUTOHAUX a22111700ux0435 – Amazon Link
- 2.5″ Diameter Generic Exhaust Hanger U-Bolts (1x 2-pack): PALOZO EC-2.5 – Amazon Link
- Note: Stock Fiero rubber exhaust hangers can be reused.
- 2.5″ Diameter Exhaust Tips (2x): Re-use stock Fiero exhaust tips.
- Optional: 96-02 Camaro/Firebird Oil Pan for Stock Exhaust Routing (1x): Spectra Premium GMP46A – Amazon Link
- Note: Only needed for stock Fiero-style exhaust routing.
- Optional: 96-02 Camaro/Firebird Oil Pan Pickup Tube (1x): Melling 292S – Amazon Link
- Note: Required if using the 96-02 Camaro/Firebird oil pan for stock exhaust routing.
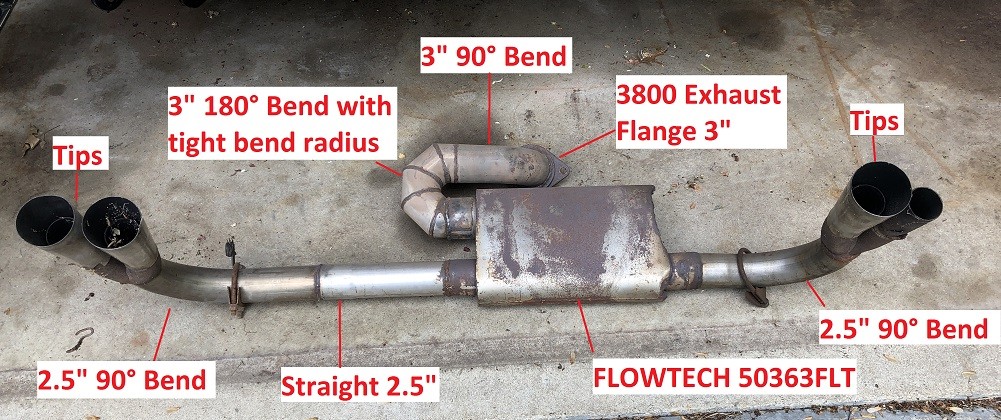 Custom Exhaust Setup Example
—–COOLANT and HOSES—–
Note: Refer to the diagram below for part numbers. Heater hose information is specific to 87-88 Fiero models; earlier models (like the 1986 Pontiac Fiero 2.5L) may require different heater hose configurations. See this YouTube video for cooling system modifications.
- 1 – 3800 Thermostat Housing to Driver’s Side Coolant Hose 1.25″ to 1.25″ (1x): Dayco 71082 – Amazon Link
- Note: Trim ends as needed. Duralast E71082 is also compatible.
- 2 / 3 – Radiator Filler Neck 1.25″ Inlet and 1.25″ Outlet (1x): HCHCSPEED JP2826-SL – Amazon Link
- Note: For coolant filling. Plug overflow nipple. Alternative methods exist. Avoid expensive custom thermostat housings like West Coast Fiero’s. Modified 3800/Fiero thermostat housings might be better for routing heater core lines on 84-86 Fieros.
- 4 – 3800 Water Pump 1.5″ to Passenger’s Fiero Coolant Hose 1.25″ (1x): Gates 21205 – Amazon Link
- Note: Trim small end as needed. DAYCO 71126 is also compatible.
- 5 – Barb Coupling 5/8″-5/8″ ID (1-2x): ICT Billet AN627-10A – Amazon Link
- Note: Or use a barb ball valve shutoff (Sharkbite 22462LFA – Amazon Link) to control coolant flow to the cabin in summer.
- 6 – Heater Hose (1x): 1987-1988 Continental 63113 – eBay Link | Amazon Link or DAYCO C87641 – AutoZone Link
- Note: Suitable for 87-88 Fieros. Earlier models may need longer hoses and a T-fitting in the return coolant pipe (similar to 87-88). Fabricate a retaining bracket as detailed in LostNotForgotton’s Video. The 7/8″ 3800SC heater hose elbow can fit onto the 5/8″ stock 87-88 Fiero heater hose. For 1984-1986, configuration TBD.
- 7 – Aluminum Heater Hose Elbow (1x): Dorman 47065HP – Amazon Link
- Note: Plastic elbows are prone to cracking; aluminum is a durable replacement.
- 8 – Optional: 180° Thermostat (1x): Gates 33428S – Amazon Link or MotoRad 239-180 – Amazon Link or Motorad Failsafe 723-9180 – Amazon Link
- Note: Motorad thermostats with a small hole may simplify system burping but could lead to slower warm-up, P0128 codes, and minor power loss during warm-up.
- 9 – 1″ Expansion Frost Plug (1x): Dorman 02600 / 570-005 – Amazon Link or Dorman 555-018 – Amazon Link
- Note: Plugs the water pump hole originally used for the alternator coolant circuit.
- 10 – 1.5″ to 5/8″(TBD) T-Fitting (1x): TBD – Note: For 84-86 Fieros ONLY.
- 11 – 5/8 (TBD) Hose: TBD – Note: For 84-86 Fieros ONLY.
- 12 – 5/8″ (TBD) Hose: TBD – Note: For 84-86 Fieros ONLY.
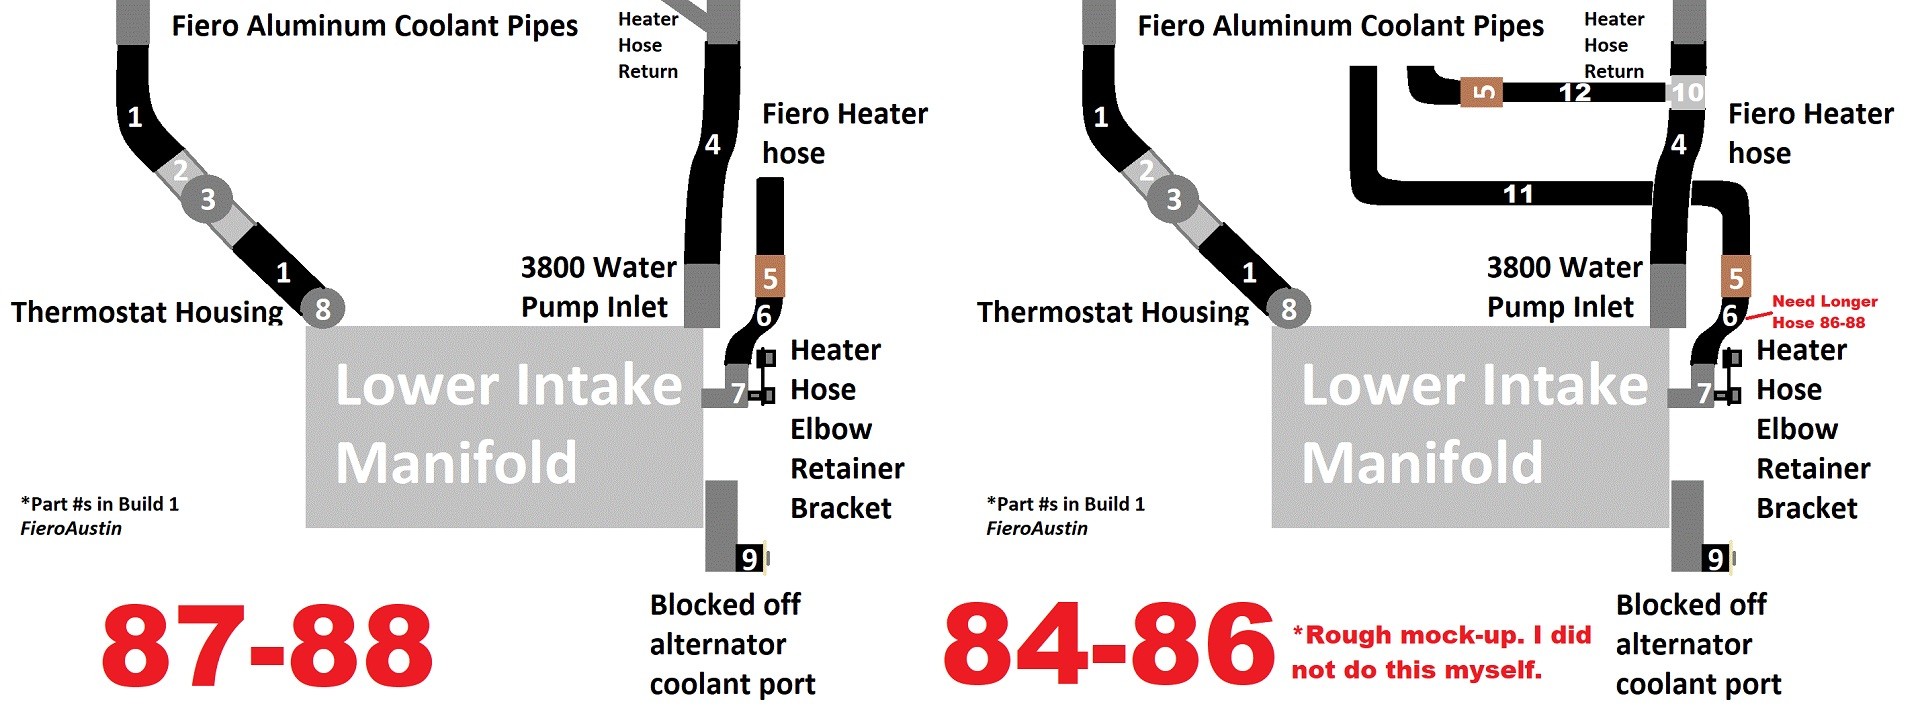 Coolant Hose Diagram
- Coolant/Antifreeze (2x 1 gallon concentrate): Peak PXA0B3 – Amazon Link
- Note: Use any color as long as you don’t mix colors and completely flush the system. Approximately 14 quarts total diluted ~50/50.
- Optional: Bigger Radiator (1x): Champion 166-CC828 – Amazon Link
- Note: Radiator install video: YouTube Link. Highly recommended for hot climates (80°F+) and essential for “Build 2.” Cheaper options are available but quality may vary: Cheaper Radiator Options on Amazon.
- Optional: Better Radiator Fan (1x): Proform 67016 – Amazon Link or eBay Link (8-blade plastic) or Permacool 19115 – Amazon Link (6-blade metal).
- Note: Permacool install instructions: Web Archive Link. Install video: YouTube Link.
- Optional: Hood Vents (1x): GM 10030564 & 10030565 – eBay Link or Paul Angel’s Custom Vents: Angel on Earth Link.
- Note: Contact Paul at [email protected]. Increases radiator airflow.
- Hose Clamp Kit (1x): Amazon Link
—–HARNESS, SENSORS, and COMPUTER (ECU/PCM)—–
Note: Detailed harness building instructions and diagrams are available in the Harness section. Tuning information is in this YouTube video. Consider purchasing pre-made harnesses and PCM tunes from providers like:
-
James L. Brown – Facebook Page
-
Dan McIlmoyle – Facebook Profile
-
West Coast Fiero (expensive) – Website Link
-
Joe Welch (olejoedad) – Fiero.nl Private Message
-
Harness from the Donor Car (1x): Junkyard Search
- Note: 1998-2002 Pontiac Grand Prix GTP harnesses are ideal.
-
Harness from the Fiero (1x): Car-Part.com
- Note: Avoid 1984 Fiero harnesses due to wiring differences.
-
3-Pin Oil Pressure Sender (1x): STANDARD MOTOR PRODUCTS PS245T – Amazon Link
- Note: Stock in 1988 Fiero V6 models.
-
1/4″ NPT Male to Female Elbow (1x): Legines 3420*BB – Amazon Link
- Note: For oil pressure sender relocation, may be needed with FieroRog alternator bracket.
—–PARTS NEEDED IF BUILDING YOUR OWN HARNESS—–
- HPTuners + 2 Credits (1x): HPTuners Website
- Note: Required for VATS deletion, disabling emissions (check local laws), and tuning. See YouTube Video. Unnecessary if purchasing a pre-programmed PCM.
- 3-Pin Oil Pressure Sender Connector (1x): Standard Motor Products HP4480 – Amazon Link
- Note: Stock in 1988 Fiero V6 models.
- 4t65e-HD/4T65e/4T60e Transmission Speed Sensor to Fiero Speedometer Buffer Circuit (1x): Red Devil River Link
- Note: Schematic available in harness section for DIY build. Consider a 125mph Fiero speedometer from junkyards: Car-Part.com.
- In-line 20A Fuse Holders (2x): Bussmann BP/HHG – Amazon Link
- Note: One for the fuel pump.
- 1998-2002 Computer (ECU/PCM) (1x): GM 09357440 – Amazon Link or eBay Link or Junkyard Search
- Note: Source from a 1998-2002 Grand Prix GTP if not from donor car.
- Fuel Pump Relay (1x): Amazon Link
- Note: Only needed for DIY harness; stock Fiero relays can be used.
—–TRANSMISSIONS—–
Note: For bypassing automatic transmission controls in a 3800 engine, see GMTuners Link.
—–MANUAL Transmissions—–
- Spec 3+ Clutch (1x): Spec Clutch Website – Choose clutch type and transmission donor car, then search part number on eBay. Common swap clutches:
- 1985-1988 2.8L Fiero 5spd – Spec SC883F
- 1985-1988 2.5L Fiero – Spec SC783F
- 1984 2.5L 4spd / 1985-1987 2.8L Fiero 4spd – Spec SC773F
- Note: Verify clutch compatibility with your specific manual transmission directly with Spec Clutch.
- F23/F40 Shifter Bracket (1x): [email protected] Fieroguru Performance Website or West Coast Fiero – Website Link or FieroSpace Link
- F23/F40 Shifter Cable (1x): Rodney Dickman Link or West Coast Fiero Link
- Flywheel Bolts (1x): FieroRog KIT or West Coast Fiero Link
- F23 from Cavalier Mounts (1x): Contact FieroRog
- F23 from Cobalt with Cavalier Bell Housing Mounts (1x): FieroSpace Link – Contact Brian Sanburn or FieroSpace Website.
—–4t65e-HD/4T65e/4T60e AUTOMATIC Transmissions—–
- 4t6x Transmission Cooler Line Fittings:
- 2004.5+ GTP Transmission: 3/8″-18 NPSM (1x), 9/16″-18 UNF (1x)
- 2000(2000.5+ GTP)-2004.5 Transmission: 1/4″-18 NPSM (1x), 3/8″-18 NPSM (1x)
- 1990-1999 (2000.5- GTP) Transmission: 1/4″-18 NPSM to -6 AN male (1x 2-pack) ICT Billet 551114 – Amazon Link
- Note: O-ring and straight thread 1/4″ NPSM side to transmission.
- Transmission Line Elbow -6AN to 3/8″ 90 deg Barb (1x 2-pack): EVIL ENERGY EV01111D90 – Amazon Link
- Transmission Hose to Fiero Steel Hose (1x 5ft): Derale 13016 – Amazon Link
- Note: Replaces stock 4t65e-HD/4T65e/4T60e steel lines.
- 4t65e-HD/4T65e/4T60e Shifter Bracket (1x): Contact Chuck Peterson – Facebook Profile or West coast Fiero: Website Link. DIY option: modified Fiero bracket and Chevy Sonic shift arm (GM 95160885 / 96888404 / 95147085 / 96639205 / 95198043 – eBay Link 1 | eBay Link 2).
- Note: 1st gear access issues with West Coast Fiero bracket and 3800 transmission shift arm. James L. Brown may produce these brackets – Facebook Page.
—–TRANSMISSION AXLES—–
—–Buying Axles—–
- Fiero Manual Axles (2x): Re-use stock axles.
- OR F23/F40 Manual Axles (2x): [email protected] Fieroguru Performance Website or West coast Fiero – Website Link
- OR 4t65e-HD/4T65e/4T60e Passenger’s Axle (1x): Stephen Poe – Facebook Profile or West Coast Fiero – Website Link
- Note: Provide transmission type, engine type, Fiero type, mount types, and axle measurements.
- 4t65e-HD/4T65e/4T60e Driver’s Axle (1x): Re-use Automatic Fiero driver’s side axle OR GSP NCV10509 – Amazon Link
—–Building 4t65e-HD/4T65e/4T60e Passenger’s Axle—–
Note: See LostNotForgotton’s axle building video: YouTube Link and GMTuners writeup. Axles below are for 4t65e-HD ONLY and require FieroRog or West Coast Fiero mounts. Verify transmission type from donor car: Wikipedia Link.
- Re-use Driver’s Side GTP Axle OEM (1x): GM 26054707 / Cardone 60-1255 – Amazon Link or Junkyard Search
- Note: Cardone remanufactured axles may or may not use OEM parts.
- Re-use Passenger’s Side GTP Axle OEM (1x): GM 26073392 / Cardone 60-1256 – Amazon Link or eBay Link or Junkyard Search
- Note: Cardone remanufactured axles may or may not use OEM parts.
- Re-use any Manual Fiero Axle OEM (1x): Car-Part.com
- Note: Use OEM parts. Mixing manufacturers may result in fitment issues.
- Axle Boot Inner with Grease (1x): Dorman 614-004 – Amazon Link
- Axle CV Boot Clamps (1x): MIKKUPPA QAT094 – Amazon Link
- Axle CV Boot Clamp Tool (1x): ABN 8542034855 – Amazon Link
—–ACCESSORIES, A/C, and MISCELLANEOUS—–
- Optional: Fiero Factory Service Manuals (1x): RockAuto Link
- Optional: OBD2 Bluetooth Scanner (1x): OBDLink CX – Amazon Link
- Note: Use with a free phone app for troubleshooting. Important for diagnosing OBD2 systems introduced with the 3800 SC swap. For the original 1986 Pontiac Fiero 2.5L systems, which are OBD1, you would need an OBD1 code reader to diagnose those systems independently. This swap introduces a hybrid diagnostic scenario, where the engine is OBD2, but the car’s original systems remain OBD1.
- Optional: Sound Deadening Material for Firewall (1x): KILMAT KLM8018 – Amazon Link or Design Engineering 050502 – Amazon Link
- Note: Design Engineering material is difficult to form; use a Dremel to notch around firewall obstacles. Only necessary if firewall panels vibrate; 25% coverage is sufficient. Primarily dampens vibrations, not sound waves. Cabin noise reduction is better achieved by sealing cabin holes.
- 1/2″ Torque Angle Meter (1x): Performance Tool M205 – Amazon Link
- Note: Required for torqueing OEM bolts. Torque specs: TorkSpec Link.
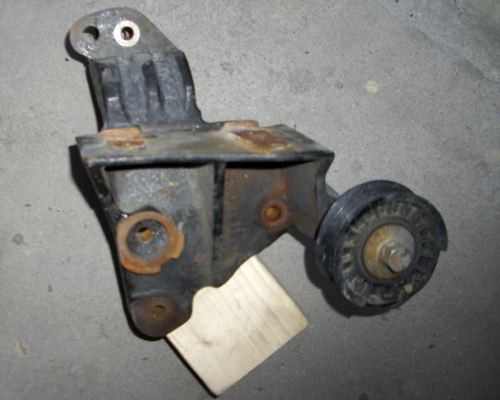
- Accessory Belt Tensioner Pulley (1x): CONTINENTAL 49247 – Amazon Link
- Note: For 1995 Ford Winstar 3.8L, only needed with FieroRog alternator relocation bracket.
- Accessory Belt – 81.5″, 6 Ribs (1x): ROADMAX 6K815AP – Amazon Link
- Note: Belt size may need slight adjustment (±0.5″). Use RockAuto to search using wildcards: RockAuto Link.
- Optional: Engine Blower Blockoff Kit (1x): Campsite Carbon Link
- Note: For 85-87 Factory V6 Fieros with removed engine blower.
- Optional: Magnetic Oil Drain Plug (1x): Dorman 090091 (65372) – Amazon Link
- Optional: A/C Dryer (1x): Four Seasons 33181 – Amazon Link
- Optional: Custom A/C Hose (1x): Contact radiator shops or specialists:
- Larry Hubbert – Facebook Profile
- Chuck Peterson – Facebook Profile or Fiero.nl Forum
- James L. Brown – Facebook Page
- Note: DIY hose video: YouTube Link. Requires R12 port for AC pressure sensor and GTP compressor fitting.
- Optional: R134a AC Seals (3800 side) (1x): Four Seasons 26728 – Amazon Link
- Optional: R134a AC Seals (Fiero Side) (1x): Four Seasons 26735 – Amazon Link
- Note: For R134a conversion, replace all AC system O-rings with HNBR and orifice tube.
- Optional: R134a AC Orifice Tube (1x): ACDELCO 15-5754 – Amazon Link
- Longer 45″ Battery Ground Cable (1x): Schumacher BAF-445S – Amazon Link
- Alternator (1x): ACDELCO 335-1088 – Amazon Link
- Note: Year 2000+ alternator required for FieroRog bracket. 125A model recommended for relocated alternators. Avoid off-brand or remanufactured alternators.
- Optional: Alternator Voltage Boost Circuit (1x): ZZPerformance Link or Easy Performance Link
- Note: May improve charging efficiency of relocated alternators. DIY option: ZZPerformance Blog.
- Optional: A/C Compressor Bypass Pulley (1x): Dorman 34195 – Amazon Link
- Jacks (2x): Amazon Link
- Jack Stands (2x): Amazon Link
—–MOUNTING and BRACKETS—–
Note: This build utilizes FieroRog brackets. Alternatives like West Coast Fiero exist. DIY brackets are possible, but may affect part compatibility. Manual Fieros don’t require cradle-side transmission mounts. Rodney Dickman poly mounts are discontinued but alternatives are available: FieroSpace Poly Mounts. James L. Brown also produces poly mounts – Facebook Page. 1988 Rodney Dickman engine cradle mount may require modification with FieroRog brackets.
- Optional: Adjustable Dogbone Mount (1x): Rodney Dickman Link 1 or Rodney Dickman Link 2
- Note: Solid mounts not recommended due to vibration.
- Rear Frame Floating Cradle Nut Kit (1x): Rodney Dickman Link
- Note: Original cradle nuts are prone to snapping. DIY alternative: weld nut to long steel piece.
—–Rubber Cradle Side Motor/Transmission Mounts—–
- Engine Cradle Mount for 84-85 4cyl, 86-87 4cyl manual, 85-87 V-6 (1x): Westar EM-2472 – Amazon Link
- OR Engine Cradle Mount for 86-87 4cyl automatic, 1988 4cyl & 1988 V-6 (1x): Westar EM-2548 – Amazon Link
- Alternative Poly Engine Cradle Mount (1x): FieroSpace Link
- Note: Poly mounts for original V6 cars only, may increase vibration.
- Front Transmission Mount (1x): DEA A2466 – Amazon Link
- Rear Transmission Mount (1x): Westar EM-2467 – Amazon Link
—–Engine/Transmission Side Brackets—–
- 4t65e-HD/4T65e/4T60e Automatic FieroRog Bracket Kit (1x): Order from FieroRog – Fiero.nl Forum Link or Facebook Profile
- Note: Includes transmission and engine mount brackets, alternator relocation bracket, dogbone mount bracket, and bolts.
- OR Manual Fiero Transmission FieroRog Bracket Kit (1x): Order from FieroRog – Fiero.nl Forum Link or Facebook Profile
- Note: Includes transmission and engine mount brackets, alternator relocation bracket, dogbone mount bracket, bolts, custom flywheel, and flywheel/clutch bolts.
- OR F23/F40 Manual Brackets: [email protected] Fieroguru Performance Website or West Coast Fiero Link
—–PARTS NEEDED IF NOT USING 1998-2002 GTP/Regal DONOR CAR—–
Note: Some parts may be found in junkyards. Junkyard Search. Regal transmission castings may need a spacer.
- 2-Bar MAP Sensor (1x): Standard Motor Products AS4 – Amazon Link
- Note: Only if using a non-supercharged 3800 block/harness.
- GTP/Regal External Transmission Gear Selector Neutral Safety Switch/Range Sensor Switch (1x): Standard Motor Products NS122 – Amazon Link
- Note: Check if your car already has this.
- GTP/Regal Neutral Safety Switch Connectors (1x): ZOOKOTO 88862288 – Amazon Link
- Note: Only if DIY harness.
- GTP/Regal Steel Oil Pan (1x): SPECTRA PREMIUM GMP11B – Amazon Link
- GTP/Regal Oil Pan Gasket (1x): Apex AOP356 – Amazon Link
- Note: May need trimming for non-GTP oil pickup tube.
- GTP/Regal Oil Pan Pickup Tube/Gasket (1x): Melling 256S – Amazon Link
- GTP/Regal Oil Filter Bracket (1x): GM 12569219 ; 24508441 – Amazon Link or eBay Link 1 or eBay Link 2 or Junkyard Search
- Note: Required for FieroRog brackets. See GMTuners Link. Oil filter spacer needed with 5% overdrive balancer pulley: eBay Link. Consider ZZP Oil Volume Kit: ZZPerformance Link.
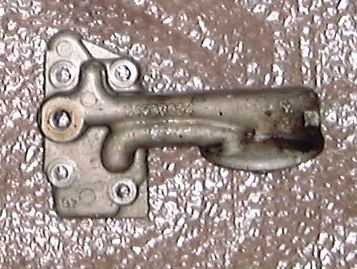 GTP Oil Filter Bracket
- Oil Filter Housing Gasket (1x): MAHLE B31639 – Amazon Link
- Note: Included in ZZP Oil Volume Kit.
- GTP/Regal Angled Coil Pack Bracket (1x): GM 24507211 ; 24504360 – eBay Link 1 or eBay Link 2 or Junkyard Search
- Note: Cut engine mount dogbone off – YouTube Video.
 GTP Coil Pack Bracket
- GTP/Regal Supercharger Tensioner Pulley (1x): Dayco 89367 – Amazon Link
- Note: Should come with GTP/Regal angled coil pack bracket.
- GTP/Regal Supercharger Idler Pulley (1x): Gates 38009 – Amazon Link
- Note: Should come with GTP/Regal angled coil pack bracket.
- Optional: Torque Converter (1x): DACCO B21JXFM – Amazon Link or eBay Link
- Note: Stall information: Atracom PDF Link. Bonneville SSEI/Park Avenue Ultra (JSFM) converters may have too low stall. GTP/Regal (JTFM) or higher stall (JZFM, JXFM) converters recommended (JXFM is highest stall and not factory supercharged). Fill torque converter with transmission fluid before install.
- GTP/Regal 3-Pin Temperature Sender (1x): Standard Motor Products TX66 – Amazon Link
- Note: Check if your car is already equipped with a 3-pin sensor.
- GTP/Regal 3-Pin Temperature Sender Connector (1x): Standard Motor Products HP4440 – Amazon Link
- Note: Only for DIY harness, check if car already has 3-pin sensor.
- Northstar Throttle Body, Adapters, and Throttle Bracket: See “Build 2” Air section.
- Note: Only for Series III/Gen V motors.
—–WEAR and MAINTENANCE PARTS for 3800SC—–
Note: Highly recommended to replace these wear parts during the swap.
Click here to view Wear Parts on Amazon
Click here to view ALL 3800 Repair Parts on Amazon
* = parts especially prone to wear on 3800 engines.
—–WEAR PARTS NOT DUPLICATED IN ANY BUILD—–
*Supercharger Coupler (1x): eBay Link or Dorman 917-022 – Amazon Link*Supercharger Snout Bearing Set (1x): Amazon Link*4t65e-hd Shift Solenoids (3x): GM 24219819 – Amazon Link- Note: Install Video: YouTube Link.
*Valve Covers:- Plastic Front (1x): Dorman 264-964 – Amazon Link
- Plastic Rear (1x): GM 12590364 – Amazon Link
- OR Aluminum Set (1x): eBay Link 1 or Amazon Link 2
- Note: Grey plastic valve covers are prone to cracking.
- Knock Sensor (2x): STANDARD MOTOR PRODUCTS KS45 – Amazon Link
- Transmission Oil Filter Kit (1x): ATP TF-161 – Amazon Link
- Transmission Oil Pan Gasket (1x):
- 8mm bolt holes/13mm bolt heads – ACDELCO 24204624 (1x): Amazon Link
- OR 6mm bolt holes/10mm bolt heads – ATP JG143 (1x): Amazon Link
- Note: Check your transmission oil pan bolt size. Avoid cork or paper gaskets from filter kits.
- Oil 10W30 (4.5 quarts): Penzoil 550045214 – Amazon Link
- Oil Filter (1x): ACDELCO PF47E – Amazon Link
- Supercharger Oil (2x): GM 12345982 – Amazon Link
- Optional: Ultraviolet Dye and Light for Fluid Leaks:
- UV Flashlight (1x): EOWCO E1 – Amazon Link
- UV Fuel/Oil/Power Steering/Transmission Fluid Dye (1x): ACDelco 1148963 – Amazon Link
- UV Coolant Dye (1x): GM 12378563 – Amazon Link
—–WEAR PARTS DUPLICATED IN BUILD 1 (ABOVE)—–
- Colder Spark Plugs – Autolite 104 – Amazon Link
- 180° Thermostat – MotoRad 239-180 – Amazon Link
*Valve Cover Seals – Ultra-Power VS50465R – Amazon Link*Aluminum Heater Hose Elbow – Dorman 47065HP – Amazon Link- Spark Plug Wire Kit – Taylor Cable 83253 – Amazon Link
- Spark Plug Wire Crimper – MSD 3503 – Amazon Link
—–WEAR PARTS DUPLICATED IN BUILD 2 (BELOW)—–
- Automatic Transmission Service Overhaul Kit – GM Genuine Parts 19258573 – Amazon Link
- Note: Required for shift solenoids, hardened input shaft, 4th clutch shaft, and pump shaft. Overhaul video: YouTube Link.
- Transmission Fluid Dexron III – Valvoline UM746 – Amazon Link
*Intake Manifold Gasket Set – ACDelco 89017825 – Amazon Link- Grey Gasket Maker – Permatex 85144 – Amazon Link
- Series III/GENV Supercharger Upper Intake Manifold Plenum Gasket Set – Apex AMS3735 – Amazon Link
- OR Series II / Gen3 Upper Intake Manifold Plenum Gasket Set – FEL-PRO MS95744 – Amazon Link
- Note: ZZP Phenolic Spacer and intercooler kits include gaskets.
*Flexplate Bolts – GM 24501365 – Amazon Link- Note: Only if removing automatic flexplate. Yield bolts, replace. Manual transmissions use different flywheel bolts (see FieroRog section).
- Oil Pump Kit – Melling K195 – Amazon Link
- Head Gasket:
- OEM Style (not reusable):
- RHS – FEL-PRO 9918 PT – Amazon Link
- LHS – FEL-PRO 9917 PT – Amazon Link
- OR MLS Head Gasket (reusable):
- RHS stock height – Cometic C5721-066 – Amazon Link
- LHS stock height – Cometic C5720-066 – Amazon Link
- RHS higher compression – Cometic C5721-060 – Amazon Link
- LHS higher compression – Cometic C5720-060 – Amazon Link
- OR INTENSE Racing options: INTENSE Racing Link
- Note: Pistons ~0.025″ out of cylinder hole, aim for 0.038″-.046″ quench. MLS gaskets require perfectly flat and clean surfaces, may need decking. MLS gaskets reusable (unless heat cycled). Copper spray may be needed for coolant passage sealing with MLS. LHS gasket (arrow and “L”) goes on cylinder 1/3/5 side.
- OEM Style (not reusable):
- Head Bolts – FEL-PRO ES 74033 – Amazon Link
- OR Reusable Head Studs – ARP 193-4001 – Amazon Link
- Note: ARP Head Stud Instructions: ARP Tech Link. Do NOT use ARP thread sealant; use Permatex Ultra Black Gasket Maker. Head studs required for head gasket.
- Head Stud Sealant – Permatex 82180 – Amazon Link
- Note: Do not get sealant on head deck surface. Head stud sealing video: YouTube Link. Required for head studs.
- ARP 7/16″-14 Thread Chaser – ARP 911-0004 – Amazon Link
- Note: Cleans sealant from head bolt threads. Do NOT use a tap. Required for head bolts/studs.
*Camshaft Bolt – GM 24501366 – Amazon Link or INTENSE Racing Link or eBay Link- Note: Only if changing camshaft.
*Crankshaft/Harmonic Balancer Bolt – GM 24504736 – Amazon Link- Note: Balancer bolt swap video: YouTube Link. Yield bolt, required for balancer/front cover/timing chain/camshaft/balance shaft removal.
*Rocker Bolts:- Non-reusable kit – GM 24503515 – Amazon Link
- OR Reusable kit – S23BLTS-12 – eBay Link
- Note: Reusable kit comes with 1.9 Rockers. Required if changing camshaft, head gasket, or timing chain.
- High Strength Threadlocker – Loctite 272 – Amazon Link
- Note: For rocker bolts and plastic lifter retainers. Required for reusable rocker bolts/1.9 rockers.
*Timing Chain – Melling 381A – Amazon Link- Note: Replaced with double roller in “Build 2,” requires balance shaft deletion.
*Timing Chain Tensioner Damper – GM 24503893 – Amazon Link- Note: Tensioner swap video: YouTube Link. Deleted in “Build 2.”
- Extra Thick Front Cover Gasket – ZZP ZZ-FCGG – eBay Link or GM 12587003 – Amazon Link
- Note: ZZP gasket needed for double roller timing chain. GM gasket not extra thick. Required if changing camshaft, timing chain, or balance shaft deletion.
- Crankshaft Seal REAR – National 320691 – Amazon Link
- Crankshaft Seal FRONT – GM 12582313 – Amazon Link
- Note: Seal swap video: YouTube Link.
- Fuel Injector O-ring Pack – Dorman 90100 – Amazon Link
- Note: Use thick brown o-rings from pack for DEKA injectors.
- Intake/Exhaust Valve Stem Seals – FEL-PRO SS 72144 – Amazon Link
- Water Pump – US MOTOR WORKS US5075 – Amazon Link or Electric Water Pump – Meziere WP140 – eBay Link
- Aluminum Water Pump Gasket – Fel-Pro 35804 – Amazon Link
- Thread Sealant – Permatex 80632 – Amazon Link
- Note: For bolts in water/oil jackets (water pump, front cover, timing chain, camshaft, tensioner, lower intake manifold, etc.).
—–FieroAustin1988 GT 3800SC Series III 2.8″ Pulley—–
- Amazon Recommendation Store: Amazon Link
- 3800sc Instructions: Fiero.nl Forum Link
- 3800sc Instructions MOBILE: Google Drive Link
- eBay Affiliate: eBay Link
- Donate: PayPal Link
- Join Channel Membership: YouTube Join Link
- Subscribe: YouTube Subscribe Link
- Consulting: Facebook Page
- Facebook Subscribers Group: Facebook Supporters Link
Diagnostic Considerations for your 1986 Pontiac Fiero 2.5L and the 3800 SC Swap
When undertaking a 3800 supercharged engine swap into a classic vehicle like a 1986 Pontiac Fiero 2.5L, understanding the diagnostic landscape is crucial. Your 1986 Fiero, in its original configuration, utilizes an OBD1 (On-Board Diagnostics 1) system. OBD1 systems are less sophisticated than modern OBD2 (On-Board Diagnostics 2), offering limited data and requiring specific, often vehicle-manufacturer-dependent code readers.
The 3800 SC engine, particularly if sourced from a 1998-2002 Pontiac Grand Prix GTP or Buick Regal, comes with its OBD2 engine management system. This swap, therefore, introduces a more advanced diagnostic capability for the engine itself, but it’s important to recognize the diagnostic duality you’ll now have in your Fiero:
OBD1 for Original Fiero Systems:
- The original systems of your 1986 Fiero, such as the chassis electricals, some sensor readings outside the engine management, and potentially the original transmission control (if automatic and retained), will still be diagnosed via the OBD1 system.
- Diagnosing these systems will require an OBD1 code reader compatible with GM vehicles of that era. These readers are available, but are distinct from the OBD2 readers used for modern cars.
- Accessing OBD1 codes typically involves locating the Assembly Line Diagnostic Link (ALDL) connector, which is different from the OBD2 connector and is usually found under the dashboard.
OBD2 for the 3800 SC Engine:
- Once the 3800 SC engine and its PCM are installed, engine-related diagnostics shift to the OBD2 standard.
- For engine diagnostics (engine misfires, sensor failures within the 3800 system, etc.), you will use a standard OBD2 code reader. The OBD2 connector from your donor car’s harness will be the access point.
- The OBD2 system provides a wealth of data, including live sensor readings, and uses standardized codes, making diagnosis more straightforward than OBD1 for the engine itself.
Key Diagnostic Tools to Consider:
- OBD1 Code Reader for 1986 Pontiac Fiero: Invest in a reliable OBD1 code reader that is compatible with early GM vehicles. This will be essential for diagnosing any issues within the original Fiero systems both before and after the engine swap.
- OBD2 Code Reader (Bluetooth Recommended): As suggested in the parts list, an OBD2 Bluetooth scanner like the OBDLink CX is highly recommended. This will allow you to leverage smartphone apps for reading codes, viewing live data, and performing more in-depth diagnostics of the 3800 SC engine system.
- Multimeter and Wiring Diagrams: For both OBD1 and OBD2 systems, a multimeter is an invaluable tool for electrical troubleshooting. Acquiring wiring diagrams for both your 1986 Fiero and the donor car will be essential for tracing circuits, verifying sensor signals, and ensuring correct wiring during the swap.
Pre-Swap Diagnostic Steps for Your 1986 Pontiac Fiero 2.5L:
Before beginning the 3800 SC swap, it’s wise to perform a diagnostic check of your 1986 Fiero’s existing systems using an OBD1 reader. This pre-emptive step can help identify and resolve any pre-existing issues, ensuring a smoother swap process. Check for codes related to:
- Engine Management (Original 2.5L System): While this system will be replaced, checking for current codes can reveal sensor or wiring issues that might be indicative of broader electrical problems in the car.
- Transmission (if Automatic): If retaining the original automatic transmission for initial setup, check for OBD1 transmission codes.
- Charging System: Verify the health of the alternator and battery, as electrical demands will change with the new engine system.
Post-Swap Diagnostic Strategy:
After completing the 3800 SC swap, your diagnostic approach will become twofold:
- OBD2 Diagnostics for Engine Performance: Primarily, you will use your OBD2 reader to monitor the 3800 SC engine’s performance. Pay close attention to initial engine runs for any check engine lights or pending codes. Common post-swap issues can include wiring errors, vacuum leaks, or sensor connection problems within the new engine system.
- OBD1 Diagnostics for Original Car Systems: Continue to use your OBD1 reader to monitor the original Fiero systems. Issues unrelated to the engine swap, such as lighting problems, fuel delivery (to the fuel pump, which you may have upgraded but is still part of the original car’s system), or brake system issues, will still fall under the OBD1 diagnostic domain.
Bridging the Diagnostic Gap:
The key to successful diagnostics post-swap is recognizing that you are now working with two diagnostic eras within one vehicle. Efficient troubleshooting will involve:
- Clearly identifying whether the issue is engine-related (likely OBD2 domain) or related to the car’s original systems (OBD1 domain).
- Having both OBD1 and OBD2 diagnostic tools readily available.
- Understanding that some issues may be integration-related, requiring careful tracing of wiring and connections between the old and new systems.
By preparing for this diagnostic duality, you’ll be well-equipped to handle any troubleshooting needs that arise during and after your 3800 SC engine swap, ensuring optimal performance and reliability for your revitalized Pontiac Fiero.
Conclusion:
The 3800 Supercharged engine swap is a transformative upgrade for any Pontiac Fiero, offering a significant boost in power and performance. By utilizing this comprehensive guide, you’ll be well-prepared with a detailed parts list and essential considerations for a successful build. Remember to pay close attention to the diagnostic aspects, particularly the distinction between OBD1 for your classic Fiero and OBD2 for the modern 3800 SC engine, ensuring you have the tools and knowledge for both pre-swap checks and post-installation maintenance. This blend of classic car charm with modern engine technology provides a unique and exhilarating driving experience.