The On-Board Diagnostics II (OBD2) port in your 04 Acura TL is crucial for vehicle diagnostics and performance monitoring. If you’re experiencing issues connecting your diagnostic tools, or suspect a problem with your OBD2 port, testing it with a multimeter is a straightforward process. This guide will walk you through the steps to check the functionality of your 04 Tl Obd2 Port, ensuring you can effectively communicate with your vehicle’s computer system.
Locating the OBD2 Port in Your 04 Acura TL
Before testing, you’ll need to locate the OBD2 port. In most vehicles, including the 04 Acura TL, the OBD2 port is typically found under the dashboard on the driver’s side. Look for a 16-pin connector, often near the steering column or in the footwell area. Once located, ensure you have clear access to it for testing.
Testing the 04 TL OBD2 Port with a Multimeter
To diagnose potential issues with your 04 TL OBD2 port, you can perform a series of continuity and voltage checks using a multimeter. These tests will help determine if the port is receiving power and ground correctly.
Ground Continuity Test (Pins 4 & 5)
- Ground Connection: Set your multimeter to continuity mode.
- Pin 4 Test: Check for continuity between Pin 4 of the OBD2 port and a known vehicle ground. A solid ground point can often be found on the metal chassis behind the driver’s side kick panel. You should hear a beep or see a near-zero ohm reading, indicating a good ground connection.
- Pin 5 Test: Repeat the continuity test for Pin 5 and the same vehicle ground. Again, a beep or near-zero ohm reading is expected, confirming a good ground.
- Voltage Between Pins 4 & 5: Set your multimeter to measure DC voltage. Place the red lead on Pin 4 and the black lead on Pin 5. The voltage reading should be very low, ideally less than 2V, and in this case, around 0.5mV is acceptable, indicating a proper ground circuit.
Power and Ground Voltage Test (Pin 16)
- Voltage to Ground (Pin 16): Set your multimeter to measure DC voltage. Place the red lead on Pin 16 (power pin) and the black lead on the vehicle ground. You should expect a reading close to your vehicle’s battery voltage. A reading around 12.23V, as in the original test, is healthy, indicating that Pin 16 is receiving power.
- Voltage Between Pins 4 & 16: Place the red lead on Pin 16 and the black lead on Pin 4. The voltage reading should again be close to battery voltage. A reading of 12.26V is within the expected range.
- Voltage Between Pins 5 & 16: Place the red lead on Pin 16 and the black lead on Pin 5. Similar to the previous test, you should see a voltage reading around battery voltage. 12.26V is a normal reading.
All these voltage and continuity readings within the expected ranges suggest that the electrical components of your 04 TL OBD2 port are functioning correctly.
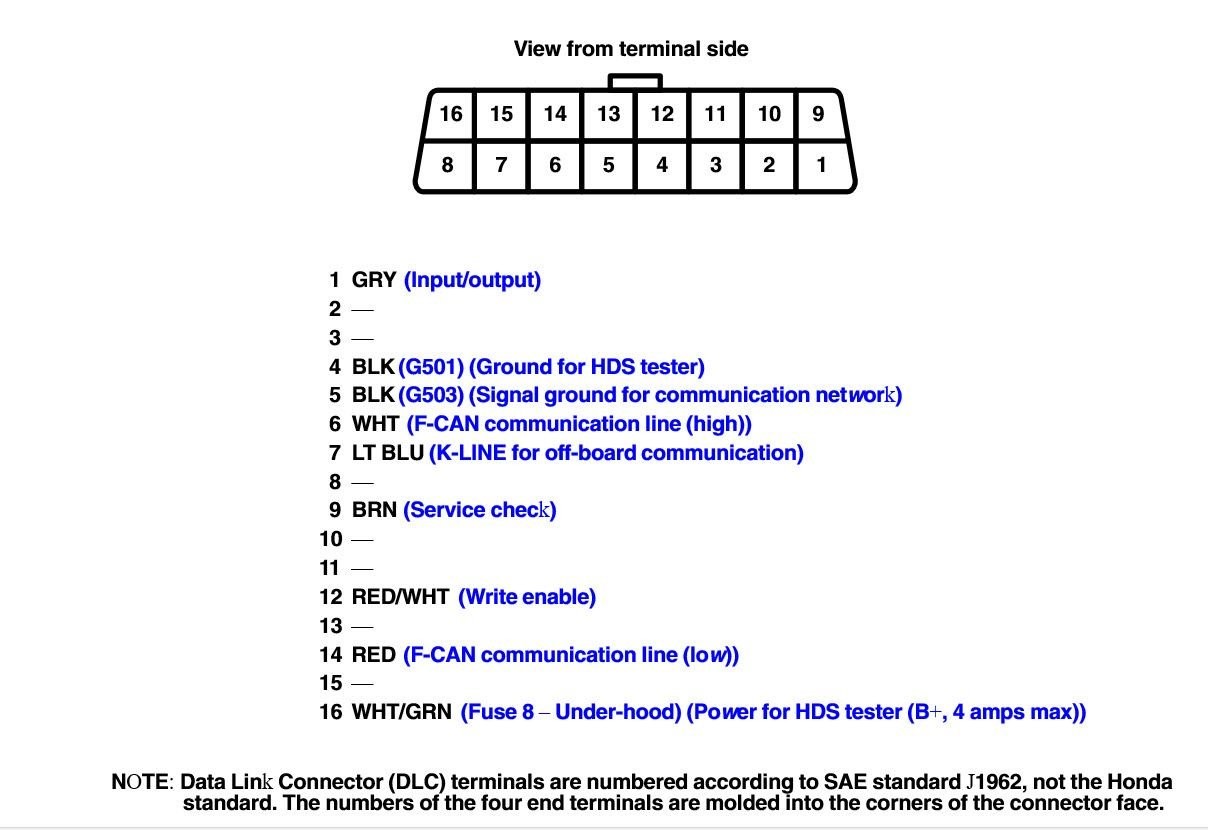 OBDII port pinout diagram with pin numbers and descriptions for automotive diagnostics.
Addressing Connection Issues with Your 04 TL OBD2 Port
If your electrical tests are successful, but you still struggle to establish a stable connection with diagnostic devices, the issue might be physical. A loose or damaged OBD2 port can prevent devices from seating properly.
- Physical Inspection: Carefully inspect the OBD2 port for any signs of physical damage, bent pins, or looseness.
- Comparison with a Working Port: If possible, compare the feel of connecting a device to your 04 TL OBD2 port with a known good port, like the one in your wife’s 2007 Acura RDX, as mentioned in the original post. A properly functioning port should provide a firm and secure connection.
- Secure Mounting: Consider ways to better secure your diagnostic device to the port if a loose connection is suspected. However, a more permanent solution might be needed if the port itself is damaged or worn.
Conclusion
Diagnosing your 04 Acura TL OBD2 port involves both electrical testing and physical inspection. By following these steps, you can determine if the port is functioning correctly or if further action, such as port replacement, is necessary. If electrical tests pass but connection issues persist, a physical problem with the port is likely, requiring careful inspection and potential repair or replacement to ensure reliable diagnostic access to your vehicle’s systems.