Understanding the fuse box diagram of your 2008 Cadillac Escalade is crucial for diagnosing and resolving electrical issues, including problems related to your OBD2 port. Fuses protect your vehicle’s electrical circuits from overloads, and knowing their locations and functions can save you time and money on repairs. This guide provides a comprehensive overview of the 2008 Cadillac Escalade fuse box locations and diagrams, with a focus on fuses that might affect your OBD2 functionality.
The 2008 Cadillac Escalade utilizes three distinct fuse boxes, each serving different vehicle systems:
- Underhood Fuse Block: Located in the engine compartment, this box houses fuses and relays for critical engine and powertrain components.
- Instrument Panel Fuse Block: Situated inside the vehicle, often behind a panel in the dashboard or under the steering wheel, this box protects circuits for interior electronics and accessories.
- Center Instrument Panel Fuse Block: Also located within the interior, typically in the center console area, this box manages fuses for additional interior features.
Let’s explore each fuse box in detail with diagrams and fuse descriptions to help you locate the specific fuse you need, including potential fuses related to your OBD2 port.
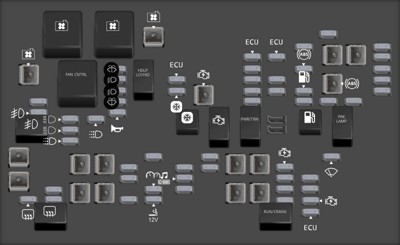
Underhood Fuse Block Diagram
The underhood fuse block is the primary power distribution center for your 2008 Cadillac Escalade’s engine and related systems. It’s essential to check this box first for issues concerning engine control, fuel delivery, and other vital functions.
 2008 Cadillac Escalade underhood fuse box diagram
2008 Cadillac Escalade underhood fuse box diagram showcasing location of fuses for engine controls, fuel pump, and other critical vehicle systems.
| Fuse Number | Type | Description |
|---|---|---|
| 1 | Fuse MINI | Right Trailer Stop/Turn Lamp |
| 2 | Fuse MINI | Electronic Stability Suspension Control, Automatic Level Control Exhaust |
| 3 | Fuse MINI | Left Trailer Stop/Turn Lamp |
| 4 | Fuse MINI | Engine Controls |
| 5 | Fuse MINI | Engine Control Module, Throttle Control |
| 6 | Fuse MINI | Trailer Brake Controller |
| 7 | Fuse MINI | Front Washer |
| 8 | Fuse MINI | Oxygen Sensors |
| 9 | Fuse MINI | Antilock Brakes System 2 |
| 10 | Fuse MINI | Trailer Back-up Lamps |
| 11 | Fuse MINI | Driver Side Low-Beam Headlamp |
| 12 | Fuse MINI | Engine Control Module (Battery) |
| 13 | Fuse MINI | Fuel Injectors, Ignition Coils (Right Side) |
| 14 | Fuse MINI | Transmission Control Module (Battery) |
| 15 | Fuse MINI | Vehicle Back-up Lamps |
| 16 | Fuse MINI | Passenger Side Low-Beam Headlamp |
| 17 | Fuse MINI | Air Conditioning Compressor |
| 18 | Fuse MINI | Oxygen Sensors |
| 19 | Fuse MINI | Transmission Controls (Ignition) |
| 20 | Fuse MINI | Fuel Pump |
| 21 | Fuse MINI | Fuel System Control Module |
| 22 | Fuse MINI | Headlamp Washers |
| 23 | Fuse MINI | Rear Windshield Washer |
| 24 | Fuse MINI | Fuel Injectors, Ignition Coils (Left Side) |
| 25 | Fuse MINI | Trailer Park Lamps |
| 26 | Fuse MINI | Driver Side Park Lamps |
| 27 | Fuse MINI | Passenger Side Park Lamps |
| 28 | Fuse MINI | Fog Lamps |
| 29 | Fuse MINI | Horn |
| 30 | Fuse MINI | Passenger Side High-Beam Headlamp |
| 31 | Fuse MINI | Daytime Running Lamps |
| 32 | Fuse MINI | Driver Side High-Beam Headlamp |
| 33 | Fuse MINI | Daytime Running Lights 2 |
| 34 | Fuse MINI | Sunroof |
| 35 | Fuse MINI | Key Ignition System, Theft Deterrent System |
| 36 | Fuse MINI | Windshield Wiper |
| 37 | Fuse MINI | SEO B2 Upfitter Usage (Battery) |
| 38 | Fuse MINI | Electric Adjustable Pedals |
| 39 | Fuse MINI | Climate Controls (Battery) |
| 40 | Fuse MINI | Airbag System (Ignition) |
| 41 | Fuse MINI | Amplifier |
| 42 | Fuse MINI | Audio System |
| 43 | Fuse MINI | Miscellaneous (Ignition), Cruise Control |
| 44 | Fuse MINI | Liftgate Release |
| 45 | Fuse MINI | Airbag System (Battery) |
| 46 | Fuse MINI | Instrument Panel Cluster |
| 47 | Fuse MINI | Power Take-Off |
| 48 | Fuse MINI | Auxiliary Climate Control (Ignition), Compass-Temperature Mirror |
| 49 | Fuse MINI | Center High-Mounted Stoplamp (CHMSL) |
| 50 | Fuse MINI | Rear Defogger |
| 51 | Fuse MINI | Heated Mirror |
| 52 | Fuse MINI | SEO B1 Upfitter Usage (Battery) |
| 53 | Fuse MINI | Cigarette Lighter, Auxiliary Power Outlet |
| 54 | Fuse MINI | Automatic Level Control Compressor Relay, SEO Upfitter Usage |
| 55 | Fuse MINI | Climate Controls (Ignition) |
| 56 | Fuse MINI | Engine Control Module, Secondary Fuel Pump (Ignition) |
| 57 | Fuse FMX/JCase | Cooling Fan 1 |
| 58 | Fuse FMX/JCase | Automatic Level Control Compressor |
| 59 | Fuse FMX/JCase | Heavy Duty Antilock Brake System |
| 60 | Fuse FMX/JCase | Cooling Fan 2 |
| 61 | Fuse FMX/JCase | Antilock Brake System 1 |
| 62 | Fuse FMX/JCase | Starter |
| 63 | Fuse FMX/JCase | Stud 2 (Trailer Brakes) |
| 64 | Fuse FMX/JCase | Left Bussed Electrical Center 1 |
| 65 | Fuse FMX/JCase | Electric Running Boards |
| 66 | Fuse FMX/JCase | Heated Windshield Washer System |
| 67 | Fuse FMX/JCase | Four-Wheel Drive System |
| 68 | Fuse FMX/JCase | Stud 1 (Trailer Connector Battery Power) |
| 69 | Fuse FMX/JCase | Mid-Bussed Electrical Center 1 |
| 70 | Fuse FMX/JCase | Climate Control Blower |
| 71 | Fuse FMX/JCase | Power Liftgate Module |
| 72 | Fuse FMX/JCase | Left Bussed Electrical Center 2 |
| FAN HI | Relay | Cooling Fan High Speed |
| FAN LO | Relay | Cooling Fan Low Speed |
| FAN CNTRL | Relay | Cooling Fan Control |
| HDLP LO/HID | Relay | Hi Intensity Discharge Headlamp |
| FOG LAMP | Relay | Front Fog Lamps |
| A/C CMPRSR | Relay | Air Conditioning Compressor |
| STRTR | Relay | Starter |
| PWR/TRN | Relay | Powertrain |
| FUEL PMP | Relay | Fuel Pump |
| PRK LAMP | Relay | Parking Lamps |
| REAR DEFOG | Relay | Rear Defogger |
| RUN/CRANK | Relay | Switched Power |
OBD2 Fuse Considerations in the Underhood Fuse Box:
While there isn’t a fuse explicitly labeled “OBD2” or “Diagnostic Port,” the OBD2 port’s functionality is tied to the vehicle’s computer systems. Therefore, fuses related to the Engine Control Module (ECM) and Transmission Control Module (TCM) are crucial for OBD2 operation. In the Underhood Fuse Block, pay close attention to:
- Fuse 5 (Engine Control Module, Throttle Control): A blown fuse here could disrupt communication with the ECM, affecting OBD2 data.
- Fuse 12 (Engine Control Module (Battery)): This fuse provides constant power to the ECM.
- Fuse 14 (Transmission Control Module (Battery)): Essential for TCM operation, which can also be accessed via OBD2.
- Fuse 56 (Engine Control Module, Secondary Fuel Pump (Ignition)): Another fuse linked to ECM operation.
If you are experiencing issues with your OBD2 scanner connecting to your 2008 Escalade, checking these ECM/TCM related fuses in the underhood fuse box is a vital first step.
Instrument Panel Fuse Block Diagram
The instrument panel fuse box is responsible for protecting various interior circuits, including convenience features and some lighting. It’s typically accessible from inside the cabin.
 2008 Cadillac Escalade instrument panel fuse box diagram
Diagram of the 2008 Cadillac Escalade instrument panel fuse box, highlighting fuses for interior lights, door locks, and rear climate controls.
| Fuse Number | Type | Description |
|---|---|---|
| 1 | Fuse MINI 20A | Rear Seats |
| 2 | Fuse MINI 20A | Rear Accessory Power Outlet |
| 3 | Fuse MINI 2A | Steering Wheel Controls Backlight |
| 4 | Fuse MINI 15A | Driver Door Module |
| 5 | Fuse MINI 15A | Dome Lamps, Driver Side Turn Signal |
| 6 | Fuse MINI 15A | Driver Side Turn Signal, Stoplamp |
| 7 | Fuse MINI 10A | Instrument Panel Back Lighting |
| 8 | Fuse MINI 15A | Passenger Side Turn Signal, Stoplamp |
| 9 | Fuse MINI 15A | Passenger Door Module, Universal Home Remote System |
| 10 | Fuse MINI 15A | Power Door Lock 2 (Unlock Feature) |
| 11 | Fuse MINI 15A | Power Door Lock 2 (Lock Feature) |
| 12 | Fuse MINI 15A | Stoplamps, Center-High Mounted Stoplamp |
| 13 | Fuse MINI 30A | Rear Climate Controls |
| 14 | Fuse MINI 2A | Not Used |
| 15 | Fuse MINI 10A | Body Control Module (BCM) |
| 16 | Fuse MINI 20A | Accessory Power Outlets |
| 17 | Fuse MINI 10A | Interior Lamps |
| 18 | Fuse MINI 15A | Power Door Lock 1 (Unlock Feature) |
| 19 | Fuse MINI 5A | Rear Seat Entertainment |
| 20 | Fuse MINI 10A | Ultrasonic Rear Parking Assist, Power Liftgate |
| 21 | Fuse MINI 15A | Power Door Lock 1 (Lock Feature) |
| 22 | Fuse MINI 10A | Driver Information Center (DIC) |
| 23 | Fuse MINI 25A | Rear Wiper |
| 24 | Fuse MINI 30A | Not Used |
| 25 | Fuse MINI 10A | Driver Seat Module, Remote Keyless Entry System |
| 26 | Fuse MINI 15A | Not Used |
| LT DR | Connector | Driver Door Harness Connection |
| BODY1 | Connector | Harness Connector |
| BODY2 | Connector | Harness Connector |
OBD2 Fuse Considerations in the Instrument Panel Fuse Box:
The Body Control Module (BCM) plays a role in overall vehicle electronics and communication. While less directly related to OBD2 than the ECM, a problem with the BCM could indirectly affect diagnostic functions.
- Fuse 15 (Body Control Module (BCM)): Check this fuse if you suspect a broader electrical issue affecting interior systems and potentially OBD2 communication.
Center Instrument Panel Fuse Block Diagram
The center instrument panel fuse box is often the least accessed but protects circuits for specific interior accessories and features located in the center console or dashboard area.
 2008 Cadillac Escalade center instrument panel fuse box diagram
Center instrument panel fuse box diagram for the 2008 Cadillac Escalade detailing connectors and circuit breakers for power windows and seats.
| Fuse Number | Type | Description |
|---|---|---|
| BODY 2 | Connector | Body Harness Connector 2 |
| BODY 1 | Connector | Body Harness Connector 1 |
| BODY 3 | Connector | Body Harness Connector 3 |
| HEADLINER 3 | Connector | Headliner Harness Connector 3 |
| HEADLINER 2 | Connector | Headliner Harness Connector 2 |
| HEADLINER 1 | Connector | Headliner Harness Connector 1 |
| SEO/UPFITTER | Connector | Special Equipment Option Upfitter Harness Connector |
| CB1 | Circuit breaker ATO | Passenger Side Power Window Circuit Breaker |
| CB2 | Circuit breaker ATO | Passenger Seat Circuit Breaker |
| CB3 | Circuit breaker ATO | Driver Seat Circuit Breaker |
| CB4 | Circuit breaker ATO | Rear Sliding Window |
OBD2 Fuse Considerations in the Center Instrument Panel Fuse Box:
This fuse box is less likely to contain fuses directly related to OBD2 functionality. It mainly deals with body and accessory circuits. However, always ensure all fuse boxes are checked when troubleshooting electrical problems.
Troubleshooting Your 2008 Escalade OBD2 Port with Fuses:
If you’re experiencing issues with your OBD2 port, such as a scanner not powering on or failing to communicate, follow these steps:
- Consult your owner’s manual: Locate the fuse box diagrams in your 2008 Cadillac Escalade owner’s manual for precise locations and fuse numbers. While this guide is comprehensive, your manual is vehicle-specific.
- Check Underhood Fuse Box Fuses: Begin by inspecting fuses 4, 5, 12, 14, and 56 in the underhood fuse box, as these are related to the ECM and TCM, which are vital for OBD2 operation.
- Check Instrument Panel Fuse Box Fuse 15: Inspect fuse 15 in the instrument panel fuse box, related to the BCM.
- Visually Inspect Fuses: Remove each fuse and visually inspect the wire inside. If the wire is broken or melted, the fuse is blown and needs replacement.
- Use a Fuse Tester: For a more accurate check, use a fuse tester. This tool will quickly indicate if a fuse is blown without needing to remove it.
- Replace Blown Fuses: Replace any blown fuses with new fuses of the exact same type and amperage rating. Using a fuse with a higher amperage rating can damage your vehicle’s electrical system.
- Test Your OBD2 Port: After checking and replacing fuses, try connecting your OBD2 scanner again to see if the issue is resolved.
Important Notes:
- Always turn off the ignition and remove the key before working with fuses.
- Never replace a fuse with one of a higher amperage rating.
- If fuses repeatedly blow, it indicates a more serious electrical problem that requires professional diagnosis and repair.
- Keep spare fuses of various amperage ratings in your vehicle for emergencies.
By understanding the fuse box diagrams and the function of each fuse, you can effectively troubleshoot electrical issues in your 2008 Cadillac Escalade, including problems related to your OBD2 port. Remember to consult your owner’s manual for the most accurate and vehicle-specific information.