Experiencing issues with your 2006 Gmc Obd2 Port can be frustrating, especially when you need to diagnose a problem with your vehicle. A non-functioning OBD2 port prevents you from using diagnostic scanners to read trouble codes, hindering your ability to understand and fix car issues. If you’re also noticing that your cigarette lighter port isn’t working correctly, it could be related. This guide will walk you through a simple troubleshooting process to get your 2006 GMC OBD2 port back in action.
Often, the solution is simpler than you might think. Let’s start with the most common culprit: a blown fuse.
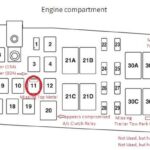
The first and easiest step is to check Fuse 13 in your GMC’s underhood fuse box. It’s important not to just visually inspect the fuse. Even if a fuse looks intact, it can still be defective. Internal breaks or oxidation on the fuse terminals can prevent proper electrical flow.
Alt Text: Diagram of the underhood fuse box in a 2006 GMC vehicle, highlighting the location of Fuse 13 which is crucial for the OBD2 port and cigarette lighter.
Step-by-Step Fuse Check and Replacement
- Locate the Underhood Fuse Box: Refer to your 2006 GMC owner’s manual for the precise location of the underhood fuse box. It’s typically found in the engine compartment.
- Identify Fuse 13: Consult the fuse box diagram (usually printed on the fuse box cover) to locate Fuse 13. This fuse is specifically linked to the OBD2 port and cigarette lighter.
- Remove Fuse 13: Use a fuse puller (often included in the fuse box) or needle-nose pliers to carefully remove Fuse 13.
- Replace with a Known Good Fuse: Even if Fuse 13 appears visually okay, replace it with a new 20 Amp fuse. Make sure it’s the correct amperage as specified for Fuse 13 in your owner’s manual.
- Test the OBD2 Port and Cigarette Lighter: After replacing the fuse, check if your OBD2 port is now functioning by plugging in a code reader or scanner. Also, test your cigarette lighter port to see if it’s receiving power (approximately 12V DC).
Further Diagnosis if Fuse Replacement Doesn’t Work
If replacing Fuse 13 doesn’t solve the problem, the next step involves using a multimeter to diagnose the electrical circuit.
Using a Multimeter to Test for Voltage
- Set up the Multimeter: Set your digital multimeter to the DC Volts setting.
- Ground the Negative Lead: Connect the negative (black) lead of your multimeter to a good ground point on your vehicle’s chassis.
- Test Fuse 13 for Voltage: With the new Fuse 13 in place, use the positive (red) probe of your multimeter to touch each of the exposed metal contacts on top of Fuse 13.
- Voltage Reading: You should see a reading of approximately 12V DC on both sides of the fuse. This indicates that power is reaching the fuse.
Alt Text: Image depicting a multimeter testing a blade fuse in a car fuse box, demonstrating the process of checking for 12V voltage across the fuse terminals.
Troubleshooting Low or No Voltage
- No Voltage on Either Side of Fuse 13: This suggests a problem upstream from the fuse box, which is less likely for this specific circuit. However, it’s worth checking the main power supply to the fuse box.
- 12V on One Side, But Not the Other: This indicates that the fuse is indeed blown or there is an issue with the fuse box contacts themselves. Double-check the fuse and the fuse box terminals.
- Low Voltage (e.g., 6V as mentioned initially): This could suggest a voltage drop due to a wiring issue, corrosion, or a partial short circuit.
Checking Continuity to the OBD2 Port
If you are getting 12V at Fuse 13 but still have no power at the OBD2 port, you’ll need to check the wiring for continuity.
- Set Multimeter to Ohms (Continuity Test): Switch your multimeter to the Ohms setting or the continuity test setting (which often has a beep sound).
- Test Continuity: Remove Fuse 13. Connect one probe of your multimeter to the load side contact in the Fuse 13 socket in the fuse box (the side that should be going to the OBD2 port). Connect the other probe to Pin 16 of your 2006 GMC OBD2 port. Pin 16 is the power pin on the OBD2 connector.
- Continuity Reading: You should see a reading of zero ohms or hear a beep (depending on your multimeter’s continuity test function). This indicates a continuous wire path between the fuse box and the OBD2 port. If you see infinite resistance or no beep, there’s a break or open circuit in the wiring.
Alt Text: OBD2 port pinout diagram illustrating the function of each pin, with a specific focus on Pin 16 as the power supply pin that needs to be checked for voltage.
Wiring Diagram Reference
As shown in the original wiring diagram, the circuit for the OBD2 port and cigarette lighter is relatively simple. It runs directly from the load side of Fuse 13 to Pin 16 of the OBD2 port and the center terminal (Pin A) of the cigarette lighter port. If you suspect a wiring issue, tracing this circuit using a wiring diagram for your 2006 GMC will be crucial.
Conclusion
Troubleshooting a non-functioning 2006 GMC OBD2 port often starts with checking Fuse 13. If a fuse replacement doesn’t resolve the issue, using a multimeter to test for voltage and continuity is the next logical step. By systematically checking these components, you should be able to pinpoint the cause of the problem and restore functionality to your OBD2 port, enabling you to diagnose and maintain your vehicle effectively.
If you continue to experience problems after these steps, it may be necessary to consult a professional mechanic or refer to more detailed wiring diagrams specific to your 2006 GMC model. Remember to report back with any OBD2 codes you retrieve once your port is working again for further assistance!