Understanding the fuse box in your 2003 Honda Accord is crucial for diagnosing and resolving electrical issues, especially when it comes to your OBD2 port. This guide provides a detailed look at the fuse locations for your 2003 Honda Accord, ensuring you can quickly identify and check the necessary fuses, including those related to your OBD2 system.
Your 2003 Honda Accord is equipped with two main fuse boxes: one located under the hood and another inside the vehicle. Each fuse box protects different circuits and components of your car. Let’s explore both to pinpoint the fuses relevant to your OBD2 port and overall vehicle diagnostics.
Under-Hood Fuse Box Location and Fuses
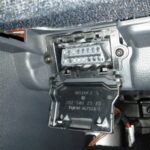
The under-hood fuse box in your 2003 Honda Accord is typically located in the engine compartment, near the battery. This fuse box houses fuses and relays that protect engine management systems, headlights, cooling fans, and other vital components.
Here’s a diagram of the under-hood fuse box:
 2003 Honda Accord Under-hood Fuse Box Diagram
Alt text: 2003 Honda Accord Under-Hood Fuse Box Diagram – Diagram showing the location of fuses for headlights, cooling fans, and engine components in the under-hood fuse box.
Below is a table detailing the fuses in the under-hood fuse box of your 2003 Honda Accord:
| Type | No. | Description |
|---|---|---|
| Fuse MINI 10A | 1 | Left Headlight Low |
| Fuse MINI 30A | 2 | Rear Defroster Coil |
| Fuse MINI 10A | 3 | Left Headlight Hi |
| Fuse MINI 15A | 4 | Small Light |
| Fuse MINI 10A | 5 | Right Headlight Hi |
| Fuse MINI 10A | 6 | Right Headlight Low |
| Fuse MINI 7.5A | 7 | Back Up |
| Fuse MINI 15A | 8 | FI ECU |
| Fuse MINI 20A | 9 | Condenser fan |
| Fuse MINI 20A | 11 | Cooling Fan |
| Fuse MINI 30A | 11 | Cooling Fan [6-cylinder models] |
| Fuse MINI 7.5A | 12 | MG. Clutch |
| Fuse MINI 20A | 13 | Horn, Stop |
| Fuse FMX/JCase 40A | 14 | Rear Defroster |
| Fuse FMX/JCase 40A | 15 | Back Up, ACC |
| Fuse MINI 15A | 16 | Hazard |
| Fuse FMX/JCase 30A | 17 | ABS Motor |
| Fuse FMX/JCase 30A | 17 | TCS Motor [6-cylinder models] |
| Fuse FMX/JCase 20A | 18 | ABS F/S |
| Fuse FMX/JCase 40A | 18 | TCS [6-cylinder models] |
| Fuse FMX/JCase 40A | 19 | Heated Seats |
| Fuse FMX/JCase 40A | 20 | Condenser Fan |
| Fuse FMX/JCase 40A | 21 | Heater Motor |
| Multi fuse block MUSB | 22 | Battery |
| Multi fuse block MUSB | 23 | +B IG1 Main // Power Window Main |
| Fuse MINI 30A | 24 | SPARE |
| Fuse MINI 15A | 25 | SPARE |
| Fuse MINI 20A | 26 | SPARE |
While the under-hood fuse box is vital for many vehicle functions, the interior fuse box is more likely to contain the fuse directly related to your OBD2 port and related diagnostic systems.
Interior Fuse Box Location and Fuses
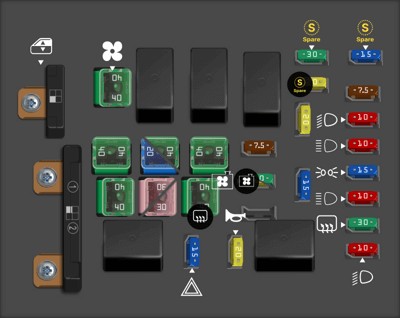
The interior fuse box in a 2003 Honda Accord is typically located under the dashboard on the driver’s side. You may need to remove a small panel to access it. This fuse box protects circuits for interior lights, radio, power windows, and importantly, the OBD2 system and engine control unit (ECU) interfaces.
Here’s a diagram of the interior fuse box:
 2003 Honda Accord Interior Fuse Box Diagram
Alt text: 2003 Honda Accord Interior Fuse Box Diagram – Diagram showing the location of fuses for interior components, radio, power windows and potentially the OBD2 system in the interior fuse box.
The table below details the fuses found in the interior fuse box of your 2003 Honda Accord:
| Type | No. | Description |
|---|---|---|
| Fuse MINI 15A | 1 | Drive by Wire |
| Fuse MINI 15A | 2 | Ignition Coil |
| Fuse MINI 10A | 3 | Day Light [On Canadian models] |
| Fuse MINI 15A | 4 | Laf Heater |
| Fuse MINI 10A | 5 | Radio |
| Fuse MINI 7.5A | 6 | Interior Light |
| Fuse MINI 10A | 7 | Back-Up Lights |
| Fuse MINI 20A | 8 | Door Lock |
| Fuse MINI 15A | 9 | Front Accessory Sockets |
| Fuse MINI 7.5A | 10 | IG OPDS |
| Fuse MINI 30A | 11 | IG Wiper |
| Fuse MINI 20A | 13 | Passenger’s Power Seat Recline |
| Fuse MINI 20A | 14 | Driver’s Power Seat Slide |
| Fuse MINI 20A | 15 | Heated Seat |
| Fuse MINI 20A | 16 | Driver’s Power Seat Recline |
| Fuse MINI 15A | 18 | IG ACG |
| Fuse MINI 15A | 19 | IG Fuel Pump |
| Fuse MINI 7.5A | 20 | IG Washer |
| Fuse MINI 7.5A | 21 | IG Meter |
| Fuse MINI 10A | 22 | IG SRS |
| Fuse MINI 7.5A | 23 | IGP (PGM-FI ECU) |
| Fuse MINI 20A | 24 | Left Rear Power Window |
| Fuse MINI 20A | 25 | Right Rear Power Window |
| Fuse MINI 20A | 26 | Right Front Power Window |
| Fuse MINI 20A | 27 | Driver’s Power Window |
| Fuse MINI 20A | 28 | Moonroof |
| Fuse MINI 7.5A | 30 | IG HAC |
| Fuse MINI 7.5A | 32 | ACC |
| Fuse MINI 7.5A | 33 | HAC OP |
| Fuse MINI 20A | 17 | Passenger’s Power Seat Slide |
Locating the OBD2 Fuse
While neither fuse box explicitly labels a fuse as “OBD2”, several fuses are critical for the OBD2 port to function correctly. The OBD2 port needs power and a functioning ECU to communicate diagnostic data.
Key fuses to check for OBD2 issues in the interior fuse box include:
- Fuse 8 (Door Lock) (20A): In some vehicles, circuits related to body control modules which can affect OBD2 communication, might be linked to this fuse. Check if this fuse is blown.
- Fuse 9 (Front Accessory Sockets) (15A): The OBD2 port is sometimes powered through the same circuit as the accessory sockets. If your OBD2 scanner isn’t powering up, this fuse could be the culprit.
- Fuse 19 (IG Fuel Pump) (15A) & Fuse 23 (IGP (PGM-FI ECU)) (7.5A): These “IG” or Ignition fuses, particularly the “PGM-FI ECU” fuse, are crucial as they power the Engine Control Unit (ECU). The ECU is essential for OBD2 communication. A blown fuse here can directly disable your OBD2 port.
- Fuse 21 (IG Meter) (7.5A): This fuse powers the instrument cluster and related systems. Problems here might indirectly affect OBD2 data transmission or port functionality.
- Fuse 32 (ACC) (7.5A): The Accessory fuse provides power to various systems when the ignition is in the ACC or ON position. This could potentially affect OBD2 power.
- Fuse 7 (Back-Up Lights) (10A) & Under-hood Fuse 7 (Back Up) (7.5A) & Under-hood Fuse 15 (Back Up, ACC) (40A): “Back Up” fuses can sometimes be related to the general power supply for control modules that interact with the OBD2 system.
Troubleshooting Steps for OBD2 Port Issues:
- Check Fuses: Start by visually inspecting the fuses listed above in the interior fuse box. Look for a broken filament inside the fuse.
- Test Fuses: Use a fuse tester or multimeter to confirm if a fuse is blown.
- Replace Blown Fuses: If you find a blown fuse, replace it with a fuse of the same amperage.
- Consult a Professional: If replacing fuses doesn’t resolve the issue, or if fuses keep blowing, it indicates a more serious electrical problem. Consult a qualified mechanic to diagnose the underlying issue.
Conclusion
Locating and checking the fuses related to your OBD2 port is a fundamental step in diagnosing communication issues with your 2003 Honda Accord’s diagnostic system. By using these fuse box diagrams and descriptions, you can systematically check the relevant fuses and potentially resolve OBD2 port problems yourself. Remember to always replace fuses with the correct amperage and consult a professional if you encounter persistent issues. Understanding your 2003 Honda Accord’s fuse layout empowers you to perform basic troubleshooting and maintain your vehicle effectively.