Are you a BMW enthusiast looking to unlock the full potential of your car through coding and diagnostics? Often, this journey begins with connecting your car to a laptop, and for BMWs, an ENET (Ethernet to OBDII) cable is typically required. However, purchasing pre-made ENET cables can sometimes be costly or inconvenient, especially with import restrictions. The good news is, crafting your own Obd2 To Laptop Cable is not only feasible but also a rewarding DIY project. This guide will walk you through the process of creating your own ENET cable at home, using readily available components and simple tools.
This DIY approach is perfect for those who enjoy hands-on projects and want a cost-effective solution. By following these step-by-step instructions, you’ll be equipped to create a functional OBD2 to laptop cable, specifically an ENET cable, enabling you to perform various diagnostic and coding tasks on your BMW.
Materials You’ll Need to Make Your OBD2 to Laptop Cable
Before you begin, gather all the necessary materials. You can easily find these items online or at your local electronics store. Here’s what you’ll need to build your OBD2 to laptop cable:
-
Soldering Kit: Essential for creating secure and reliable electrical connections. A basic soldering kit will suffice for this project. You can find affordable options here.
-
Multimeter: A multimeter is crucial for testing the resistor and ensuring proper continuity in your cable. It helps verify that your connections are sound and the resistor value is correct. A reliable multimeter is available here.
-
Ethernet Cable (10 Feet): A standard Ethernet cable will form the backbone of your OBD2 to laptop cable. Choose a length that provides comfortable reach between your car’s OBD2 port and your laptop. A 10-foot cable is a good starting point and can be found here.
-
OBD2 Connector (Male): This connector will plug into your car’s OBD2 port. Ensure you get a male OBD2 connector with screw terminals for easy wiring. You can purchase one here.
-
510 Ohm Resistor: A 510 Ohm resistor is a critical component in the ENET cable circuit. It’s essential for proper communication between your BMW and laptop. Find 510 Ohm resistors here.
-
Optional Combo Kit: For convenience, you can also opt for a combo kit that includes a soldering kit, multimeter, and cutter, especially if you don’t already own these tools. A combo kit is available here.
Step-by-Step Guide to Assembling Your OBD2 to Laptop Cable
Now that you have all the necessary materials, let’s proceed with the assembly process. Follow these steps carefully to create your OBD2 to laptop ENET cable.
Step 1: Prepare the Ethernet Cable
Begin by preparing the Ethernet cable. Cut the Ethernet cable approximately in half to give you manageable lengths to work with. Then, slide a cable protector and boot onto one end of each cut piece. This will provide a professional finish and protect the connection point.
Step 2: Expose and Identify Ethernet Wires
Carefully remove the outer plastic jacket of the Ethernet cable end you’ve prepared. Expose about 2-3 inches of the internal wires. You’ll see eight wires, each with a different color. It’s crucial to identify each wire color and its corresponding pin number in the Ethernet cable standard (T568B is commonly used). Refer to the image below for wire color identification. Tin the exposed edges of each wire using your soldering iron. This preps them for soldering to the OBD2 connector.
It’s important to note that for this specific OBD2 to laptop ENET cable for BMW, we will not be using all eight wires. Specifically, pins 4, 5, and 7 of the Ethernet cable (Blue, White/Blue, and White/Brown wires respectively in T568B standard) are not needed and can be trimmed off to avoid confusion.
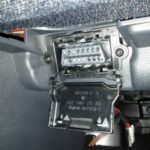
Step 3: Open the OBD2 Connector
Next, carefully open the OBD2 connector. Typically, these connectors come in two halves that are either clipped or screwed together. Once opened, you’ll see the internal pins, numbered from 1 to 16. There are usually eight pins on the top row and eight on the bottom. Familiarize yourself with the pin layout as you will be soldering wires to specific pins.
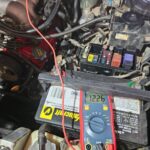
Step 4: Test the Resistor
Before soldering the resistor into the circuit, it’s a good practice to test its value using your multimeter. Set your multimeter to measure resistance (Ohms – Ω) and check the 510 Ohm resistor. The reading should be close to 510 Ohms, ideally within the range of 506-560 Ohms. This ensures the resistor is within the correct tolerance for the ENET cable to function properly.
Step 5: Solder Ethernet Wires to OBD2 Connector
Now, carefully solder the Ethernet wires to the corresponding pins on the OBD2 connector according to the pin diagram below. This diagram is crucial for ensuring correct wiring, which is essential for the OBD2 to laptop cable to work.
Here’s a breakdown of the wire connections:
| Ethernet Pin # | Wire Color (T568B) | OBD2 Pin # |
|---|---|---|
| 1 | White/Orange | 3 |
| 2 | Orange | 11 |
| 3 | White/Green | 12 |
| 6 | Green | 13 |
| 8 | Brown | 4 & 5 |
Solder each tinned Ethernet wire to its designated OBD2 connector pin. For Ethernet pin 8 (Brown wire), you will need to connect it to both pin 4 and pin 5 on the OBD2 connector. You can achieve this by either splitting the brown wire or using a small jumper wire.
Step 6: Solder the 510 Ohm Resistor
The final wiring step is to solder the 510 Ohm resistor. Connect one end of the resistor to pin 8 of the OBD2 connector and the other end to pin 16. Pin 8 is already connected to the Brown wire from the Ethernet cable, so you will be effectively bridging pins 8 and 16 with the resistor.
Step 7: Final Assembly and Testing
After completing all the soldering, carefully close the OBD2 connector cover, ensuring no wires are pinched or exposed. Your DIY OBD2 to laptop ENET cable is now complete!
To test your newly made cable, connect the OBD2 end to your BMW’s OBD2 port and the Ethernet end to your laptop. Use BMW diagnostic or coding software (such as E-Sys, ISTA-D, or similar) to establish a connection with your car. If the connection is successful, you can proceed with your desired diagnostics or coding tasks.
Congratulations! You have successfully created your own OBD2 to laptop ENET cable. This DIY project not only saves you money but also provides a valuable learning experience in automotive electronics and diagnostics. Enjoy the enhanced control and insight into your BMW that this cable provides!