Navigating the world of automotive diagnostics can be confusing, especially when dealing with older General Motors (GM) vehicles. A common point of misunderstanding revolves around the diagnostic connectors used in these cars, specifically the transition from the older Assembly Line Diagnostic Link (ALDL) to the more modern OBD-II (On-Board Diagnostics II) systems. This guide will clarify the differences, focusing on the 12-pin ALDL connector and its relationship to OBD2.
What is ALDL and the 12 Pin Connector?
Before OBD-II became the industry standard in 1996, GM utilized ALDL systems for on-board diagnostics. ALDL was GM’s proprietary system used from the early 1980s up to the mid-1990s. The early iteration of ALDL featured a 12-pin connector. This 12 pin ALDL connector was the gateway to retrieving diagnostic trouble codes and accessing limited engine data from the vehicle’s Powertrain Control Module (PCM). Typically found under the dashboard or in other accessible locations, this 12 pin aldl setup required specific tools and procedures, different from the later OBD-II systems.
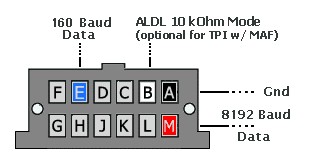 12 Pin ALDL Connector Pinout Diagram
The 16 Pin ALDL: Not an OBD2 Connector
Adding to the confusion, GM introduced a 16-pin ALDL connector in some vehicles from 1993 to 1995. Visually, this 16-pin connector is almost identical to the OBD-II connector, leading many to mistakenly believe they are dealing with an OBD-II system. However, it is crucial to understand that this 16 pin ALDL connector is not an OBD-II connector. It still operates on ALDL protocols and is not compatible with standard OBD-II scan tools in most cases. This distinction is vital for accurate diagnostics and repair procedures.
Diagnosing a 12 Pin ALDL System
For vehicles equipped with the 12 pin ALDL connector, retrieving basic diagnostic codes can be done without a scan tool. By using a simple paperclip to bridge pins A and B on the 12 pin aldl connector, you can initiate a diagnostic mode that will flash the Service Engine Soon Light (SESL) to display trouble codes. These flashed codes are interpreted based on a specific pattern and code chart relevant to the vehicle’s year and model. While this method is rudimentary, it provides a basic way to identify potential issues. However, it lacks the advanced diagnostic capabilities of OBD-II systems.
The Advent of OBD2
OBD-II marked a significant advancement in automotive diagnostics. Standardized across all manufacturers in 1996, OBD-II provides a universal diagnostic protocol and connector. This standardization ensures compatibility between vehicles and scan tools, offering a more comprehensive and user-friendly diagnostic experience. OBD-II systems offer a wider range of diagnostic data, including live sensor readings, and support a standardized set of diagnostic trouble codes (DTCs).
 16 Pin ALDL Connector Pinout Diagram
The 1995 GM Vehicle Diagnostic Quagmire
The 1995 model year for GM vehicles presents a unique challenge. During this transition period, GM produced vehicles with a mix of diagnostic systems. Some 1995 models, particularly S-series trucks and SUVs with the PCM located on the coolant tank, have PCMs that are a hybrid of ALDL and OBD-II. These systems might use the 16-pin ALDL connector wiring but employ some aspects of OBD-II protocols, or even a variant of SAE J1850 protocols. Crucially, even if a 1995 GM vehicle uses a 16-pin connector that resembles OBD-II, it may not fully support all OBD-II DTCs and PIDs, and might not be fully compatible with standard OBD-II scan tools. Identifying the exact PCM part number and understanding the specific sensor configuration on these 1995 models is often necessary for accurate diagnosis.
Conclusion
Understanding the difference between 12 Pin Aldl To Obd2 is essential when working on older GM vehicles. The 12-pin ALDL represents an early diagnostic system requiring specific procedures, while OBD-II offers a standardized and more advanced approach. The 16-pin ALDL, while visually similar to OBD-II, remains an ALDL system and should not be mistaken for OBD-II. For 1995 GM vehicles, careful identification of the diagnostic system and PCM type is crucial for effective troubleshooting. When in doubt, consulting vehicle-specific service information and verifying PCM part numbers is always recommended to ensure you are using the correct diagnostic methods and tools.