Navigating the world of automotive diagnostics can be confusing, especially when it comes to older vehicles like the 1994 Ford Ranger. A common question among Ranger owners is whether their truck uses OBD1 or the more modern OBD2 system. If you’re wondering about diagnostic ports and compatibility, you’re in the right place. For the 1994 Ford Ranger, the diagnostic system is OBD1, and understanding this is key to troubleshooting any engine issues. Forget about searching for an OBD2 converter; it’s not needed and won’t work for your truck’s original diagnostic setup.
Understanding OBD1 Diagnostics on Your 1994 Ford Ranger
Unlike newer vehicles equipped with standardized OBD2 ports, your 1994 Ford Ranger utilizes an OBD1 system. This means you won’t find the familiar trapezoid-shaped OBD2 connector under your dashboard. Instead, the OBD1 connector is located in the engine bay. It’s typically a rectangular connector, often found near the fuse box on the driver’s side. Look for a connector that may have a cap labeled “EEC” on top to identify it correctly. You might even see a single grey connector nearby, part of the same wiring harness.
 OBD1 Diagnostic Connector Location on a 1994 Ford Ranger Engine Bay – Look for the EEC Cap
Reading OBD1 Trouble Codes on a 1994 Ford Ranger Using the CEL Method
Don’t worry if you don’t have a dedicated OBD1 scanner. You can access the diagnostic trouble codes stored in your 1994 Ford Ranger’s computer using a simple method involving the Check Engine Light (CEL) and a jumper wire or paper clip. Here’s how to do it:
- Locate the OBD1 Connector: As described earlier, find the OBD1 connector in your engine bay.
- Prepare to Jumper: With the key off, take a short jumper wire or an unfolded paper clip.
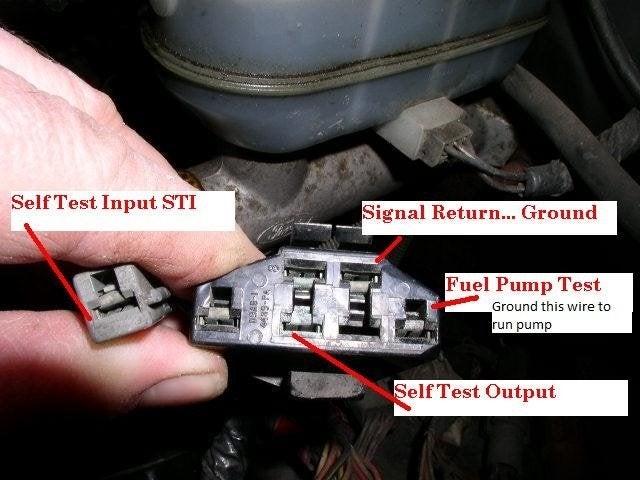
- Identify the Test Slots: You’ll need to access specific slots within the OBD1 connector. These are the “Self Test Input” (a single grey connector) and the “Signal Return” slot on the larger connector.
 OBD1 Connector Pinout for 1994 Ford Ranger – Identifying the Signal Return and Self Test Input Slots for Code Reading
- Jumper the Connectors: Connect the jumper wire between the “Self Test Input” (grey connector) and the “Signal Return” slot on the main OBD1 connector. This puts the engine control computer (EEC) into test mode when you turn the key.
- Turn the Key On (Engine Off): Turn the ignition key to the “ON” position, but do not start the engine.
- Observe the Check Engine Light (CEL): Watch the CEL on your dashboard. After a brief pause as the computer boots up, it will begin to flash out 3-digit trouble codes.
- Decipher the Codes: The CEL will flash a sequence to represent each digit of a code. For example, one flash, a short pause, one flash, a short pause, and six flashes, followed by a long pause, indicates code 116. These 3-digit codes can be referenced using a 1994 Ford Ranger OBD1 code list to understand the issue. The system will cycle through all stored codes and then repeat them. Code 111 indicates “System Pass” or no fault codes stored.
Clearing OBD1 Codes
If you want to clear the trouble codes after diagnosing and repairing the issue, it’s straightforward:
- Clear Codes: With the key still in the “ON” position and the jumper wire still connected, simply remove the jumper wire. This action clears the diagnostic codes from the computer’s memory.
- Saving Codes: If you turn off the key and remove the jumper without clearing, the codes will remain saved in memory.
Clearing codes is useful to see if a problem reoccurs. For instance, if you had a temporary issue like “bad gas” triggering codes, clearing them and seeing if they return after driving will confirm if the problem is resolved.
By understanding that your 1994 Ford Ranger uses OBD1 and knowing how to read codes using the CEL method, you can effectively diagnose and address engine-related problems without needing specialized scan tools or OBD2 converters.
