Understanding your vehicle’s On-Board Diagnostics II (OBD2) port is crucial for modern car maintenance and upgrades. For owners of vehicles around the year 2000, including models that might be considered in the “insight” category for their technological features at the time, locating this port is the first step in utilizing various automotive tools and devices. One common use is for installing GPS tracking devices, which often connect through the OBD2 port for power and data access. This guide will walk you through the process of finding your 2000 Insight Obd2 Port and using it for a device installation, ensuring a smooth and efficient setup.
Preparing for Your OBD2 Port Installation
Before you begin any installation that involves your 2000 insight OBD2 port, proper preparation is key. Start by gathering all necessary materials. Typically, an installation kit will include items like a registration card, the device itself, a diagnostic pass-thru cable, mounting brackets, and cable ties of various sizes. You might also need some additional tools such as an ink pen for notes, dash panel removers to access the port, a socket/screwdriver set, flush cutters for cable ties, and a tamper seal for security.
Crucially, locate the 10-digit serial number (ESN) on your device and record it on the registration card provided in your kit. This number will be needed for device verification and registration later in the process. For online verification and device registration, you will need to visit a specific website, often provided by the device manufacturer. It’s wise to bookmark this page for easy access during and after the installation.
Connecting Through Your 2000 Insight OBD2 Port
Connecting your device to the 2000 insight OBD2 port can typically be done in two ways: direct plug-in or using a diagnostic cable.
Direct Plug-in Method
In many cases, devices are designed for a direct plug-in to the OBD2 port, simplifying the installation process significantly. However, for certain vehicle setups or device types, using a diagnostic cable might offer more flexibility and better placement options.
Diagnostic Cable Instructions for OBD2 Port Access
If you opt for the diagnostic cable method, or if it’s required for your specific 2000 insight OBD2 port location, follow these steps carefully:
First, you will likely need to remove dashboard panels to gain clear access to the OBD2 port and to facilitate device mounting and cable management.
Ensure the vehicle’s ignition is turned off and the keys are removed before proceeding with any connections. This is a critical safety step to prevent electrical issues during the installation.
The next step involves freeing up the existing OBD-II port from its original location. This might involve unfastening it from a bracket or panel to allow for the pass-thru cable to be connected.
Connect the pass-thru cable to the vehicle’s diagnostic port. Secure the connection with a cable tie to prevent it from coming loose due to vibrations or accidental bumps.
Mount the replacement port of the pass-thru cable in a convenient and accessible location. This new port will take the place of the original OBD2 port you just used.
Finally, connect your PNP device to the pass-thru cable. Again, use a cable tie to secure this connection.
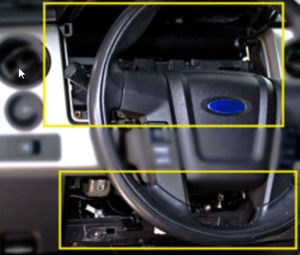 Dashboard panel removal for OBD2 access
After making these connections to your 2000 insight OBD2 port, check the device lights. They should begin to flash upon connection, indicating power and initialization. If the lights do not become solid within 3-5 minutes, consult the troubleshooting section or FAQs for your specific device, as there might be an issue with the power supply or connection.
Mounting Your Device Near the OBD2 Port
Once the device is connected and functioning, the next step is mounting it securely. For optimal performance, especially for GPS devices, it’s important to mount the device as high within the dashboard as possible and ensure that no metal parts are covering it, which could interfere with signal reception. Use cable ties to secure the device in place, ensuring it is stable and won’t move around during vehicle operation.
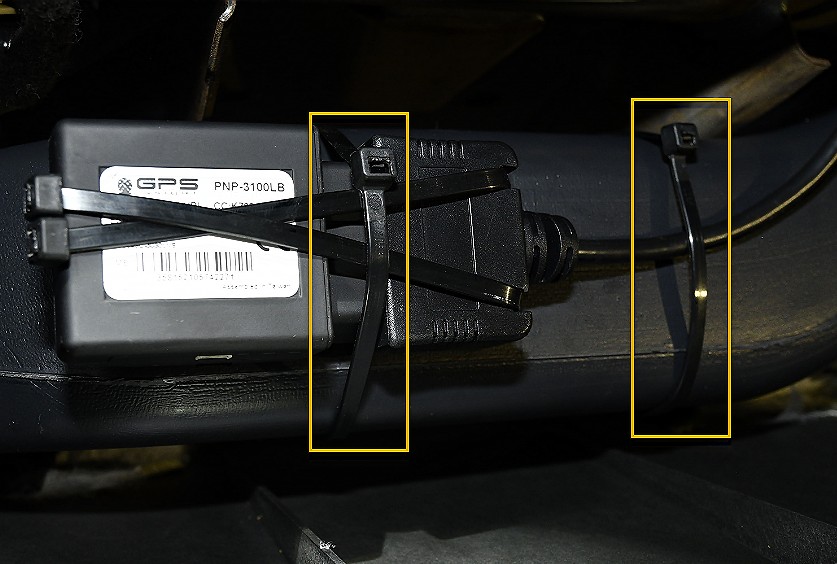 Device mounting inside dashboard
Verification and Registration Post 2000 Insight OBD2 Port Installation
After physically installing your device connected to the 2000 insight OBD2 port, the final step is verification and registration.
Open the web application provided by your device manufacturer, usually accessible via a URL like verifygps.gpsinsight.com, on your computer or smartphone. Enter your Install Key, the Device Serial Number (ESN) you recorded earlier, and select the Device Type, which in this case would typically be ‘PNP.’
Follow the on-screen instructions for verification and device registration. This process confirms that your device is correctly installed and activated on the network.
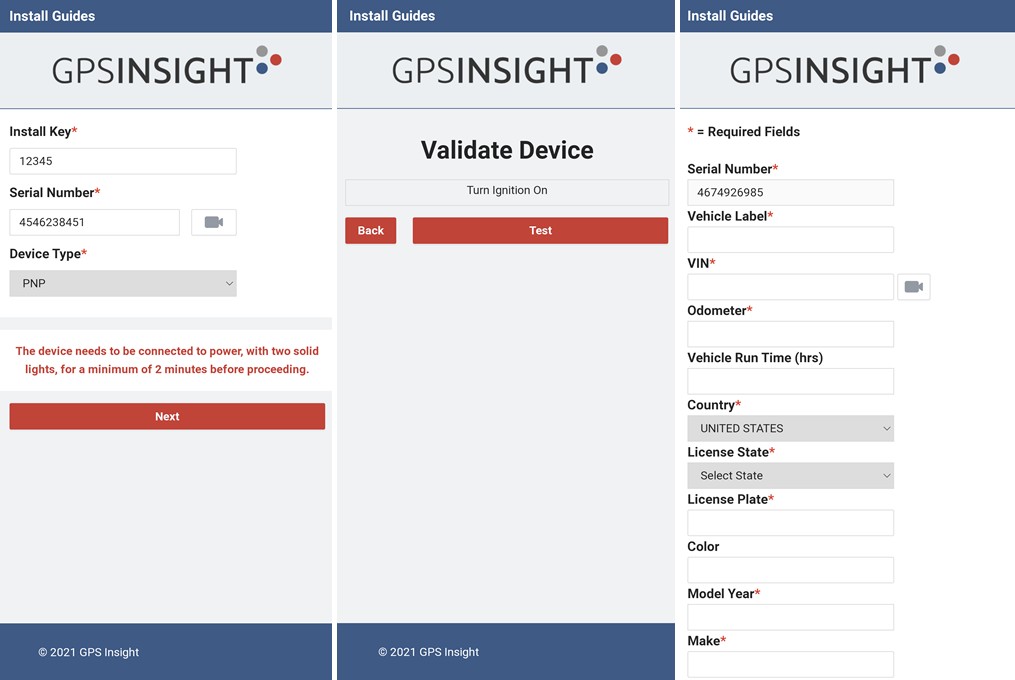 Device verification and registration app interface
Upon successful completion of verification and registration, reassemble any dashboard panels you removed during the installation process, ensuring everything is back in its original condition. Finally, hand over the registration card to your GPS administrator or keep it for your records as required.
By following these steps, you can effectively locate and utilize your 2000 insight OBD2 port for device installations, enhancing your vehicle’s capabilities and connectivity. For any further questions or issues, always refer to the device’s FAQ or contact technical support for assistance.