Experiencing trouble connecting your OBD2 scanner to your 2001 Dodge Ram 2500? It’s a frustrating situation, especially when you’re trying to diagnose engine or transmission issues. A non-functional OBD2 port leaves you in the dark, unable to retrieve crucial diagnostic trouble codes or monitor live data. If you’re facing this problem with your 2001 Dodge Ram 2500, you’re not alone. Many owners encounter this issue, and thankfully, there are systematic troubleshooting steps you can take to pinpoint the cause and get your diagnostic port back online. This guide will walk you through the common culprits behind a dead OBD2 port on your 2001 Dodge Ram 2500 and provide a step-by-step approach to diagnose and resolve the problem.
Understanding the OBD2 Port in Your 2001 Dodge Ram 2500
The On-Board Diagnostics II (OBD2) port is a crucial interface in your 2001 Dodge Ram 2500. It’s essentially a gateway to your truck’s computer systems, allowing mechanics and DIYers alike to communicate with the vehicle’s Engine Control Module (ECM) or Powertrain Control Module (PCM). This communication is vital for:
- Reading Diagnostic Trouble Codes (DTCs): These codes pinpoint specific problems within your vehicle’s systems, from engine misfires to transmission issues.
- Monitoring Live Data: Access real-time data from sensors throughout your truck, such as engine temperature, RPM, and sensor readings. This is invaluable for diagnosing intermittent problems or assessing overall engine health.
- Emissions Testing: OBD2 compliance is essential for emissions testing in many regions. A functioning port is necessary to pass these tests.
- Programming and Calibration: While less common for DIYers, some advanced functions like module programming and calibration also rely on the OBD2 port.
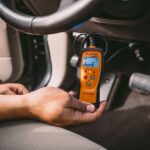
For your 2001 Dodge Ram 2500, the OBD2 port is typically located beneath the dashboard on the driver’s side. Its standard trapezoidal shape with 16 pins makes it universally compatible with most OBD2 scanners.
Symptoms of a Non-Functional OBD2 Port
The primary symptom is obvious: your OBD2 scanner fails to connect or communicate with the vehicle’s computer via the port. This can manifest in several ways:
- Scanner displays “Link Error” or “No Communication”: The scanner simply cannot establish a connection to the vehicle’s ECM/PCM.
- Scanner powers on but cannot read vehicle information: The scanner might power up, but it gets stuck in a linking phase or fails to retrieve vehicle identification number (VIN) or diagnostic data.
- No power at the OBD2 port: Some scanners might indicate a lack of power at the port itself.
While a non-reading OBD2 port is the main indicator, it’s important to note if it’s accompanied by other electrical issues in your 2001 Dodge Ram 2500. However, in many cases, the OBD2 port issue is isolated.
Diagnosing a No-Read OBD2 Port: Step-by-Step Guide
Troubleshooting a non-functional OBD2 port requires a systematic approach. Here’s a step-by-step guide tailored for your 2001 Dodge Ram 2500:
1. Preliminary Checks: The Basics
- Verify Scanner Function: Before diving into vehicle diagnostics, ensure your OBD2 scanner is working correctly. Test it on another OBD2-compliant vehicle if possible. This eliminates the scanner itself as the source of the problem.
- Inspect the OBD2 Port: Visually inspect the OBD2 port on your 2001 Dodge Ram 2500. Look for:
- Bent or Damaged Pins: Carefully examine each pin in the port for any signs of bending, corrosion, or damage. Bent pins can prevent proper connection.
- Debris or Obstructions: Check for any foreign objects, dirt, or debris lodged inside the port that might be blocking the scanner connector.
- Check Fuses: The OBD2 port is typically powered by a fuse. Consult your 2001 Dodge Ram 2500 owner’s manual or a reliable wiring diagram to identify the fuse specifically for the diagnostic port or the cigarette lighter/accessory power, as they sometimes share fuses.
- Location: Fuse boxes are usually located under the hood and/or inside the cabin (often on the driver’s side).
- Testing: Use a fuse tester or a multimeter to check for continuity across the fuse terminals. Replace any blown fuses with the correct amperage rating.
2. Power and Ground Verification at the OBD2 Port
The OBD2 port requires both power and ground to operate. Use a multimeter to check for these at the port itself:
- Power Check (Pin 16):
- Set your multimeter to DC Voltage mode.
- Turn the ignition key to the “ON” position (engine off).
- Connect the red multimeter lead to pin 16 of the OBD2 port (Pin 16 is typically the top right pin).
- Connect the black multimeter lead to a known good ground point on the vehicle chassis (unpainted metal part).
- Expected Reading: You should read approximately 12 volts. If there is no voltage, or significantly lower voltage, there is a power supply issue to the port. Trace back from pin 16 to the fuse and wiring.
- Ground Check (Pin 4 & 5):
- Set your multimeter to Continuity mode or Resistance mode.
- Connect one multimeter lead to pin 4 (Chassis Ground) and the other lead to a known good ground point. You should get a continuity beep or very low resistance (close to 0 ohms), indicating a good ground connection.
- Repeat the continuity/resistance test between pin 5 (Signal Ground) and a known good ground point. Again, expect continuity or very low resistance.
- No Continuity/High Resistance: If you don’t get continuity or have high resistance, there’s a ground issue. Inspect the ground wires connected to pins 4 and 5, tracing them back to their ground points, checking for breaks, corrosion, or loose connections.
3. Communication Wiring Checks (CAN Bus)
The 2001 Dodge Ram 2500 likely uses the Controller Area Network (CAN bus) communication protocol for OBD2 data. The relevant pins for CAN communication are typically:
- Pin 6: CAN High (J-2284)
- Pin 14: CAN Low (J-2284)
You can perform resistance checks on these wires to assess their integrity:
-
CAN Bus Resistance Test:
- Turn the ignition OFF.
- Locate the ECM/PCM connector. Refer to a wiring diagram for your 2001 Dodge Ram 2500 to identify the ECM/PCM and the CAN bus wires at the connector.
- Disconnect the ECM/PCM connector. Important: Disconnecting the ECM/PCM is crucial to get an accurate reading.
- At the OBD2 port, measure the resistance between pin 6 (CAN High) and pin 14 (CAN Low).
- Expected Reading: Approximately 60 ohms. This is the typical terminating resistance of the CAN bus network when the ECM/PCM is disconnected.
- Deviation from 60 ohms:
- Higher Resistance (e.g., 120 ohms): Could indicate a missing terminating resistor in the circuit (less likely in a stock vehicle) or a break in one of the CAN wires.
- Lower Resistance (e.g., significantly below 60 ohms): Could indicate a short circuit between the CAN High and CAN Low wires or a fault in a module on the CAN bus network.
-
Continuity to ECM/PCM:
- With the ECM/PCM connector still disconnected, check for continuity between:
- OBD2 port pin 6 and the corresponding CAN High pin at the ECM/PCM connector.
- OBD2 port pin 14 and the corresponding CAN Low pin at the ECM/PCM connector.
- No Continuity: Indicates a break or open circuit in the wiring between the OBD2 port and the ECM/PCM. Inspect the wiring harness for damage, cuts, or corrosion along the path.
- With the ECM/PCM connector still disconnected, check for continuity between:
4. PCM/ECM as a Potential Cause (Less Common, but Possible)
While wiring issues, fuses, and port damage are more common causes, a faulty PCM/ECM can, in rare cases, be the reason for a non-functional OBD2 port. If you have meticulously checked all the wiring, power, and grounds, and everything else seems to be in order, a PCM/ECM malfunction becomes a possibility.
However, before concluding PCM/ECM failure:
- Re-examine all previous steps: Double-check your power, ground, fuse, and wiring tests. Ensure you haven’t missed anything.
- Consider professional diagnostics: At this stage, it’s advisable to consult a qualified mechanic or a diagnostic specialist. They have advanced tools and expertise to perform deeper diagnostics, including:
- Module Scanning: Professional scanners can sometimes attempt to communicate with individual modules on the CAN bus, even if the main OBD2 communication is failing. This can help isolate if the PCM/ECM is responding at all.
- Oscilloscope Analysis: An oscilloscope can be used to analyze the CAN bus signal waveforms to identify signal integrity issues or bus faults that a multimeter cannot detect.
If PCM/ECM replacement is suspected:
- Proper Diagnosis is Critical: PCM/ECM replacement is a significant step and expense. Ensure you have exhausted all other diagnostic possibilities and have strong evidence pointing to PCM/ECM failure.
- Programming and Compatibility: A replacement PCM/ECM will likely need to be programmed to your 2001 Dodge Ram 2500’s VIN and options. This often requires specialized tools and knowledge.
Addressing Transmission Issues (Context from Original Post)
The original poster mentioned transmission problems alongside the OBD2 port issue. While seemingly unrelated, it’s worth briefly considering if there’s any connection:
- Indirect Relationship (Power/Ground): It’s unlikely that transmission problems directly cause OBD2 port failure. However, shared power or ground circuits are a possibility in complex vehicle electrical systems. If there’s a broader electrical issue affecting multiple systems, it could theoretically impact both the transmission control and OBD2 port power. However, this is less common.
- Focus on OBD2 Port First: The most logical approach is to resolve the OBD2 port issue first. Once you have communication with the vehicle’s computer, you can then properly diagnose any transmission-related trouble codes and live data using your scanner. This will provide a clearer picture of the transmission problem itself, separate from the OBD2 port issue.
Conclusion: Restoring Your 2001 Dodge Ram 2500 OBD2 Port
A non-functional OBD2 port on your 2001 Dodge Ram 2500 can be a roadblock to effective vehicle diagnostics. By following this systematic troubleshooting guide, starting with basic checks and progressing to more advanced electrical testing, you can effectively pinpoint the root cause. In many cases, the issue is a simple blown fuse, a damaged pin, or a wiring problem. By methodically working through these steps, you’ll be well on your way to restoring communication with your truck’s computer and getting back on the road to proper diagnosis and repair. Remember to prioritize safety when working with vehicle electrical systems and consult a professional if you are unsure or uncomfortable with any of these diagnostic procedures.