The On-Board Diagnostics II (OBD2) port in your 2003 Honda CRV is a crucial interface for accessing your vehicle’s computer system. It’s primarily used for reading diagnostic trouble codes, which can help pinpoint issues when your check engine light comes on. However, the OBD2 port also provides power and ground connections that are essential for scan tools to function. Understanding the pin layout and how to check these pins is vital for both DIYers and professional mechanics. Incorrectly handling the OBD2 port pins can lead to electrical problems, as one Honda owner discovered.
Recently, a user of a Honda vehicle forum recounted an experience that highlights the importance of correctly identifying OBD2 port pins. While attempting to read transmission codes by jumping pins – a method sometimes used for older Honda models – they accidentally shorted pins on their OBD2 port. This mistake led to a cascade of electrical accessory failures.
Let’s delve into what happened and how you can avoid similar issues, especially when working with your 2003 Honda CRV’s OBD2 port.
The user intended to jump pins 4 and 9, a procedure mentioned in online forums for accessing diagnostic codes on certain Honda vehicles. However, due to an inverted view of the port, they mistakenly connected pin 16 (+12V battery) to pin 5 (Signal Ground).
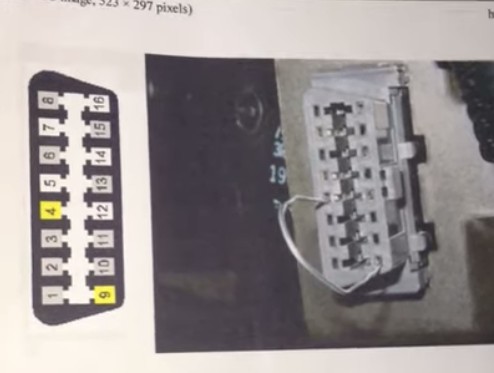 Correct OBD2 Pin Jumper Location
Correctly jumpering pins on an OBD2 port for diagnostic purposes (Note: This method is not recommended and can be risky if not done properly. Modern scan tools are the preferred method for reading codes).
According to standard OBD2 pinout guides, like those available on pinoutguide.com, pin 16 indeed carries battery voltage, and pin 5 is a signal ground. Shorting these pins creates a direct short circuit, potentially damaging fuses or electrical components.
After correcting the jumper and successfully reading the transmission code (which, in their case, indicated a faulty 3rd clutch oil pressure switch), the user discovered that several electrical accessories were no longer working. These included the radio, dome light (partially), power locks, remote key fob, and cruise control. Notably, the OBD2 port itself was no longer providing power, preventing the use of a scan tool.
The symptoms closely mirrored those described in an older online forum post about a similar Honda vehicle with radio power loss, further suggesting a connection between the OBD2 port mishap and the electrical failures.
Checking Your 2003 Honda CRV OBD2 Port Pins
If you suspect issues with your 2003 Honda CRV’s OBD2 port, or if you are experiencing electrical problems after working with it, checking the pins is a good first step. Here’s how you can approach it:
-
Visual Inspection: Carefully examine the OBD2 port for any signs of damage. Look for bent or broken pins, corrosion, or any debris that might be lodged in the connector.
-
Voltage Check (Pin 16): Pin 16 should provide battery voltage. To check this:
- Turn your Honda CRV’s ignition to the “ON” position (engine not running).
- Use a multimeter set to DC Voltage.
- Connect the black probe of the multimeter to a known good ground (e.g., a clean, unpainted metal part of the car’s chassis).
- Carefully touch the red probe to pin 16 of the OBD2 port.
You should read approximately 12V (battery voltage). If there is no voltage or significantly lower voltage, there might be a blown fuse or a wiring issue.
-
Ground Check (Pins 4 and 5): Pins 4 and 5 are ground pins. To check for continuity to ground:
- Set your multimeter to Continuity mode (or Ohms/Resistance mode).
- Connect one probe of the multimeter to pin 4 or pin 5.
- Connect the other probe to a known good ground point on the vehicle.
The multimeter should indicate continuity (a beep sound or a reading close to 0 ohms), indicating a good ground connection.
Troubleshooting Steps After Potential OBD2 Port Short
If you suspect you might have shorted pins on your 2003 Honda CRV’s OBD2 port and are experiencing electrical issues, follow these steps:
-
Check Fuses: The first and most crucial step is to check your Honda CRV’s fuse boxes. Consult your owner’s manual to locate the fuse boxes and identify fuses related to the OBD2 port, radio, interior lights, power locks, and other affected accessories. Look for blown fuses (broken filament inside the fuse). Replace any blown fuses with new fuses of the correct amperage rating.
-
Wiring Diagrams: If fuses are not the issue, or if fuses keep blowing, you may need to consult a wiring diagram for your 2003 Honda CRV. Wiring diagrams can help you trace the circuits connected to the OBD2 port and the affected accessories to identify potential short circuits or breaks in the wiring.
-
Professional Diagnosis: If you are uncomfortable working with electrical systems or cannot pinpoint the issue, it is best to take your 2003 Honda CRV to a qualified mechanic or Honda dealership. They have the tools, expertise, and wiring diagrams to diagnose and repair complex electrical problems.
Important Safety Precautions
- Always disconnect the negative battery terminal before working on the electrical system to prevent accidental shorts and further damage.
- Double-check pin numbers before jumping or probing any OBD2 pins. Refer to reliable pinout diagrams.
- Use caution when probing pins to avoid bending or damaging them.
- Consider using a scan tool instead of jumping pins for diagnostic purposes. Modern scan tools are safer and more reliable for reading trouble codes.
Working with your vehicle’s electrical system requires caution and knowledge. Understanding the OBD2 port pin layout and taking care when working with it can prevent accidental electrical damage and ensure you can effectively diagnose your 2003 Honda CRV. If in doubt, always seek professional help.