If you’re trying to diagnose a problem with your 2003 Hyundai Sonata using an OBD2 code reader, one of the first things you might need to check is the fuse related to the On-Board Diagnostics system. Locating the correct fuse is crucial not only for ensuring your code reader powers up but also for understanding potential electrical issues that could be affecting your vehicle’s diagnostics and other systems. This guide will walk you through finding the relevant fuse locations and provide some helpful tips for troubleshooting common problems, drawing on real-world experiences to give you a practical understanding.
When working on your car’s electrical system, especially when dealing with sensitive components like airbags or diagnostic systems, it’s essential to proceed with caution. One common mistake, as shared by many DIYers, is forgetting to disconnect the negative battery terminal before starting any electrical work. This simple step can prevent accidental shorts and potential damage to your car’s electronics. Imagine the frustration of tackling a seemingly simple task, only to find yourself facing a dashboard warning light afterward!
To pinpoint the fuse for your OBD2 port on a 2003 Hyundai Sonata, you’ll typically need to consult your owner’s manual. This manual is your best resource for accurate fuse box diagrams and fuse designations specific to your vehicle model and year. Hyundai Sonatas of this era usually have at least two fuse box locations:
-
Interior Fuse Box: This fuse box is commonly located inside the cabin of the Sonata. Typical locations include beneath the dashboard on the driver’s side or sometimes on the passenger side. You might need to remove a small access panel to reveal the fuse box.
-
Engine Compartment Fuse Box: As the name suggests, this fuse box is situated under the hood, often near the battery or engine bay walls.
Alt text: Location of the interior fuse box on a Hyundai Sonata, typically under the dashboard on the driver’s side, with a view of the access panel.
Within these fuse boxes, you’ll find a diagram, either printed on the inside of the fuse box cover or detailed in your owner’s manual. This diagram is key to identifying the fuse associated with the OBD2 system, or more broadly, the “ECM” (Engine Control Module) or “ENG CONT” fuse, which often powers the OBD2 port. Look for labels that clearly indicate “OBD,” “DIAGNOSTIC,” “ECM,” or “ENGINE CONTROL.” The amperage rating of the fuse will also be indicated, usually printed on the fuse itself and specified in the diagram (often 10A or 15A for diagnostic related fuses).
If you’re unable to locate your owner’s manual, there are alternative resources. Online Hyundai owner’s manual databases can sometimes be found with a quick search, allowing you to download a PDF version of the manual for your 2003 Sonata. Additionally, online forums and communities dedicated to Hyundai vehicles can be valuable sources of information. Other Sonata owners may have encountered similar issues and can offer guidance on fuse locations and troubleshooting tips.
Alt text: Diagram of an engine compartment fuse box, highlighting the symbols and labels used to identify different fuses, including potential locations for ECM or diagnostic fuses.
Let’s consider a scenario where you’re experiencing issues with your OBD2 code reader not powering on when connected to your 2003 Sonata. Here’s a step-by-step approach to troubleshoot fuse-related problems:
- Locate the Fuse Boxes: Refer to the descriptions above to find both the interior and engine compartment fuse box locations in your Sonata.
- Consult the Fuse Box Diagram: Obtain the fuse box diagram from your owner’s manual or online resources. Identify fuses labeled “OBD,” “DIAGNOSTIC,” “ECM,” or “ENGINE CONTROL.”
- Visually Inspect the Fuse: Once you’ve located the potential fuse, use a fuse puller (often found in one of the fuse boxes) or needle-nose pliers to carefully remove the fuse. Hold the fuse up to the light and check if the thin wire inside is broken or melted. A blown fuse will have a visible gap in this wire.
- Test with a Multimeter (Optional): For a more definitive test, use a multimeter in continuity mode. Place the probes on each of the fuse’s metal prongs. If there is no continuity (no beep or reading), the fuse is blown.
- Replace the Fuse: If the fuse is blown, replace it with a new fuse of the exact same amperage rating. Using a fuse with a higher amperage rating can be dangerous and could damage your vehicle’s electrical system.
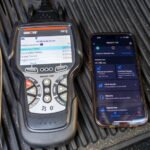
- Test Your OBD2 Reader: After replacing the fuse, try connecting your OBD2 code reader again to see if it powers on and communicates with your car’s computer.
Alt text: Close-up of a blown automotive fuse, clearly showing the broken filament inside the fuse casing, indicating an electrical overload.
If replacing the fuse doesn’t solve the issue, or if the fuse blows again immediately, it indicates a more significant electrical problem. This could be a short circuit in the wiring related to the OBD2 port or the systems it powers. In such cases, further diagnosis by a qualified automotive technician is recommended. Attempting to bypass fuses or repeatedly replacing blown fuses without addressing the underlying issue can lead to more serious electrical damage and potential safety hazards.
Remember, while checking the OBD2 fuse is a common first step, it’s also crucial to consider other factors if you’re experiencing diagnostic issues. Ensure your OBD2 code reader is compatible with your 2003 Hyundai Sonata and that you are following the reader’s instructions correctly. Sometimes, the issue might not be electrical at all but rather related to the vehicle’s computer system or sensors.
By systematically checking the fuse for your OBD2 port and understanding the basics of your 2003 Hyundai Sonata’s electrical system, you can take a proactive step in diagnosing and resolving car problems. However, always prioritize safety and seek professional help when dealing with complex electrical issues or when you are unsure about any step in the troubleshooting process.