Fuses are critical components in your 2006 Ford Ranger’s electrical system, acting as safeguards against overloads that can damage sensitive electronics. If you’re experiencing issues with your On-Board Diagnostics II (OBD2) port, or other electrical malfunctions, a blown fuse might be the culprit. Before you delve into complex repairs, checking the fuses related to the OBD2 system is a crucial first step. This guide will walk you through locating the relevant fuses, understanding their function, and how to check and replace them, specifically focusing on the “2006 Ford Ranger Obd2 Fuse”.
The fuse panels in your Ford Ranger are strategically placed to protect different circuits. Understanding their locations and the fuses they house is essential for effective troubleshooting. Let’s explore the fuse box diagrams and pinpoint the fuses relevant to your OBD2 port and related systems.
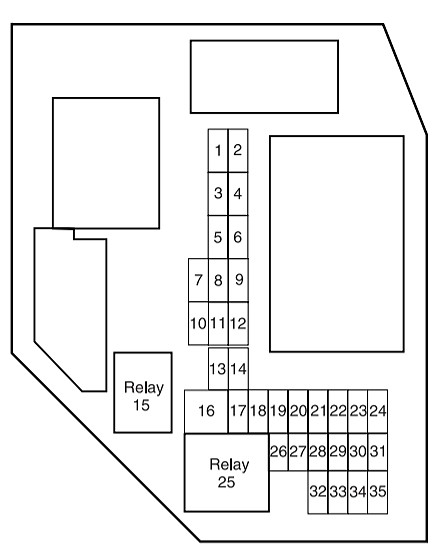
Passenger Compartment Fuse Panel
The primary fuse panel you’ll need to access is located inside the passenger compartment. This panel controls many of the interior electrical functions, including the diagnostic connector, which is crucial for accessing your vehicle’s computer system via the OBD2 port.
| No. | AMPS | Protected circuits |
|---|---|---|
| 1 | 5 | Instrument panel dimmer switch |
| 2 | 10 | Trailer tow park lamps |
| 3 | 10 | Right low beam headlamp |
| 4 | 10 | Left low beam headlamp |
| 5 | 30 | 2004-2007: Windshield wipers/washer |
| 5 | 2008-2012: Windshield wiper module (run/accy) | |
| 6 | 10 | Radio (RUN/ACCY), Door switch illumination (2008-2012) |
| 7 | 5 | 2004-2006: Headlamp illumination indicator |
| 8 | 10 | Restraints Control Module (RCM), PADI (Passenger Air bag Deactivation Indicator), Occupant classification sensor (OCS; 2007-2012) |
| 9 | 5 | Cluster air bag indicator |
| 10 | 10 | Cluster (RUN/START), 4×4 module (RUN/START) |
| 11 | 10 | Passenger compartment fuse panel (Logic power) |
| 12 | 15 | Center console subwoofer amplifier, Satellite radio |
| 13 | 15 | Horn, Interior lamps |
| 14 | 15 | High beam headlamp, High beam indicator (cluster) |
| 16 | 30 | Power windows |
| 17 | 15 | Turn signals/Hazards |
| 18 | — | Not used |
| 19 | 20 | Center High-Mounted Stop Lamp (CHMSL)/Stop lamps |
| 20 | 10 | Anti-lock Brake System (ABS) module, Brake-shift interlock (2004-2007), Speed control module, Back-up lamps, Overdrive cancel switch, Electronic flasher (turn/hazard) |
| 21 | 5 | Starter relay |
| 22 | 5 | Spare |
| 23 | 30 | Headlamps (low and high beam) |
| 24 | 20 | Radio |
| 26 | 2 | 2004-2006: Brake pressure switch 2007-2012: Redundant cruise switch |
| 27 | 10 | Climate control blower relay/blend doors, 4×4 module (2004-2006) |
| 28 | 15 | 4×4 module battery feed (B+) |
| 29 | 20 | Cigar lighter or power point, Diagnostic connector (OBD II) |
| 30 | 5 | Power mirrors |
| 31 | 20 | Front park lamps, Rear park lamps, License plate lamps, Dimmer switch, Trailer tow park lamps |
| 32 | 5 | Brake switch (logic) |
| 33 | 5 | Instrument cluster battery feed (B+) |
| 34 | 20 | Power point |
| 35 | 15 | Power locks |
| Relay | ||
| 15 | 2004-2007: One-touch down relay | |
| 25 | Accessory relay |
Fuse #29 in this panel is particularly important as it is rated at 20 amps and protects the Diagnostic connector (OBD II), along with the cigar lighter or power point. If your OBD2 scanner is not powering up when connected to your 2006 Ford Ranger, this fuse is the first point of inspection. A blown fuse here will directly prevent communication with your vehicle’s computer.
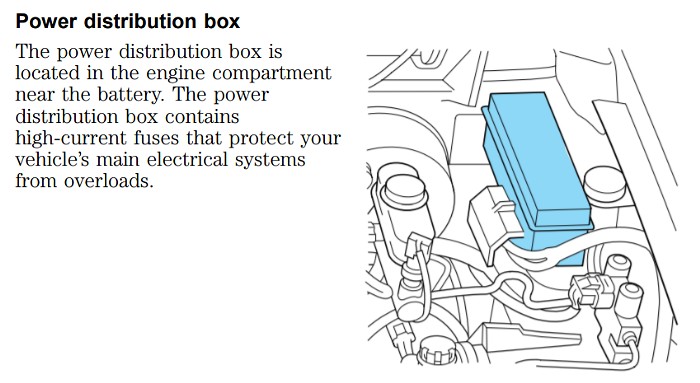
Power Distribution Box
In addition to the passenger compartment fuse panel, the power distribution box, located in the engine compartment, houses high-current fuses and relays that protect major vehicle systems. While less directly related to the OBD2 port itself, fuses in this box can affect systems that indirectly interact with or are monitored by the OBD2 system.
The power distribution box is situated in the engine compartment on the driver’s side, near the fender.
Here are diagrams specific to the engine type in your 2006 Ford Ranger:
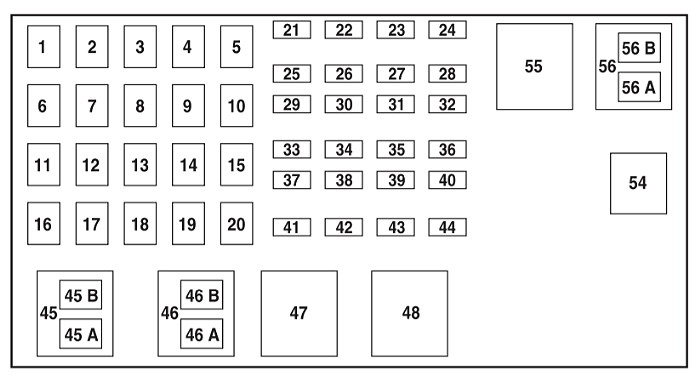 2006 Ford Ranger 2.3L Engine Power Distribution Box Diagram
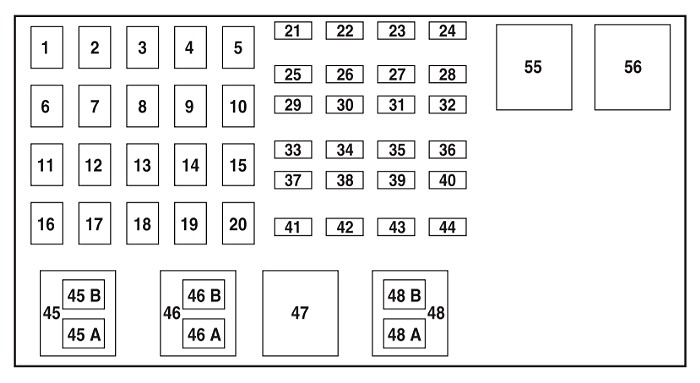 2006 Ford Ranger 3.0L & 4.0L Engines Power Distribution Box Diagram
| No. | AMP | Protected circuits |
|---|---|---|
| 1 | 50 | 2004: Passenger compartment fuse panel |
| 40 | 2005-2012: Passenger compartment fuse panel | |
| 2 | 40 | 2004-2007: Amplifier (Tremor audio system only) |
| 3 | 50 | 2004: Passenger compartment fuse panel |
| 40 | 2005-2012: Passenger compartment fuse panel | |
| 4 | — | Not Used |
| 5 | 50 | Passenger compartment fuse panel |
| 6 | — | Not Used |
| 7 | 40 | 2004-2007: Starter |
| 30 | 2008-2012: Starter | |
| 8 | — | Not Used |
| 9 | 40 | Ignition switch |
| 10 | — | Not Used |
| 11 | 30 | Powertrain Control Module (PCM), Engine sensors |
| 12 | — | Not Used |
| 13 | 30 | Blower motor (climate control) |
| 14 | — | Not Used |
| 15 | 30 | 2004: Anti-lock Brake System (ABS) (solenoids) |
| 16 | — | Not Used |
| 17 | 40 | ABS (motor) |
| 18 | — | Not Used |
| 19 | 20 | 2.3L engine: Engine fan |
| 20 | — | Not Used |
| 21 | 10 | PCM keep alive power, Canister purge valve solenoid (2007-2012) |
| 22 | — | Not Used |
| 23 | 20 | 2004-2006: Fuel pump |
| 30 | 2007-2012: Fuel pump motor, Fuel injectors | |
| 24 | — | Not Used |
| 25 | 10 | A/C clutch solenoid |
| 26 | — | Not Used |
| 27 | 20 | 4×4 module |
| 28 | — | Not Used |
| 29 | 30 | 2008-2012: Wipers/washer |
| 30 | — | Not Used |
| 31 | 15 | Fog lamps |
| 32 | 30 | 2005-2012: Anti-lock brake system (ABS) module |
| 33 | — | Not Used |
| 34 | — | Not Used |
| 35 | — | Not Used |
| 36 | — | Not Used |
| 37 | — | Not Used |
| 38 | 7.5 | Trailer tow (right turn) |
| 39 | 15 | 2007-2012: PCM power |
| 40 | — | Not Used |
| 41 | 15 | 2004-2006: Heated Exhaust Gas Oxygen (HEGO) sensors, EVAP canister vent valve, Exhaust Gas Recirculation (EGR) stepper motor, Transmission |
| 10 | 2007-2012: Automatic transmission | |
| 42 | 7.5 | Trailer tow (left turn) |
| 43 | 20 | 2007-2012: Engine fan relay coil, A/C relay coil, IAC, Mass air flow sensor, Heated exhaust gas oxygen sensor, Catalyst module sensor, Vapor management valve solenoid |
| 44 | 15 | 2007-2012: Ignition coil, Capacitor |
| Relay | ||
| 45A | 2004-2007: Wiper HI/LO relay | |
| 45B | 2004-2007: Wiper Park/Run relay | |
| 46A | 2004-2006 (2.3 L): Fuel pump relay 2007-2012 (2.3 L): Fuel pump relay, Fuel injectors relay 3.0L and 4.0L engines: A/C clutch solenoid | |
| 46B | 2004-2007: Washer pump relay | |
| 47 | 2.3L engine: Engine fan relay 3.0L and 4.0L engines: PCM relay | |
| 48 | 2.3L engine: Starter relay | |
| 48A | 2004-2006 (3.0 L, 4.0 L): Fuel pump relay 2007-2012 (3.0 L, 4.0 L): Fuel pump relay, Fuel injectors relay | |
| 48B | 3.0L and 4.0L engines: Fog lamp relay | |
| 54 | Powertrain Control Module (PCM) relay | |
| 55 | Blower relay | |
| 56 | 3.0L and 4.0L engines: Starter relay | |
| 56A | 2.3L engine: A/C clutch solenoid relay | |
| 56B | 2.3L engine: Fog lamp relay |
Fuses #1, #3, and #5 in the power distribution box are listed as feeding the passenger compartment fuse panel. While not directly labeled “OBD2,” these fuses are vital as they supply power to the entire interior fuse panel, which does contain the OBD2 fuse (#29). If you find fuse #29 in the passenger compartment panel is intact, but still have OBD2 issues, checking these larger fuses in the power distribution box is the next logical step.
Checking and Replacing Fuses
Once you have identified the fuses to inspect, the process of checking and replacing them is straightforward:
-
Locate the Fuse Panel: For the passenger compartment fuse panel, it’s on the left end of the instrument panel. Remove the cover by using a finger in the designated divot and gently pulling. Inside the cover, you’ll often find spare fuses and a fuse puller tool. The power distribution box is under the hood in the engine compartment.
-
Identify the Fuse to Check: Refer to the fuse panel cover diagram to locate the specific fuse number (like #29 for the OBD2 port in the passenger compartment).
-
Inspect the Fuse: Visually check the fuse. Look through the clear plastic casing for a broken or melted metal wire inside. If the wire is separated, the fuse is blown and needs replacement.
Alternatively, use a fuse tester for a quick check without removing the fuse. A Bussmann fuse tester is a handy tool. Simply align the tester prongs with the metal contacts on top of the fuse and observe the indicator light. A lit indicator means the fuse is good.
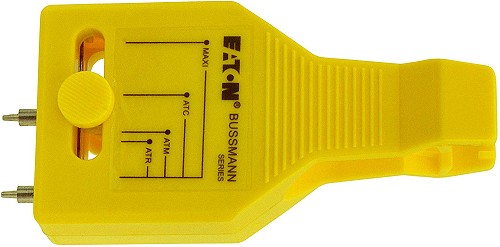
Using a fuse tester to check a car fuse without removal. -
Replace the Fuse: If the fuse is blown, replace it with a new fuse of the exact same amperage rating. The correct amperage is indicated on the fuse itself and in the fuse panel diagrams.
*WARNING: Never use a fuse with a higher amperage rating than specified. This can lead to serious electrical damage and risk of fire.
-
Reinstall the Fuse Panel Cover: Once replaced, securely put the fuse panel cover back in place.
If the fuse blows again immediately after replacement, there is likely an underlying electrical problem causing an overload in the circuit. Further diagnosis by a qualified mechanic is recommended to pinpoint and repair the root cause.
Fuse Color / Ratings:
Fuses are color-coded to easily identify their amperage rating. Always match the color and rating when replacing a fuse to ensure proper circuit protection.
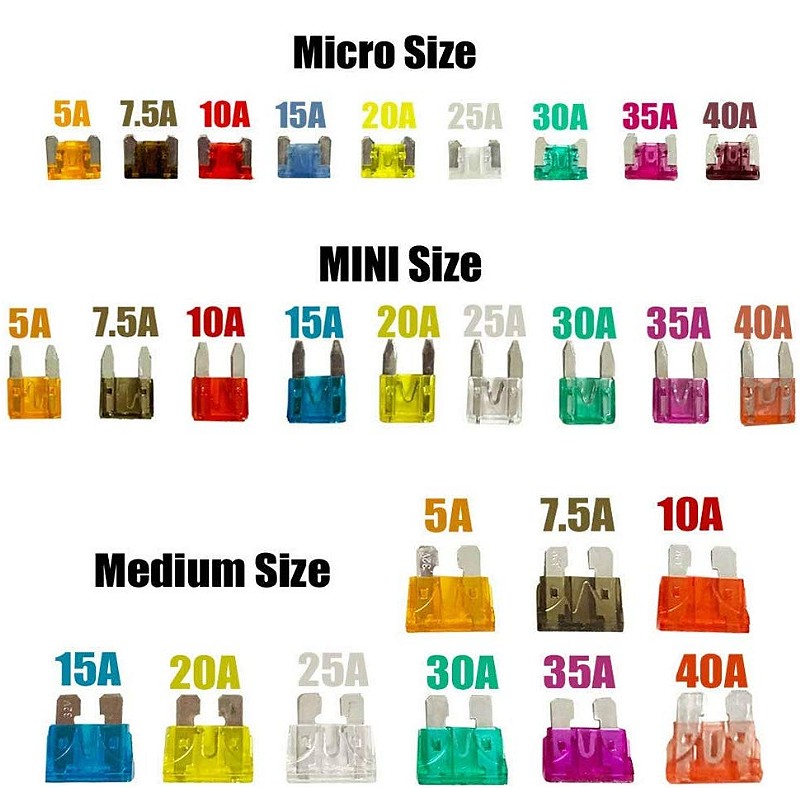 Automotive fuse color codes and amperage ratings.
By systematically checking the fuses, especially fuse #29 in the passenger compartment and related fuses in the power distribution box, you can effectively troubleshoot OBD2 port issues in your 2006 Ford Ranger and ensure your vehicle’s electrical system is properly protected.