Having trouble connecting your OBD2 scanner to your 2008 Honda CRV? A common culprit could be a blown fuse. The OBD2 port, your gateway to your vehicle’s computer for diagnostics and performance monitoring, needs power to function. If it’s not getting power, your scanner won’t be able to communicate with your car’s systems. Locating the correct fuse is the first step in diagnosing this issue. This guide will pinpoint the fuse that powers the OBD2 port in your 2008 Honda CRV and provide steps to check and resolve the problem.
Identifying the OBD2 Port Fuse in Your 2008 Honda CRV
The On-Board Diagnostics II (OBD2) port in your 2008 Honda CRV receives its power from a specific fuse located in the under-hood fuse box. This fuse is crucial for providing the necessary 12-volt power to Pin 16 of the Data Link Connector (DLC), which is the standard OBD2 port. Pins 4 and 5 are designated as ground connections.
For your 2008 Honda CRV, the fuse you’re looking for is Fuse 23, labeled “Back up”, and it’s a 10 Amp fuse. This fuse is situated in the primary fuse box located under the hood of your vehicle.
To access the under-hood fuse box:
- Ensure your vehicle’s ignition is turned off.
- Open the hood of your 2008 Honda CRV.
- Locate the fuse box, usually on the driver’s side of the engine compartment, near the battery. It is typically a black plastic box with a labeled cover.
- Open the fuse box cover. You may need to release clips or latches to open it.
Once you have the fuse box open, you’ll see a diagram on the underside of the cover or printed on a label within the box. This diagram illustrates the location of each fuse and relay, along with its function and amperage. Refer to this diagram to pinpoint the exact location of Fuse 23 “Back up” (10A).
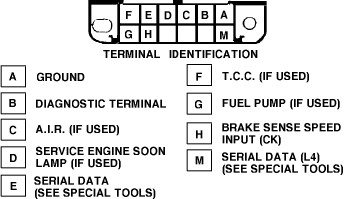 Honda CRV Under-hood Fuse Box Diagram
Image of the fuse box diagram for a 2008 Honda CRV, highlighting the layout and fuse positions.
Honda CRV Fuse Box Location under hood
Image showing the general location of the under-hood fuse box in a Honda CRV engine bay.
Honda CRV Under-hood Fuse Box Open
Image of an open fuse box in a Honda CRV, revealing the fuses and components inside.
Steps to Check and Replace the OBD2 Port Fuse
After locating Fuse 23 “Back up” (10A), follow these steps to check its condition and replace it if necessary:
-
Visual Inspection: Carefully examine the fuse. Look for a broken filament inside the fuse window. If the small wire inside is melted or broken, the fuse is blown and needs replacement.
Blown Fuse Visual InspectionImage illustrating a visual inspection of a fuse, pointing out a blown or broken filament.
-
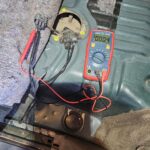
Fuse Tester or Multimeter: For a more definitive check, use a fuse tester or a multimeter.
- Fuse Tester: Simply insert the fuse tester into the test points on top of the fuse while it’s still in the fuse box. If the tester doesn’t light up, the fuse is likely blown.
- Multimeter: Set your multimeter to the continuity setting (or Ohms). Remove the fuse from the fuse box. Place the multimeter probes on each of the fuse’s metal prongs. If the multimeter reads no continuity (or infinite resistance), the fuse is blown.
-
Replacement: If the fuse is blown, replace it with a new 10 Amp fuse. It’s crucial to use the correct amperage rating. Using a fuse with a higher amperage can potentially damage the electrical system.
- Use a fuse puller (often found in the fuse box itself) or needle-nose pliers to carefully remove the blown fuse.
- Insert the new 10 Amp fuse into the Fuse 23 slot. Ensure it’s firmly seated.
-
Test the OBD2 Port: After replacing the fuse, try connecting your OBD2 scanner again to see if it now powers up and can communicate with your vehicle.
What if Replacing the Fuse Doesn’t Work?
If you replace Fuse 23 and the OBD2 port still doesn’t power up, or if the fuse blows again immediately, there might be a more serious underlying issue. Here are a few potential causes to investigate:
- Short Circuit: A short circuit in the wiring related to the OBD2 port or the “Back up” circuit could be causing the fuse to blow. This requires careful inspection of the wiring harness for any signs of damage, fraying, or exposed wires.
- OBD2 Port Wiring or Connector Damage: Inspect the OBD2 port itself for any bent or damaged pins. Check the wiring harness connected to the OBD2 port for any breaks or damage.
- Faulty OBD2 Scanner: While less likely, try using a different OBD2 scanner to rule out a problem with your scanner itself.
If you are not comfortable performing electrical diagnostics, it’s recommended to take your 2008 Honda CRV to a qualified mechanic. They have the tools and expertise to diagnose and repair more complex electrical issues affecting your OBD2 port.
Honda CRV Fuse Replacement
Image depicting the process of replacing a fuse in a car fuse box.
By following these steps, you should be able to locate and check the fuse powering the OBD2 port in your 2008 Honda CRV. This simple check can often resolve OBD2 connectivity issues and get you back on track with your vehicle diagnostics.