Understanding the 2008 Lr2 Specs For Obd2 Protocol is crucial for effective vehicle diagnostics and maintenance. For Land Rover LR2 owners, especially when addressing fuel system issues, familiarity with the OBD2 system becomes invaluable. Recently, I tackled a fuel pressure sensor replacement (part number LR005490) on my 2008 LR2 and want to share my experience, focusing on how OBD2 protocol plays a role in this process. While numerous online tutorials exist, this guide aims to provide a clearer picture, particularly for those less familiar with DIY car repairs.
Step-by-Step Fuel Pressure Sensor Replacement on a 2008 LR2
Before starting any work on your fuel system, safety is paramount. Begin by disconnecting the battery to prevent any electrical sparks during the process.
On the passenger side fuel rail, you’ll find a T25 cap. Removing this cap reveals a Schrader valve. It’s advisable to place a rag underneath this area. Using a small flathead screwdriver, gently depress the pin inside the Schrader valve to release any residual fuel pressure. In my case, as the vehicle had been sitting for 12 hours, there was minimal pressure release or fuel spillage. Working on a cold engine is always recommended for safety and comfort.
Moving to the driver’s side fuel rail, the next step involves disconnecting the wire connector attached to the fuel pressure sensor. Again, position rags beneath to catch any potential fuel leakage. Access to the T25 bolt securing the sensor is limited. Initially, my standard wrench and bit set seemed adequate. However, I quickly realized that as the bolt is unscrewed, the clearance diminishes, making it impossible to remove the wrench and bolt simultaneously. My 25mm T25 bit proved too long. I had to partially screw the bolt back in just to extract the wrench. The key takeaway here is that patience is essential when fully unscrewing the bolt by hand once it’s loosened.
To avoid this tool constraint in future replacements, investing in a low-profile mini bit set with 15mm bits is highly recommended. These compact sets are available on platforms like Amazon and are invaluable for tight-space automotive work.
Replacing the sensor itself is straightforward. Minimal fuel spillage occurred during the sensor swap, contrary to some videos where significant spillage was shown – likely due to recent vehicle operation. Upon reconnecting the battery, a minor spark at the terminal is normal. It’s crucial to thoroughly clean any spilled fuel and allow ample evaporation time (20+ minutes) before reconnecting the power to mitigate any fire risk.
OBD2 Protocol Verification and Fuel Pressure Monitoring
Post-replacement, verifying the fuel pressure using an OBD2 device is a crucial step to ensure the repair’s success and confirm that the 2008 LR2 specs for OBD2 protocol are being correctly interpreted by your diagnostic tool. Upon connecting my OBD2 scanner, the fuel pressure reading was within the normal range, registering around 55psi, and slightly increasing to 61psi during cold starts. This confirmed that the new sensor was functioning correctly and communicating effectively with the vehicle’s ECU via the OBD2 protocol.
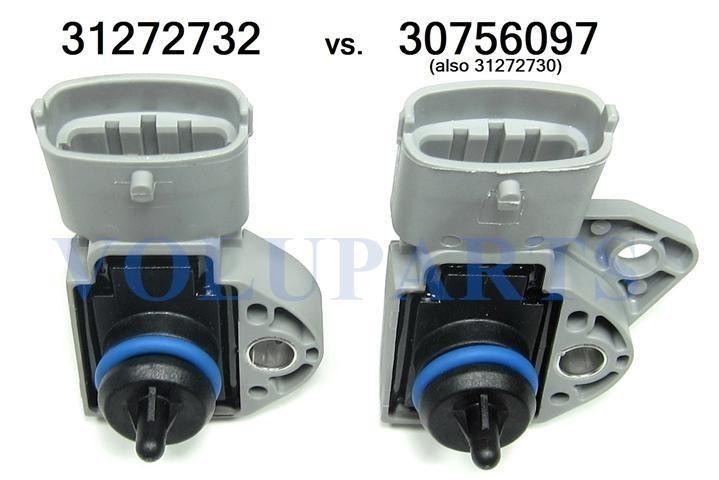
It’s worth noting that fuel pressure sensors for this model may have slight variations, primarily concerning the mounting hole for a nearby wire harness clip. While my replacement sensor was a Bosch unit, it’s advisable to compare the part currently installed in your LR2, referencing resources like Volvo part numbers (as seen in the image below) to ensure compatibility.
For visual guidance, numerous YouTube tutorials are available, with the linked video being particularly helpful: You Tube.
In conclusion, replacing the fuel pressure sensor on a 2008 LR2 is a manageable DIY task, especially when approached with the correct tools and a clear understanding of the process. Utilizing an OBD2 scanner to verify fuel pressure afterward is essential, highlighting the importance of understanding 2008 LR2 specs for OBD2 protocol for effective vehicle maintenance and diagnostics.