Understanding the fuse box diagram of your 2011 Cadillac Escalade is crucial for diagnosing and resolving electrical issues. Fuses protect your vehicle’s electrical circuits from overloads, and knowing their location and function can save you time and money on repairs. While there isn’t a specific “OBD2 fuse”, several fuses are vital for the systems that the OBD2 port relies on for diagnostics. This guide will walk you through the fuse box locations and diagrams for your 2011 Escalade, ensuring you can quickly identify and address any fuse-related problems.
The 2011 Cadillac Escalade incorporates three distinct fuse boxes, strategically placed to manage the vehicle’s extensive electrical system. These fuse boxes are:
- Engine Compartment Fuse Block: Located under the hood, this fuse box houses fuses and relays for critical engine and powertrain components.
- Instrument Panel Fuse Block: Situated inside the vehicle, this panel controls interior and accessory functions.
- Center Instrument Panel Fuse Block: Also located within the interior, this box manages additional convenience and body electrical systems.
Locating the correct fuse box and identifying the faulty fuse is the first step in any electrical repair. Below, you will find diagrams and detailed fuse listings for the Engine Compartment and Instrument Panel fuse boxes of your 2011 Cadillac Escalade.
Engine Compartment Fuse Block Diagram
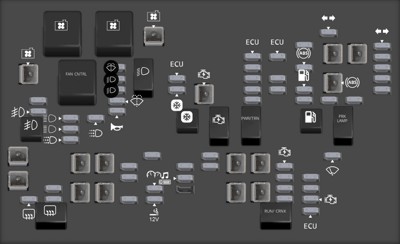
The engine compartment fuse block is the primary electrical distribution point for many of your Escalade’s essential systems. Familiarizing yourself with its layout is key for troubleshooting engine-related electrical problems.
 2011 Cadillac Escalade Engine Compartment Fuse Box Diagram
This diagram illustrates the layout of the Engine Compartment Fuse Block. Refer to the table below for a detailed list of fuses and their corresponding functions within this box.
| Fuse Number | Type | Description |
|---|---|---|
| 1 | Fuse MINI | Right Trailer Stop/ Turn Lamp |
| 2 | Fuse MINI | Electronic Stability Suspension Control, Automatic Level Control Exhaust |
| 3 | Fuse MINI | Left Trailer Stop/ Turn Lamp |
| 4 | Fuse MINI | Engine Controls |
| 5 | Fuse MINI | Engine Control Module, Throttle Control |
| 6 | Fuse MINI | Trailer Brake Controller |
| 7 | Fuse MINI | Front Washer |
| 8 | Fuse MINI | Oxygen Sensors |
| 9 | Fuse MINI | Antilock Brakes System 2 |
| 10 | Fuse MINI | Trailer Back-up Lamps |
| 11 | Fuse MINI | Driver Side Low-Beam Headlamp |
| 12 | Fuse MINI | Engine Control Module (Battery) |
| 13 | Fuse MINI | Fuel Injectors, Ignition Coils (Right Side) |
| 14 | Fuse MINI | Transmission Control Module (Battery) |
| 15 | Fuse MINI | Vehicle Back-up Lamps |
| 16 | Fuse MINI | Passenger Side Low-Beam Headlamp |
| 17 | Fuse MINI | Air Conditioning Compressor |
| 18 | Fuse MINI | Oxygen Sensors |
| 19 | Fuse MINI | Transmission Controls (Ignition) |
| 20 | Fuse MINI | Fuel Pump |
| 21 | Fuse MINI | Fuel System Control Module |
| 22 | Fuse MINI | Headlamp Washer |
| 23 | Fuse MINI | Rear Windshield Washer |
| 24 | Fuse MINI | Fuel Injectors, Ignition Coils (Left Side) |
| 25 | Fuse MINI | Trailer Park Lamps |
| 26 | Fuse MINI | Driver Side Park Lamps |
| 27 | Fuse MINI | Passenger Side Park Lamps |
| 28 | Fuse MINI | Fog Lamps |
| 29 | Fuse MINI | Horn |
| 30 | Fuse MINI | Passenger Side High-Beam Headlamp |
| 31 | Fuse MINI | Daytime Running Lamps (DRL) (If Equipped) |
| 32 | Fuse MINI | Driver Side High-Beam Headlamp |
| 33 | Fuse MINI | Daytime Running Lamps 2 (If Equipped) |
| 34 | Fuse MINI | Sunroof |
| 35 | Fuse MINI | Key Ignition System, Theft Deterrent System |
| 36 | Fuse MINI | Windshield Wiper |
| 37 | Fuse MINI | SEO B2 Upfitter Usage (Battery) |
| 38 | Fuse MINI | Electric Adjustable Pedals |
| 39 | Fuse MINI | Climate Controls (Battery) |
| 40 | Fuse MINI | Airbag System (Ignition) |
| 41 | Fuse MINI | Amplifier |
| 42 | Fuse MINI | Audio System |
| 43 | Fuse MINI | Miscellaneous (Ignition), Cruise Control |
| 44 | Fuse MINI | Liftgate Release |
| 45 | Fuse MINI | Airbag System (Battery) |
| 46 | Fuse MINI | Instrument Panel Cluster |
| 48 | Fuse MINI | Auxiliary Climate Control (Ignition) |
| 49 | Fuse MINI | Center High-Mounted Stoplamp (CHMSL) |
| 50 | Fuse MINI | Rear Defogger |
| 51 | Fuse MINI | Heated Mirrors |
| 52 | Fuse MINI | SEO B1 Upfitter Usage (Battery) |
| 53 | Fuse MINI | Cigarette Lighter, Auxiliary Power Outlet |
| 54 | Fuse MINI | Automatic Level Control Compressor Relay |
| 55 | Fuse MINI | Climate Controls (Ignition) |
| 56 | Fuse MINI | Engine Control Module, Secondary Fuel Pump (Ignition) |
| 57 | Fuse FMX/JCase | Cooling Fan 1 |
| 58 | Fuse FMX/JCase | Automatic Level Control Compressor |
| 59 | Fuse FMX/JCase | Heavy Duty Antilock Braking System |
| 60 | Fuse FMX/JCase | Cooling Fan 2 |
| 61 | Fuse FMX/JCase | Antilock Brake System 1 |
| 62 | Fuse FMX/JCase | Starter |
| 63 | Fuse FMX/JCase | Stud 2 (Trailer Brakes) |
| 64 | Fuse FMX/JCase | Left Bussed Electrical Center 1 |
| 65 | Fuse FMX/JCase | Electric Running Boards |
| 66 | Fuse FMX/JCase | Heated Windshield Washer System |
| 67 | Fuse FMX/JCase | Transfer Case |
| 68 | Fuse FMX/JCase | Stud 1 (Trailer Connector Battery Power) |
| 69 | Fuse FMX/JCase | Mid-Bussed Electrical Center 1 |
| 70 | Fuse FMX/JCase | Climate Control Blower |
| 71 | Fuse FMX/JCase | Power Liftgate Module |
| 72 | Fuse FMX/JCase | Left Bussed Electrical Center 2 |
| Relay FAN HI | Relay | Cooling Fan High Speed |
| Relay FAN LO | Relay | Cooling Fan Low Speed |
| Relay FAN CNTRL | Relay | Cooling Fan Control |
| Relay HDLP LO/HID | Relay | Low-Beam Headlamp |
| Relay FOG LAMP | Relay | Front Fog Lamps |
| Relay A/C CMPRSR | Relay | Air Conditioning Compressor |
| Relay STRTR | Relay | Starter |
| Relay PWR/TRN | Relay | Powertrain |
| Relay FUEL PMP | Relay | Fuel Pump |
| Relay PRK LAMP | Relay | Parking Lamps |
| Relay REAR DEFOG | Relay | Rear Defogger |
| Relay RUN/ CRNK | Relay | Switched Power |
Instrument Panel Fuse Block Diagram
Located inside the cabin, usually beneath the dashboard or behind a panel, the Instrument Panel Fuse Block controls many interior and accessory circuits.
 2011 Cadillac Escalade Instrument Panel Fuse Box Diagram
This diagram details the layout for the Instrument Panel Fuse Block. Refer to the table below for a description of each fuse in this location.
| Fuse Number | Type | Description |
|---|---|---|
| 1 | Fuse MINI | Rear Seats |
| 2 | Fuse MINI | Rear Accessory Power Outlet |
| 3 | Fuse MINI | Steering Wheel Controls Backlight |
| 4 | Fuse MINI | Driver Door Module |
| 5 | Fuse MINI | Dome Lamps, Driver Side Turn Signal |
| 6 | Fuse MINI | Driver Side Turn Signal, Stoplamp |
| 7 | Fuse MINI | Instrument Panel Back Lighting |
| 8 | Fuse MINI | Passenger Side Turn Signal, Stoplamp |
| 9 | Fuse MINI | Passenger Door Module, Driver Unlock |
| 10 | Fuse MINI | Power Door Lock 2 (Unlock Feature) |
| 11 | Fuse MINI | Power Door Lock 2 (Lock Feature) |
| 12 | Fuse MINI | Stoplamps, Center HighMounted Stoplamp |
| 13 | Fuse MINI | Rear Climate Controls |
| 14 | Fuse MINI | Power Mirror |
| 15 | Fuse MINI | Body Control Module (BCM) |
| 16 | Fuse MINI | Accessory Power Outlets |
| 17 | Fuse MINI | Interior Lamps |
| 18 | Fuse MINI | Power Door Lock 1 (Unlock Feature) |
| 19 | Fuse MINI | Rear Seat Entertainment |
| 20 | Fuse MINI | Ultrasonic Rear Parking Assist, Power Liftgate |
| 21 | Fuse MINI | Power Door Lock 1 (Lock Feature) |
| 22 | Fuse MINI | Driver Information Center (DIC) |
| 23 | Fuse MINI | Rear Wiper |
| 24 | Fuse MINI | Cooled Seats |
| 25 | Fuse MINI | Driver Seat Module, Remote Keyless Entry System |
| 26 | Fuse MINI | Driver Power Door Lock (Unlock Feature) |
| LT DR_CB | Circuit breaker | Driver Side Power Window Circuit Breaker |
| LT DR | Connector | Driver Door Harness Connection |
| BODY1 | Connector | Harness Connector |
| BODY2 | Connector | Harness Connector |
Understanding Fuses and OBD2 Diagnostics
While there isn’t a dedicated fuse labeled “OBD2,” the On-Board Diagnostics II (OBD2) system relies on several vehicle modules and sensors to function. If you are experiencing issues with your OBD2 scanner connecting or retrieving data, checking related fuses can be a helpful first step.
Fuses related to the Engine Control Module (ECM), Transmission Control Module (TCM), and Body Control Module (BCM) – all of which are essential for OBD2 data – are found in these fuse boxes. For example, fuses powering the ECM (like Fuse 5 and 12 in the Engine Compartment Fuse Block) are critical for OBD2 operation. Similarly, fuses for sensors (like Oxygen Sensors – Fuses 8 & 18) and the instrument panel cluster (Fuse 46), which displays diagnostic information, can indirectly affect OBD2 functionality.
If you’re troubleshooting OBD2 issues on your 2011 Cadillac Escalade, consult these fuse diagrams and check fuses associated with the ECM, TCM, BCM, and related sensors to ensure they are in good condition. A blown fuse in one of these circuits could be the reason for your diagnostic problems.
Conclusion
Having access to the 2011 Cadillac Escalade fuse box diagrams is an invaluable resource for any owner. Whether you’re addressing a minor electrical malfunction or performing routine maintenance, understanding your vehicle’s fuse layout empowers you to troubleshoot effectively. By using these diagrams and fuse descriptions, you can confidently maintain your 2011 Escalade’s electrical system and ensure all components are functioning correctly. Remember to always consult your owner’s manual for the most accurate and up-to-date information for your specific vehicle.
