Removing the OBD2 port in your 2017 Civic Si might be necessary for various reasons, from replacement to accessing wiring. This guide provides a step-by-step visual approach to safely detach the OBD2 connector from its bracket. By carefully following these instructions, you can remove the port without damaging the connector or wiring.
To begin, identify the retaining clips that secure the OBD2 port to the metal bracket. These clips are crucial for holding the connector in place.
Using a small flathead screwdriver, gently push in each of these retaining clips. While doing so, slightly wiggle or angle the plug to aid in the release process. It’s essential to push upwards on the plug, away from the floorboard, to correctly disengage the clips.
Be cautious as the connector releases, as this will expose the pins and wires at the back. Keep a hand behind the plug to ensure these wires remain in their sockets and are not pulled loose.
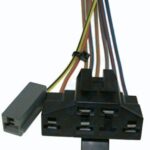
Understanding the connector’s structure is helpful. The bottom view shows the part you typically plug your OBD2 scanner into.
The plug features small teeth on its sides with holes, which are key to its secure attachment.
When assembled, these teeth are compressed against the bracket (represented by the red line in an earlier image), causing nubs to protrude into the pass-through holes. This mechanism locks each pin into its socket. Ensure the pin with the hole faces these nubs for proper locking.
It is crucial to maintain the original orientation of each wire and pin during removal and reinstallation to ensure proper function of your 2017 Civic Si Obd2 Port. By following these steps and visuals, you can confidently remove your OBD2 port.