Dealing with a service reminder wrench icon on your 2020 Suzuki GSX-S1000 can be frustrating, especially after routine maintenance. Many owners seek a straightforward solution to reset this indicator without incurring dealership costs. This guide provides a DIY approach to creating a simple service interval reset tool and crucially, pinpoints the 2020 Suzuki Gsx-s1000 Obd2 Port Location necessary to use this tool effectively. Inspired by community efforts to simplify motorcycle maintenance, this article will help you confidently reset your service reminder and understand the correct diagnostic port access.
Resetting your Suzuki GSX-S1000 service interval is a process that can be easily managed at home with a homemade tool. The procedure itself is quite simple:
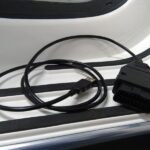
- Access the Diagnostic Port: Locate the diagnostic port on your Suzuki GSX-S1000. For the 2020 model, this port is typically found under the passenger seat. This 2020 Suzuki GSX-S1000 OBD2 port location is key to connecting your reset tool.
- Connect the Tool: With the ignition off, plug your DIY service reset tool into the correct terminals of the diagnostic port.
- Turn on the Ignition: Switch the ignition to the “on” position.
- Observe the Display: The code “C00” should appear on your motorcycle’s LCD display. If you see “—” instead, it’s possible a fuse has been blown, often due to incorrect port connections – a common mistake we aim to help you avoid.
- Navigate the Menu: Use your motorcycle’s controls to go to Menu > Service > Reset > Yes.
- Repeat as Needed: The service interval is typically set for 12,000 km (7,500 miles) or one year. Remember to reset it again at each service interval.
Identifying the Correct Diagnostic Port Terminals
The crucial step is connecting to the correct terminals within the 2020 Suzuki GSX-S1000 OBD2 port location. The port features multiple holes, but only two specific ones are required for service reset. You need to connect the outer two holes that are opposite the single fin or spine within the port.
It’s important to emphasize avoiding the larger rectangular openings. Using these can lead to touching neighboring leads and potentially blowing a fuse, a mistake commonly made even by experienced mechanics unfamiliar with this specific procedure. Focus on the small square holes designed for the tool’s pins.
Building Your DIY Service Reset Tool
Creating your own service reset tool is an economical alternative to purchasing the Suzuki OEM part (09930-83130) or aftermarket options. Here’s what you’ll need to build this simple yet effective tool for your 2020 Suzuki GSX-S1000 OBD2 port location:
Required Tools and Parts:
- Small Nose Pliers: Essential for handling small components and inserting wires. Wire strippers and cutters are also highly recommended for preparing the wires.
- Terminal DJ7069Y-0.6-11: This is the connector terminal plug that fits the Suzuki diagnostic port. These can be sourced from online retailers like AliExpress. It’s wise to order a few extra as practice may be needed during assembly.
- 26 AWG Cable: Thin gauge wire is necessary to fit into the connector terminals. 24 AWG might work, but anything thicker is likely to be too large.
- Crimp Pliers (Recommended): These connectors are designed to be crimped, providing a secure and reliable connection. Quality crimp pliers suitable for 24-26 AWG wire are recommended for the best results.
Optional Enhancements:
- Soldering Iron, Flux, and Solder: If crimp pliers are not available, soldering provides a more secure wire-to-terminal connection than simply pressing the wire into place. Soldering is also useful if you decide to add an on/off switch.
- On/Off Switch: For those who prefer to leave the tool plugged into the 2020 Suzuki GSX-S1000 OBD2 port location for easier access in the future, an inline on/off switch can be a convenient addition.
- Heat Shrink Tubing: Provides a clean, professional finish and insulates connections, especially if soldering.
- Third Hand Tool: Helpful for soldering, as it holds components in place, freeing up both hands.
Step-by-Step Guide to Assembling the Tool:
Important Note: Using crimp pliers simplifies this process significantly. The steps below are detailed for those who may not have crimp pliers and are adapting the process.
-
Understand the Terminal Plug: Examine the components of the terminal plug. Familiarize yourself with how the metal leads insert into the narrow end and how the black plastic piece secures the pins. Rubber seals may be included, but these are often difficult to use in this application due to size constraints.
-
Prepare the Wire: Cut a length of wire (around 15 cm is a good starting point; the final length will be approximately half of this once folded). Strip the insulation from both ends of the wire.
-
Attach Leads to Wire: Insert the exposed wire ends into the metal leads. Secure the connection by crimping with pliers, soldering, or carefully pressing the lead to clamp the wire. Securing the plastic jacket of the lead to the wire insulation can add durability.
-
Insert Leads into Plug: This is the most delicate part. Insert the connected leads into the two outer holes of the plug, opposite the fin. The sloped part of the lead should face down. Use small pliers to gently but firmly push the leads into the holes. Once inserted far enough, you can grasp the lead from the other side of the plug and pull it until the wide part of the lead is seated in its groove.
-
Secure with Plastic Piece: Once both leads are correctly positioned and pulled all the way into their grooves, secure them by sliding the black plastic piece into the plug. Ensure the plastic piece goes over the pins, locking them in place. Once clicked in, this piece is difficult to remove, and the leads will be firmly secured.
-
Final Tool: With both leads secured, your DIY service reset tool is complete and ready to use with the 2020 Suzuki GSX-S1000 OBD2 port location.
By following these steps, you can confidently locate the 2020 Suzuki GSX-S1000 OBD2 port location and create a tool to reset your service interval indicator, saving time and money while gaining a better understanding of your motorcycle’s maintenance. Always double-check connections and procedures to ensure safe and effective service resets.