For owners of 4th generation F-bodies (Camaro and Firebird models from 1993-2002), encountering issues with the Vehicle Anti-Theft System (VATS) can be a frustrating experience. While modern OBD2 diagnostic systems are invaluable for pinpointing a wide array of automotive problems, VATS issues can sometimes be a bit more nuanced. This guide will walk you through understanding VATS in your 4th gen F-body, how it relates to your OBD2 system, and a practical DIY approach to bypass VATS if needed.
Understanding VATS in 4th Gen F-Bodies
The Vehicle Anti-Theft System, or VATS, is a security feature implemented by General Motors in vehicles like the 4th gen F-body to deter theft. In essence, VATS uses a resistor embedded in your ignition key. When you insert the key, the system reads this resistance value. If the resistance matches what the Body Control Module (BCM) expects, it allows the engine to start. If there’s a mismatch, or no signal, VATS intervenes by disabling the starter and fuel delivery, effectively preventing the car from starting.
For 4th gen F-bodies, VATS is a common source of headaches as components age. Issues can range from intermittent no-start conditions to complete immobilization. While your OBD2 system might not directly flag a “VATS failure” code, it can be crucial in diagnosing related symptoms or ruling out other potential problems.
OBD2 Diagnostics and VATS Related Issues
When your 4th gen F-body exhibits starting problems, your first step should always be to utilize your OBD2 scanner. Connect your scanner to the OBD2 port, typically located under the driver’s side dashboard. Scan for any Diagnostic Trouble Codes (DTCs). While you might not find a code specifically labeled “VATS fault,” you may encounter codes related to:
- Fuel delivery: VATS disables fuel, so codes related to fuel pump, fuel injectors, or lean conditions could indirectly point to a VATS issue.
- Starting system: While VATS directly inhibits the starter relay, starter-related codes could be present, though less common if VATS is the sole problem.
- PCM/BCM communication: In some cases, communication issues between the Powertrain Control Module (PCM) and Body Control Module (BCM) might surface, potentially linked to VATS malfunctions.
It’s important to note that VATS issues often don’t trigger specific OBD2 codes. The system is designed to prevent starting, not necessarily to report a fault in the way other engine or transmission components might. Therefore, if you’re experiencing intermittent or consistent no-start problems, especially if accompanied by a blinking “security” light on your dashboard, VATS becomes a prime suspect, even if your OBD2 scan is inconclusive.
VATS Bypass: A DIY Solution for 4th Gen F-Bodies
If you’ve diagnosed VATS as the likely culprit and are looking for a cost-effective solution, bypassing the system is a common approach, particularly for older vehicles where replacing VATS components can be complex and expensive. The bypass method relies on tricking the BCM into always seeing the correct key resistance, regardless of the actual key inserted.
This is achieved by installing resistors into the VATS circuit, effectively mimicking the presence of a valid key. Here’s how to do it:
1. Identify the VATS Wires:
Locate the VATS connector at the base of your steering column. The crucial wires are typically white/black and purple/white. Refer to the image below for visual guidance.
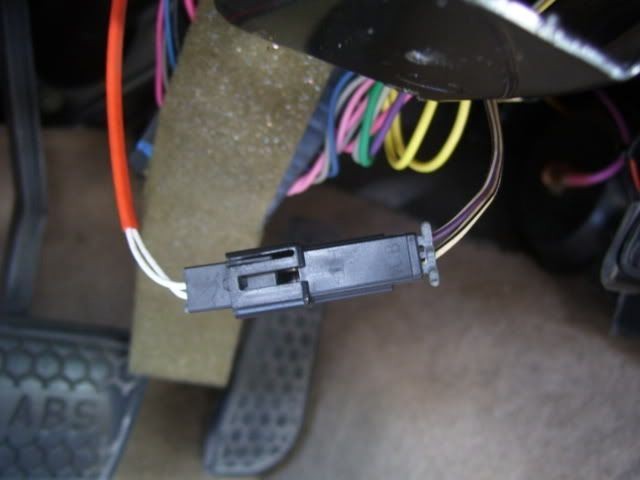 VATS wiring connector location on a 4th Gen F-Body steering column, highlighting the white/black and purple/white wires for resistor bypass.
Unplug this connector and install resistors across the white/black and purple/white wires (leave the orange sheathed white wires disconnected).
2. Determine Your Key Resistance:
You need to know the resistance value of the resistor in your original key. Use a multimeter to measure the resistance across the pellet on your key. Set your multimeter to measure resistance (Ohms – Ω) and place the probes on either side of the key pellet. Record the resistance value.
3. Find the Correct Resistor Combination:
GM used 15 different resistance values for VATS over the years. Once you have your key’s resistance, consult the chart below to find the corresponding standard resistor or resistor combination needed for the bypass. Using the correct resistance is crucial for a successful bypass.
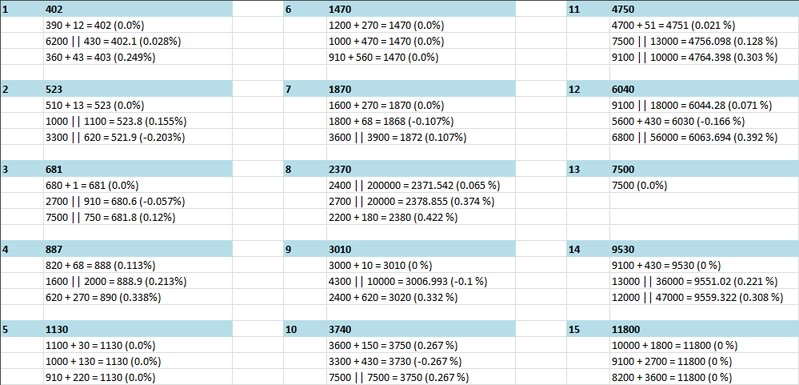 VATS resistance values chart for 4th Gen F-Body vehicles, showing resistor combinations for bypassing the Vehicle Anti-Theft System.
VATS resistance values and the resistor combinations to match them.
4. Install the Resistors:
a. Disconnect the VATS connector you identified earlier.
b. Take your chosen resistor or resistor combination.
c. Connect the resistor(s) across the purple/white and white/black wires on the connector side that goes towards the BCM (not the steering column side). For testing, you can temporarily insert the resistor ends into the connector. For a permanent solution, soldering the resistors in place or using crimp connectors after cutting off the factory connector is recommended for a reliable connection.
d. Ensure all connections are secure and well insulated with electrical tape to prevent shorts.
e. Neatly tuck the wiring and resistors back under the dash.
5. Test Your Bypass:
Reconnect your car battery if you disconnected it during the process. Try starting your 4th gen F-body. If the VATS bypass is successful, the engine should start without issue, and the security light should no longer be active.
Conclusion
While OBD2 diagnostics can be a starting point, troubleshooting VATS issues in your 4th gen F-body often requires a more direct approach. Understanding how VATS works and implementing a resistor bypass can be a DIY-friendly solution to get your classic F-body back on the road. Remember to always double-check your wiring and resistor values for a successful and lasting VATS bypass.