For owners of the robust and reliable 1994 Ford Ranger, understanding your vehicle’s diagnostic system is crucial for maintenance and troubleshooting. While the term “OBD2” is often associated with modern vehicles, the 1994 Ranger, while bridging the gap, actually utilizes an OBD1 system. This guide will walk you through the process of accessing and interpreting these OBD1 diagnostic codes on your 94 Ranger without needing a dedicated scanner.
Understanding Your 1994 Ford Ranger’s Diagnostic System
The 1994 Ford Ranger is equipped with an On-Board Diagnostics system, specifically OBD1. This system is designed to monitor various engine and emission control components. When the system detects an issue, it stores a diagnostic trouble code (DTC) and illuminates the Check Engine Light (CEL) on your dashboard. While OBD2 became the standard shortly after, understanding how to read the OBD1 codes on your 94 Ranger is a valuable skill for any owner.
Locating the OBD1 Connector
The first step is to locate the OBD1 diagnostic connector in your 1994 Ford Ranger. This connector is typically found in the engine bay, often near the fuse box on the driver’s side. It’s a grey, trapezoidal connector and may have a protective cap on it, often marked with “EEC”. It’s usually attached to the wiring harness and might be clipped to the engine fuse box for easy access.
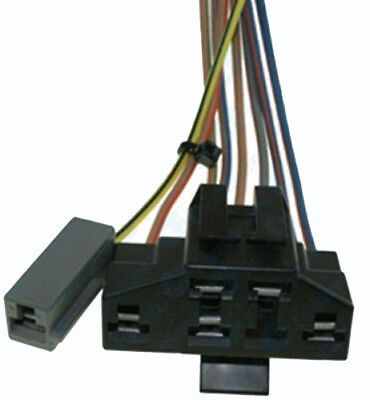 OBD1 connector location on a 1994 Ford Ranger engine bay, typically found near the fuse box and resembling a grey connector with a cap marked 'EEC'.
You’ll notice a single grey wire connector separate from the main OBD1 port but on the same harness. This single connector, along with specific pins in the main connector, is what we’ll use to access the diagnostic codes.
Reading OBD1 Codes with the Check Engine Light (CEL)
To read the diagnostic codes, you’ll use a simple jumper wire or an unfolded paper clip. Here’s a step-by-step guide:
-
Prepare Your Jumper Wire: Ensure your vehicle is turned off (key off). Take your jumper wire or unfolded paper clip.
-
Identify the Connector Slots: Locate the OBD1 connector and identify the necessary slots. You’ll be using the “Self Test Input” pin on the single grey connector and the “Signal Return” slot on the larger, trapezoidal connector.
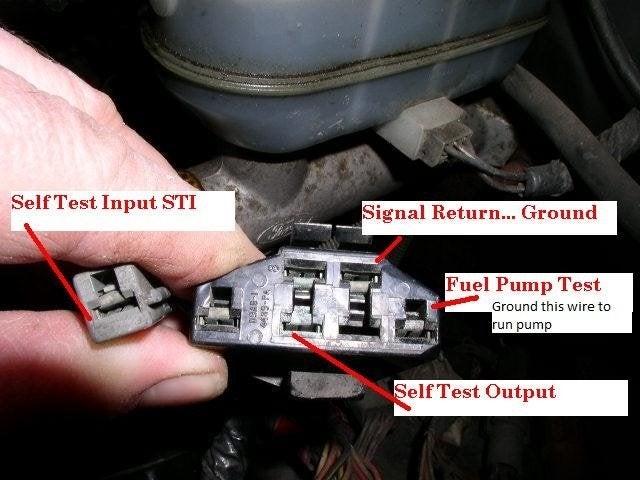 Close-up view of the OBD1 connector pins on a 1994 Ford Ranger, highlighting the 'Self Test Input' and 'Signal Return' slots required for jumper wire connection to initiate diagnostic code reading.
 -
Connect the Jumper Wire: Use the jumper wire to connect the “Self Test Input” (grey single connector) to the “Signal Return” slot on the main OBD1 connector.
-
Turn the Key to ‘ON’ (Engine Off): Turn your ignition key to the ‘ON’ position, but do not start the engine. This will power up the vehicle’s computer (EEC) and initiate the diagnostic test mode.
-
Observe the Check Engine Light (CEL): Watch the Check Engine Light on your dashboard. After a brief pause as the computer boots up (you might see a single flash), the CEL will begin to flash out 3-digit diagnostic codes.
-
Interpreting the Codes: The codes are flashed in a sequence. For example, a code 116 would be represented by one flash, a short pause, one flash, a short pause, six flashes, followed by a longer pause before the next code or the repetition of codes. It might seem a bit confusing at first, but you’ll quickly get accustomed to reading the flashes.
-
Record the Codes: The system will cycle through all stored codes and then repeat them. Make sure to note down all the codes you observe. A comprehensive list of 3-digit Ford OBD1 codes for 1994 Rangers can be found here: https://www.therangerstation.com/tech_library/3digitcodes.shtml
Understanding Diagnostic Codes
Code 111 is a common and important code to recognize. It indicates “System Pass” or “No Malfunction Present,” meaning no fault codes are currently stored in the computer’s memory. Any other codes you retrieve will correspond to specific issues within your vehicle’s systems, such as sensor malfunctions, fuel system problems, or ignition issues. Refer to the provided link for a detailed breakdown of each code and its meaning.
Clearing Diagnostic Codes
After diagnosing and repairing the issue indicated by the codes, you’ll want to clear the codes from the computer’s memory. To do this:
- Ensure Key is in ‘ON’ Position: With the jumper wire still connected and the key in the ‘ON’ position (engine off).
- Remove the Jumper Wire: Simply disconnect the jumper wire from the OBD1 connector.
- Turn Key Off: Turn the ignition key to the ‘OFF’ position.
This process will clear the stored diagnostic trouble codes. It’s advisable to clear the codes after repairs to see if any new codes reappear during subsequent driving, helping you identify if the issue is truly resolved or if other problems exist. Clearing codes is a helpful step in ensuring accurate future diagnoses.
By following these steps, you can effectively read and clear OBD1 diagnostic codes on your 1994 Ford Ranger, empowering you to understand your vehicle’s health and address potential issues proactively.