It’s a common question for Ford Ranger owners, especially those with the 1994 model: “Where is the OBD2 port location on my truck?”. You might be looking for that familiar trapezoid-shaped OBD2 connector to plug in a modern scan tool. However, if you’re trying to diagnose issues with a 1994 Ford Ranger, you’ll quickly realize it doesn’t have an OBD2 port in the way newer vehicles do. Instead, the 1994 Ford Ranger utilizes an OBD1 system, a diagnostic predecessor to OBD2.
Understanding this difference is crucial for effective vehicle diagnostics. While OBD2 is standardized and easily accessible, OBD1 systems like the one in your ’94 Ranger require a slightly different approach to retrieve diagnostic trouble codes (DTCs). Forget searching under the dash for an OBD2 port; on your 1994 Ranger, the diagnostic connector is located in the engine bay.
Locating the OBD1 Diagnostic Connector on Your 1994 Ford Ranger
The OBD1 connector on your 1994 Ford Ranger is typically found in the engine compartment. It’s designed differently from the OBD2 connectors you might be used to seeing.
Look for a grey, elongated connector often positioned near the fuse box or along the firewall in the engine bay. It may have a protective cap, possibly labeled “EEC” (Electronic Engine Control). This cap helps protect the connector from dirt and moisture. The connector is part of a wiring harness and you might also notice a single, separate grey connector located nearby on the same harness. This single connector is also important for the diagnostic process.
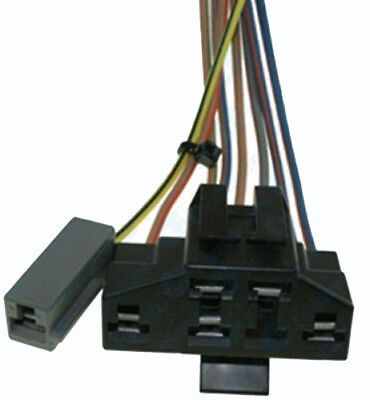 OBD1 Connector Example
Image alt text: 94 Ranger OBD1 diagnostic connector location in the engine bay, grey EEC-IV test connector with protective cap.
Reading OBD1 Codes on a 1994 Ranger: A Step-by-Step Guide
Since you won’t be plugging in an OBD2 scanner, you’ll need to use a manual method to retrieve the diagnostic codes from your 1994 Ford Ranger. This involves using the Check Engine Light (CEL) on your dashboard and a simple jumper wire or paper clip. Here’s how to do it:
Step 1: Prepare Your Ranger for Diagnostic Mode
Ensure your Ford Ranger is turned off (key in the OFF position). Locate a short piece of wire or an unfolded paper clip – this will serve as your jumper.
Step 2: Access the OBD1 Connector
Open the hood of your Ranger and locate the OBD1 diagnostic connector as described earlier. Remove the protective cap if present. You’ll see a multi-pin connector and the separate single grey connector.
Step 3: Connect the Jumper Wire
This is the key step to initiate the diagnostic test. You need to create a connection between two specific points in the OBD1 system.
Using your jumper wire or paper clip, connect the single grey connector (“Self-Test Input”) to the “Signal Return” slot on the larger, multi-pin connector. Refer to the diagram below for visual clarity on the slot positions.
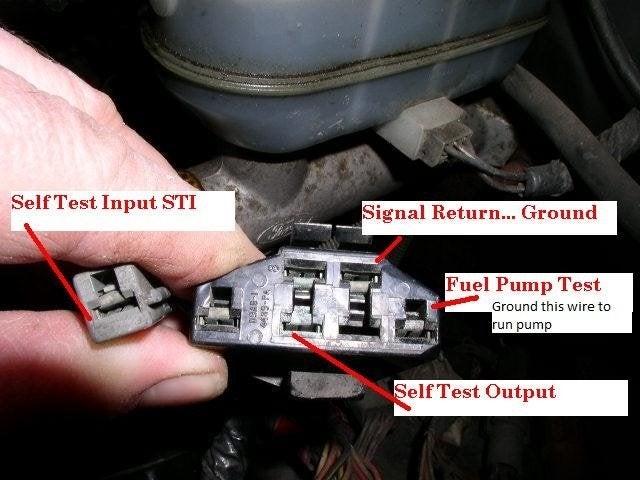 Ford OBD1 Connector Pinout Example
Image alt text: 1994 Ford Ranger OBD1 EEC-IV connector pinout diagram showing signal return and self-test input locations for code retrieval.
Step 4: Initiate Code Reading and Observe the CEL
With the jumper wire connected, turn the ignition key to the “ON” position, but do not start the engine. Observe the Check Engine Light (CEL) on your instrument cluster.
After a brief pause (the computer booting up), the CEL will begin to flash a series of codes. These codes are 3-digit codes for 1994 Ford Rangers.
Understanding the CEL Flashing Codes
The CEL will flash in a sequence to represent the 3-digit codes. For example, if you see:
- One flash, short pause, one flash, short pause, six flashes, LONG pause.
This sequence represents code 116. The long pause indicates the separation between codes. The system will display all stored codes and then repeat them. Code 111 indicates “System Pass” or “No codes present”.
You can find a comprehensive list of 3-digit Ford OBD1 codes at resources like The Ranger Station: https://www.therangerstation.com/tech_library/OBD_I_diagnostic_codes.shtml
Clearing OBD1 Codes on Your 1994 Ranger
To clear the diagnostic codes after you have addressed the issue, or simply to reset the system for further testing, you can disconnect the jumper wire while the ignition key is still in the “ON” position. Removing the jumper while the key is on will erase the stored codes. If you turn the key off before removing the jumper, the codes will be saved in the computer’s memory.
Clearing codes is helpful to see if any new codes reappear after driving, indicating if the problem is truly resolved or if it persists.
Conclusion
While the 1994 Ford Ranger doesn’t have a standard OBD2 port, accessing its diagnostic system is still straightforward. By locating the OBD1 connector in the engine bay and using the Check Engine Light flashing method, you can effectively retrieve and interpret diagnostic trouble codes. This empowers you to troubleshoot issues and maintain your classic Ford Ranger with a bit of know-how and simple tools. Remember to consult a repair manual or online resources for detailed code definitions and further diagnostic steps if needed.