The On-Board Diagnostics II (OBD2) port in your 1998 Honda Odyssey is a crucial interface for vehicle diagnostics and maintenance. Locating this port is the first step in understanding your vehicle’s health when that check engine light illuminates or during routine inspections. This article will guide you directly to the OBD2 connector location on your 1998 Honda Odyssey, ensuring you can quickly connect a scanner and access vital vehicle data.
Understanding the OBD2 Port and Its Importance
Before we pinpoint the exact location, it’s helpful to understand what the OBD2 port is and why it’s so important. Since 1996, OBD2 has been a standard requirement in vehicles sold in the United States. This standardized system allows technicians and vehicle owners to access a wealth of information about the engine, emissions system, and other vehicle parameters using a scan tool or code reader.
The OBD2 port serves as the gateway to your vehicle’s computer. Mechanics and DIYers use this port to:
- Read Diagnostic Trouble Codes (DTCs): These codes pinpoint the source of problems when your check engine light comes on.
- Clear Trouble Codes: After repairs, you can clear the codes and turn off the check engine light.
- Monitor Real-time Data: Access live data from sensors throughout your vehicle, such as engine temperature, RPM, and oxygen sensor readings.
- Perform Emissions Testing: OBD2 systems are integral to emissions testing in many regions.
For a 1998 Honda Odyssey owner, knowing the OBD2 connector location is essential for troubleshooting issues, performing self-diagnostics, and ensuring your minivan runs smoothly.
Where to Find the OBD2 Connector in Your 1998 Honda Odyssey
Locating the OBD2 port in a 1998 Honda Odyssey is typically straightforward. For this model year, the most common location is within the passenger compartment.
Primary Location:
The OBD2 port is generally found on the driver’s side of the vehicle, inside the cabin. Specifically, you should look underneath the dashboard area. It is usually situated somewhere around the steering column or slightly to the left. You might need to crouch down and look upwards to see it clearly.
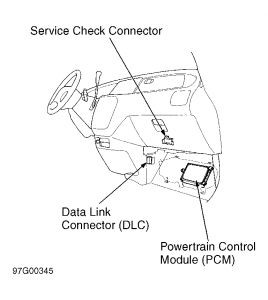 Diagram showing the OBD2 connector location in the center console of a Honda Odyssey, potentially for models around 1998.
Secondary Location (Less Common but Possible):
While less typical for the 1998 Honda Odyssey, some older vehicles may have the OBD2 port located in the center console area on the passenger side. This is mentioned in the original forum post and could be relevant depending on the vehicle’s specific origin or configuration. If you don’t find it under the dash, it’s worth checking this area as a secondary possibility.
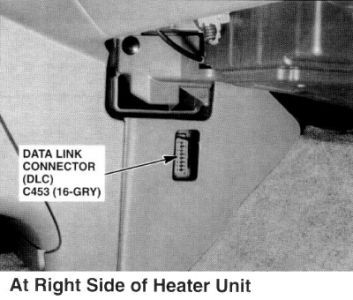 Diagram illustrating a possible OBD2 connector location in the side kick panel of a vehicle, which could be an alternative location in a 1998 Honda Odyssey.
Visual Inspection is Key:
The OBD2 connector is a 16-pin, trapezoid-shaped female connector. It’s often black, but can sometimes be gray or another dark color. It’s designed to be easily accessible, so you shouldn’t need any tools to locate it. Use a flashlight if needed to illuminate the area under the dashboard for better visibility.
Step-by-Step Guide to Locate the OBD2 Connector
- Prepare Your Vehicle: Turn off your 1998 Honda Odyssey and engage the parking brake for safety.
- Driver’s Side Inspection: Get into the driver’s seat and look under the dashboard.
- Check Under the Steering Column: Start by looking directly beneath the steering column. The OBD2 port is often placed in this area for easy access.
- Expand Your Search Area: If you don’t see it immediately, broaden your search to the left and right of the steering column, still under the dash. Feel around with your hand if visibility is limited.
- Passenger Side Center Console (If Not Found on Driver’s Side): If you’ve thoroughly checked the driver’s side and haven’t found the port, check the center console area on the passenger side. Look for a similar 16-pin connector.
- Use a Flashlight: A flashlight can be incredibly helpful to illuminate dark corners under the dashboard and clearly identify the OBD2 port.
Once you’ve located the OBD2 connector, you’re ready to plug in your scan tool or code reader to begin diagnosing your 1998 Honda Odyssey.
Connecting Your OBD2 Scanner and Next Steps
After successfully locating the OBD2 port, connecting your scanner is usually a plug-and-play process. Simply align the connector of your OBD2 scan tool with the port and push it in firmly until it’s securely connected.
With the scanner connected, turn your Honda Odyssey’s ignition to the “ON” position (without starting the engine, unless your scanner instructions specify otherwise). Follow the instructions that came with your OBD2 scanner to read trouble codes, view live data, or perform other diagnostic functions.
Knowing the OBD2 connector location in your 1998 Honda Odyssey empowers you to take a proactive approach to vehicle maintenance and quickly address any warning lights or performance issues that may arise. This simple port provides a wealth of information, making vehicle diagnostics more accessible than ever.