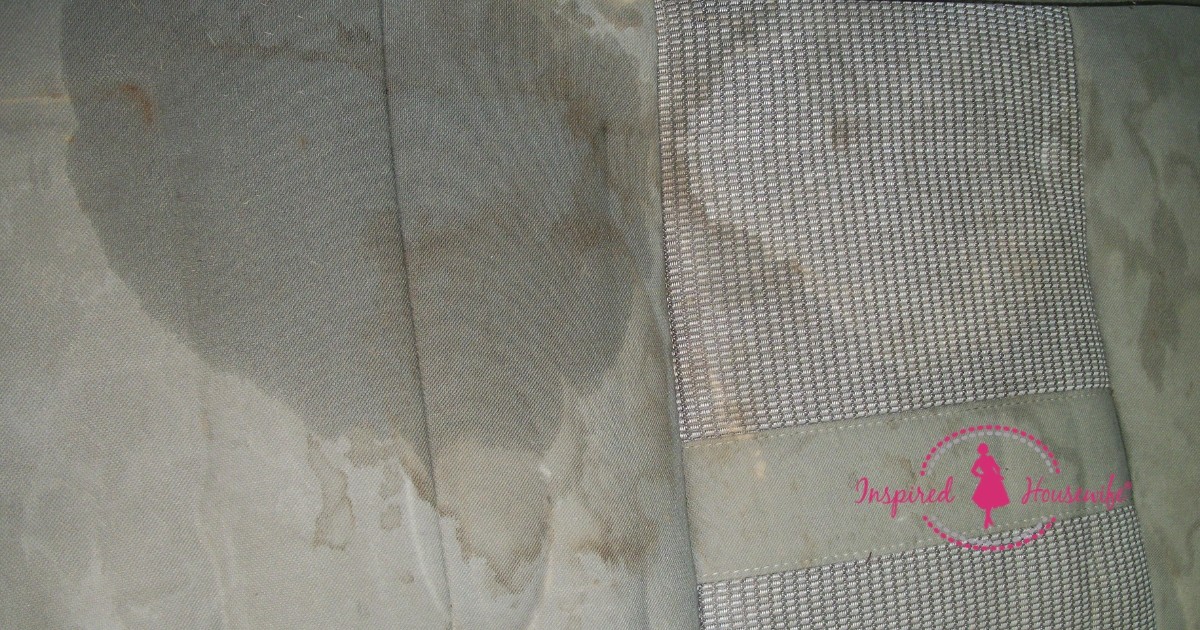
Keeping your car interior clean, especially the upholstery, can feel like a never-ending battle, particularly if you’re dealing with kids, pets, or just the daily grind. Spills, stains, and general grime are inevitable, turning your once pristine car seats into a landscape of discoloration and dirt. Like many car owners, I used to dread tackling those stubborn upholstery stains. Professional detailing seemed like the only answer, but the hefty price tags always made me hesitate. I remember vividly back in 2012, when I was saving up for a new camera, the quotes I received for professional car interior cleaning were shockingly high – upwards of $150! That’s when I thought, “There has to be a better, more affordable way to get my car upholstery looking its best.”
 Best DIY Upholstery Cleaner for Car
Driven by a desire for a spotless car interior and fueled by my camera savings goal, I embarked on a mission to find the Best Upholstery Cleaner For Car interiors that wouldn’t break the bank. What I discovered was a simple, yet incredibly effective DIY solution using common household ingredients. This journey not only saved me a significant amount of money but also led to the creation of a car upholstery cleaning recipe that I now swear by.
If you’re tired of staring at unsightly stains on your car seats and want to achieve a professionally cleaned look without the professional price, you’re in the right place. This guide will walk you through the steps to create and use the best upholstery cleaner for car interiors, transforming your car from grimy to gleaming in no time. Get ready to say goodbye to stubborn stains and hello to a fresh, clean car interior!
The Miracle DIY Car Upholstery Cleaner Recipe
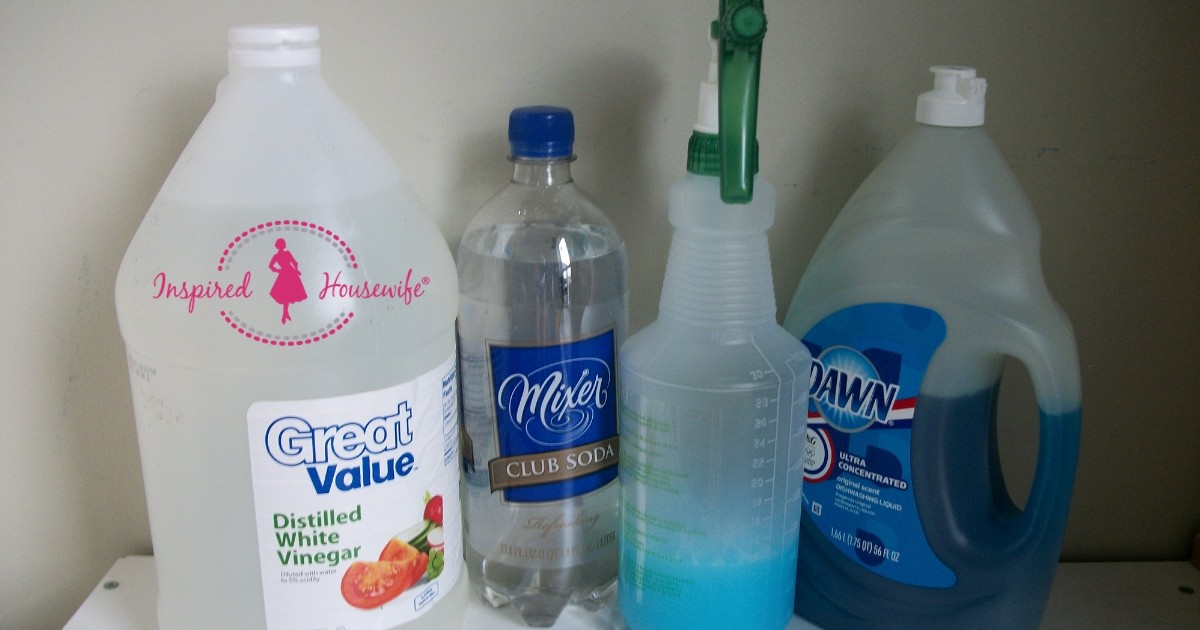
After countless experiments and a fair share of online research, I stumbled upon a winning combination of ingredients that proved to be the best upholstery cleaner for car seats and interiors. The beauty of this recipe lies in its simplicity and the fact that you likely already have these items in your home.
Here’s what you’ll need to create this miracle cleaner:
- A Durable Spray Bottle: Opt for a heavy-duty spray bottle to ensure it can withstand repeated use and won’t leak.
- Dawn Blue Dish Soap: 1 Tablespoon. Dawn is known for its grease-cutting power and gentle cleaning action, making it a key ingredient in this best upholstery cleaner for car.
- White Vinegar: 1 Cup. Vinegar acts as a natural deodorizer and stain remover, working wonders on various types of stains you might find in your car.
- Club Soda: 1 Cup. Club soda is a secret weapon for stain removal, especially on fabrics. Its carbonation helps lift stains to the surface for easier cleaning, making it essential for the best upholstery cleaner for car.
- A Scrub Brush: Choose a soft to medium bristle scrub brush suitable for car upholstery to gently agitate stains without damaging the fabric.
 Ingredients for Homemade Car Upholstery Cleaner
(Note: While this recipe is incredibly effective, some readers have reported success with slight variations, particularly omitting the club soda. Feel free to experiment to find the perfect ratio that works best for your specific needs and stains.)
Step-by-Step Guide to Cleaning Your Car Upholstery Like a Pro
Now that you have your best upholstery cleaner for car ready, let’s dive into the simple steps to transform your car’s interior:
-
Vacuum Thoroughly: Begin by vacuuming your car upholstery thoroughly. This crucial first step removes loose dirt, crumbs, and debris, allowing the cleaner to work directly on the stains. Pay special attention to crevices and seams where dirt tends to accumulate.
-
Pre-treat Crusty or Sticky Substances: Before applying the cleaner, scrape off any hardened or sticky substances from the upholstery surface. A plastic scraper or even an old credit card can be helpful for this step.
-
Mix the Cleaning Solution: In your heavy-duty spray bottle, combine the Dawn dish soap, white vinegar, and club soda. Gently shake or swirl the bottle to mix the ingredients, being careful not to create excessive suds.
-
Spray Liberally on Stained Areas: Generously spray the cleaning solution onto the stained areas of your car upholstery. Ensure the fabric is damp but not soaking wet.
-
Let it Sit: Allow the solution to sit on the stains for about 5-10 minutes. This gives the best upholstery cleaner for car time to penetrate and break down the stains.
-
Scrub Gently: Using your scrub brush, gently scrub the stained areas in small, circular motions. Avoid scrubbing too aggressively, as this could damage the fabric. Focus on working the cleaner into the stain.
-
Observe the Magic: As you scrub, you’ll be amazed to see many stains begin to fade and disappear right before your eyes! For tougher stains, you may need to repeat the spraying and scrubbing process.
-
Address Watermarks (If Necessary): If you notice watermarks after cleaning, don’t worry. A wet vacuum or even a damp cloth can help to blend these out. For more stubborn watermarks, refer to the FAQs section below for tips on using alternative methods.
-
Dry and Enjoy: Allow your car upholstery to air dry completely. Opening your car doors and windows can help speed up the drying process. Once dry, you’ll be left with beautifully clean and refreshed car seats!
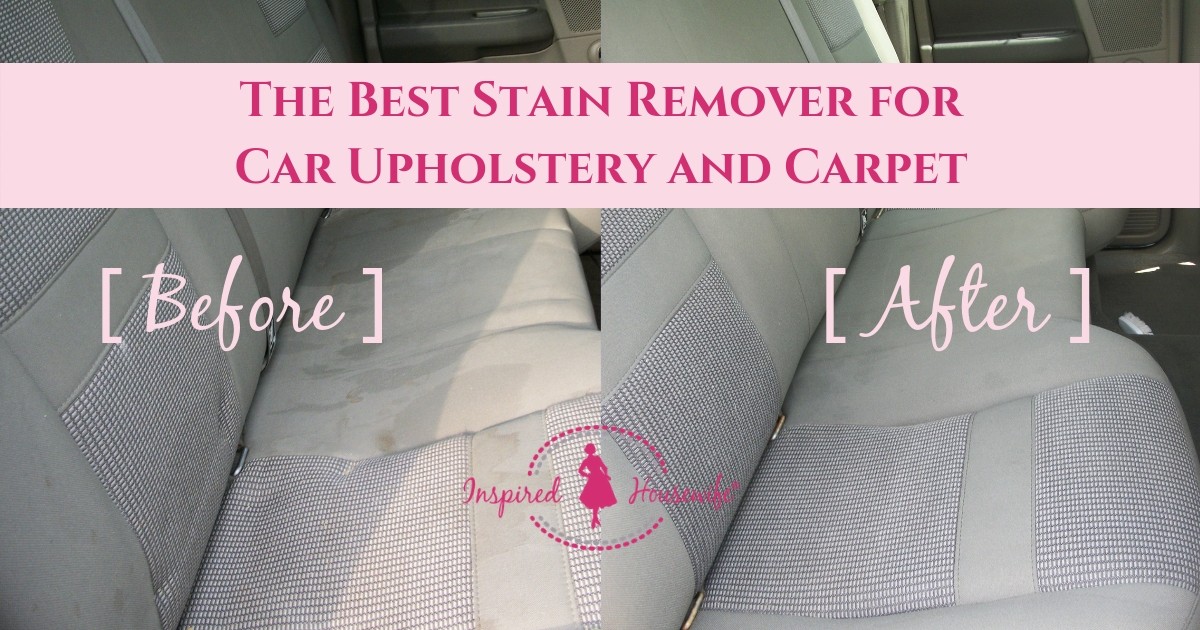
 Cleaning Car Seat with DIY Upholstery Cleaner
Tips and Tricks for Maximizing Your Car Upholstery Cleaning
To ensure you get the best results from this upholstery cleaner for car interiors, consider these helpful tips and tricks:
- Test in an Inconspicuous Area: Before applying the cleaner to visible areas, always test it in a small, hidden spot of your upholstery to ensure it doesn’t cause any discoloration or damage.
- Work in Sections: Clean your car upholstery in sections to prevent the cleaning solution from drying before you have a chance to scrub and address the stains.
- Don’t Over-Saturate: While you want to dampen the upholstery, avoid soaking it excessively. Over-saturation can lead to longer drying times and potential mildew issues.
- Blot, Don’t Rub, Fresh Spills: For fresh spills, immediately blot the area with a clean cloth or paper towel to absorb as much of the spill as possible before it sets into a stain.
- Use a Wet Vacuum for Best Results: While not essential, a wet vacuum (like a Hoover SteamVac or Bissell Little Green) can significantly enhance your cleaning results by extracting excess liquid and cleaning solution, reducing watermarks and drying time.
- Ventilate Your Car: Ensure proper ventilation while cleaning and drying your car upholstery to help dissipate any vinegar smell and speed up the drying process.
Frequently Asked Questions About Car Upholstery Cleaning
You might have some questions as you prepare to use this best upholstery cleaner for car. Here are answers to some common queries:
Q: Do I have to use Dawn brand dish soap?
A: While Dawn is recommended due to its effective grease-cutting formula, you can use other brands of dish soap. However, Dawn is generally considered a top choice for cleaning and stain removal. For those concerned about the vinegar smell, lemon or citrus-scented dish soaps can help mask the scent.
Q: What type of vinegar should I use?
A: Distilled white vinegar is the best option for cleaning car upholstery. It’s clear, effective, and less likely to stain fabrics compared to other types of vinegar.
Q: What if I don’t have a wet vacuum?
A: You can still achieve excellent results without a wet vacuum. The key is to minimize watermarks and vinegar smell. You can try using rubbing alcohol (test in a hidden area first!) to help with drying and prevent watermarks. Alternatively, follow these steps:
*   Spray the stains and let the solution sit.
*   Spray a light layer of solution over the non-stained areas to blend the cleaning.
*   Scrub in circular motions, focusing extra effort on stains.
*   Use a towel to vigorously rub and absorb as much solution as possible.
*   Rinse by spraying with hot water (from a clean spray bottle or damp cloth) and immediately rub vigorously with a dry towel. Repeat until you've removed as much moisture as possible.
This method helps to achieve a more uniform drying process and minimize watermarks.
Q: Will this leave a vinegar smell? How can I minimize it?
A: Yes, vinegar has a distinct smell. However, it dissipates quickly, especially with proper ventilation. Here are ways to minimize the vinegar smell:
*   **Reduce Vinegar:** Use slightly less vinegar in your solution.
*   **Ventilate:** Clean your car on a day when you can leave the doors open for several hours to air out the interior.
*   **Scented Dish Soap:** Use a strongly scented Dawn dish soap like "tropical," "green apple," or "lavender."
*   **Scented Vinegar:** Infuse your vinegar with citrus peels.  Soak orange or lemon peels in white vinegar for a few days, then strain and use the scented vinegar in your cleaning solution. You can also microwave orange peels in a bit of water to speed up the scent infusion.
*   **Essential Oils:** Add a few drops of your favorite essential oil to the cleaning mixture to mask the vinegar scent.
Q: Will this work on dark-colored fabric or suede leather?
A: This cleaner is generally safe for most car upholstery fabrics. However, always test in a small, inconspicuous area first, especially on dark-colored or delicate materials like suede leather. If you are unsure about suede, consult a professional leather cleaner.
Real-Life Success Stories: Reader Testimonials
Don’t just take my word for it – countless readers have experienced incredible results with this best upholstery cleaner for car. Here are a few testimonials from people who have transformed their car interiors:
On Stain Removal Power:
“This was a miracle worker for my poor car! It took out a huge grease stain that was over a year old…and it lifted a melted candy cane right out of my back seat! My hubby was shocked!!!”
“I have been trying for a couple years to get the kid goo out of my car with no success. I made this yesterday… Holy freaking moly batman… my car looks amazing!!!!!! The ONLY thing it didn’t completely remove was a little smidgen of a 6-year-old coffee stain!”
On Cleaning Without a Wet Vacuum:
“This solution really worked. I did not have a steam cleaner thing to suck out the soap, so I used a wet rag with clean water and a dry towel to help remove the solution after scrubbing. Worked great! Again, thank you for experimenting and then sharing your knowledge with the world!”
“I am currently letting the seat dry, to see how it looks… I’m not even worried about water marks because that would be a million times better than what it was. For anyone wanting to know about not having a steam vacuum, I just ‘rinsed’ it with a wet rag… and then did the same thing with a dry towel and it seemed to work.”
On Overall Satisfaction:
“WOW!!!! I saw this on Pinterest and thought I might as well give it a shot… I used it on HALF of the front passenger seat and I about died. This is magic in a bottle! Seriously, this stuff is magic!”
“This solution rocks my car was disgusting but now it looks almost new. The stuff I bought previously from an auto store was worse than useless, this solution was just what the car needed.”
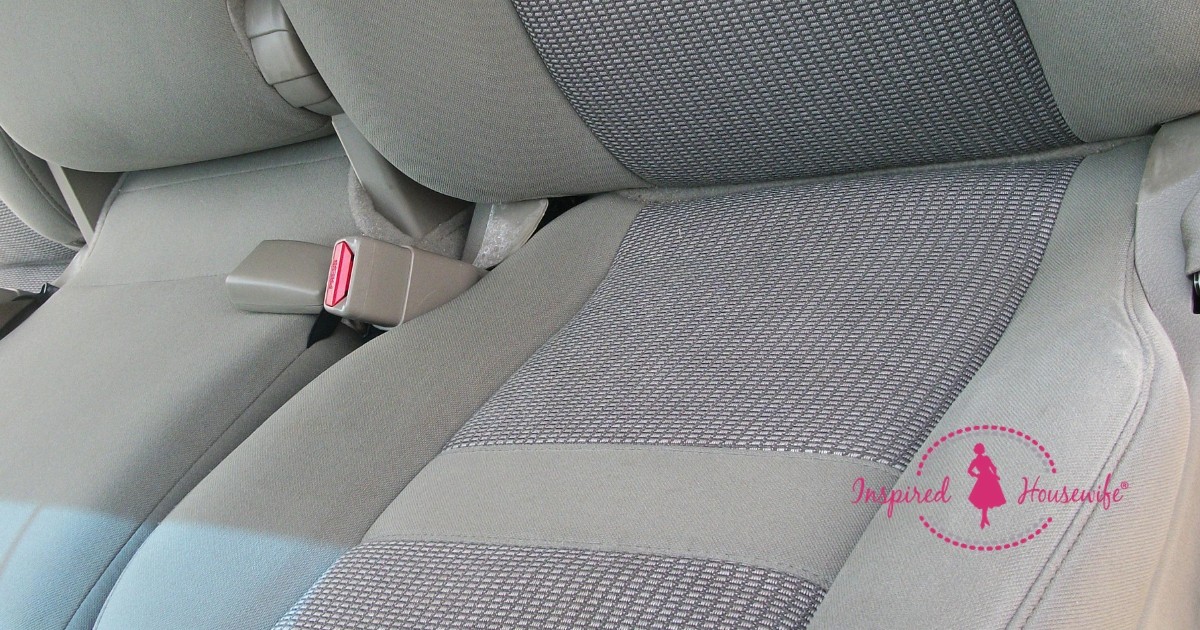 Clean Car Upholstery After DIY Cleaning
Conclusion: Reclaim Your Car’s Interior with the Best Upholstery Cleaner
This DIY recipe truly is the best upholstery cleaner for car interiors, offering an affordable, effective, and easy way to tackle even the most stubborn stains. Say goodbye to expensive professional detailing and hello to a fresh, clean car interior you can be proud of.
Once you’ve experienced the transformative power of this cleaner, why stop there? Explore other car cleaning hacks to keep your entire vehicle looking its best. And to maintain that pristine interior, check out tips for keeping your car clean, especially if you have messy eaters on board!
Now it’s your turn! Try this best upholstery cleaner for car recipe and share your results in the comments below. Let us know how it worked for you and any tips you discovered along the way. Happy cleaning!