Changing a flat tire is a fundamental skill for any cyclist, but dealing with particularly tight tires can turn a simple roadside repair into a frustrating ordeal. If you’ve ever struggled to remount a stubborn tire, especially models like the Schwalbe Marathon Plus, you’re not alone. Many cyclists find themselves wrestling with stiff tire beads, often feeling like it’s an impossible task without specialized tools or superhuman strength.
This guide focuses on a technique that leverages simple tire levers, the tools you likely already carry in your repair kit, to effectively put even a tough tire back onto the rim. The secret lies in understanding and utilizing the rim well to create the necessary slack. As illustrated in this diagram:
The core principle is to ensure the tire bead sits deep within the rim well – the central channel of the rim – which provides extra circumference, making the tire bead looser and easier to maneuver over the rim edge. While some videos may demonstrate using straps to seat the bead, this method focuses on using only tire levers, ensuring you can handle a flat repair with the tools you’d typically have on hand during a ride. This technique proved invaluable during a recent unexpected puncture with Schwalbe Marathon Plus Tour HS404 700x40C tires, renowned for their puncture resistance but also their tight fit. Despite their toughness (which lived up to the hype until an exceptionally sharp stone found its mark), roadside repair was successful using just this lever-based method.
Let’s break down the step-by-step process to master this technique:
Step-by-Step Guide: Using Tire Levers to Mount a Tight Tire
-
Preparation is Key: Begin by ensuring one side of the tire is already seated within the rim, and your inner tube is properly installed and slightly inflated to give it shape and prevent pinching.
-
Positioning for Leverage: Place the wheel on the ground with the valve stem facing downwards. This position helps to anchor the tire and provides stability during the process.
-
Initial Hand Insertion: Using your hands, work as much of the unseated tire bead as possible into the rim. Start opposite the valve and work your way around, using your thumbs to push the bead inwards. You’ll likely reach a point where manual insertion becomes too difficult.
-
Lever One: Creating an Anchor Point: Take one tire lever and insert its hooked end under the tire bead, approximately one-third of the way around the rim from where you stopped hand-inserting. Hook the lever onto a spoke to maintain its position and prevent it from slipping out. This lever acts as your fixed anchor point. It’s crucial that this lever holds its position without moving throughout the next steps.
-
Lever Two: Starting the Roll: Take your second tire lever and insert it under the tire bead, about one-third of the way around the rim on the opposite side of the wheel from the first lever.
-
The “Push Down and Roll” Technique – The Game Changer: This is the critical step. Instead of just trying to lever the tire bead directly over the rim (which is often where people struggle and risk pinching the tube), you’ll employ a “push down and roll” motion. While holding the second lever under the bead, apply downward pressure on the tire directly above where you’re levering, pushing the tire bead into the rim well. Simultaneously, roll the tire lever along the rim edge towards the first lever, maintaining downward pressure.
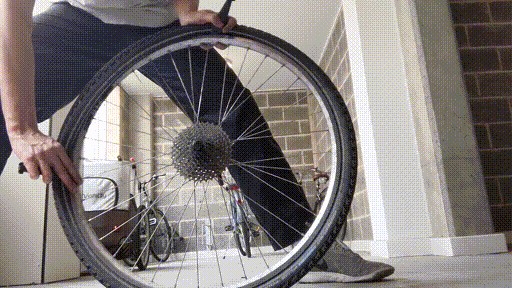 Key step of tire lever technique: Rolling and pushing down to seat tire bead
This rolling and pushing motion is key because it systematically forces the tire bead deeper into the rim well as you progress around the circumference. This action creates the slack needed to ease the remaining tire bead over the rim edge. You’ll feel the tire becoming progressively easier to move as you roll.
-
Finishing by Hand: As you roll with the second lever towards the first, you’ll notice the unseated portion of the tire decreasing. When only a small section (approximately the last 10%) remains unseated, you can often remove the tire levers entirely. At this point, with the slack you’ve created, the remaining tire bead should be pliable enough to be pushed over the rim edge using just your thumbs. Work systematically around the last section until the tire is fully seated.
-
Final Checks: Once the tire is on the rim, ensure the tire bead is seated evenly all around the rim on both sides. Check the tire sidewall for a molded line that should be a consistent distance from the rim edge. Finally, inflate the tire to the recommended pressure.
 Key step of tire lever technique: Rolling and pushing down to seat tire bead
Visual Aids and Further Resources:
For a visual demonstration of this technique, refer to these video resources, focusing on the crucial steps highlighted:
-
Key Technique Timestamp: Video of tire mounting technique (Relevant section around the 9:00 minute mark).
-
GIF Demonstration: The animated GIF above visually captures the essence of the “push down and roll” motion, emphasizing the simultaneous downward pressure and rolling action of the tire lever.
Beyond Tire Levers: Exploring Alternative Techniques (and Why Levers Are Still Essential)
While some cyclists demonstrate impressive feats of tire mounting without any tools at all, often seen with mountain bike tires, road tires and particularly robust touring tires like the Schwalbe Marathon Plus often require the mechanical advantage of tire levers. Similarly, while techniques like using thumbs to push the bead into the rim well (as demonstrated by GCN) can be helpful, they may not provide sufficient leverage for very tight tires. Even methods involving zip ties, while sometimes effective, are less readily available on a standard roadside repair kit than tire levers.
Conclusion: Practice Makes Perfect
Mastering the “push down and roll” technique with tire levers is a game-changer for anyone who encounters tight-fitting bicycle tires. By understanding the principle of using the rim well to create slack and practicing this systematic approach, you can confidently tackle even challenging tire installations with just the essential tools in your repair kit. Like any cycling skill, a little practice at home will make roadside repairs faster and less stressful when you need them most.